Clinical Setup Tables
The Clinical Setup Tables are used to customize and define operations of the charting or electronic medical record capability of MedInformatix. Most of these tables should not be modified without first consulting the system administrator or your reseller for technical assistance. These tables are located under Preferences on the Menu Bar of the Main MedInformatix Screen. When adding information into the setup tables, remember to eliminate punctuation. When it is necessary to separate information, use an Underscore “_” and never use the Pipe symbol “|” unless specifically indicated.
The following information will outline each of the various Clinical Setup Tables and the steps needed to add information to each one.
- At the Main Menu screen, click on the Preferences option in the upper toolbar.
- Click on the Setup Clinical Tables option from the dropdown menu.
- Click on the setup table name to display the selected setup table screen.
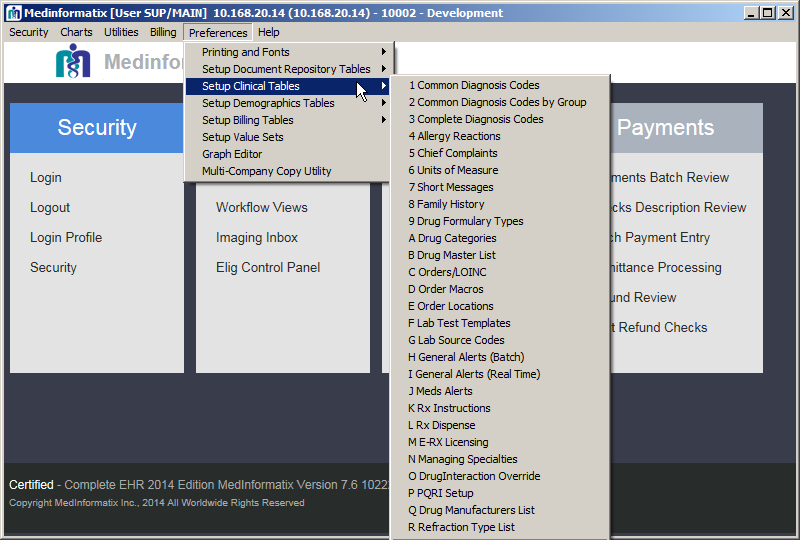
 Click on the desired link in the following list to go
directly to the description of that setup table.
Common Diagnosis Codes
The Diagnosis Codes table contains the ICD10 diagnosis codes for the common list of problems. Codes entered here are the most common codes used in the medical practice. It is important to note that codes in this list cannot be edited. If a code must be changed, it must first be deleted from the list and then added back in correctly.
The Common Diagnosis Code table is one of the few clinical tables that is also used in the billing portion of the system. This short list of diagnosis codes is accessible from the Delayed Billing screen, Finalize Appointment screen, Add/Edit Authorization screen, Enter Charge screen, and Problem List screen.
- Select 1 Common Diagnosis Codes from the Setup Clinical Tables list under Preferences on the Main Menu.
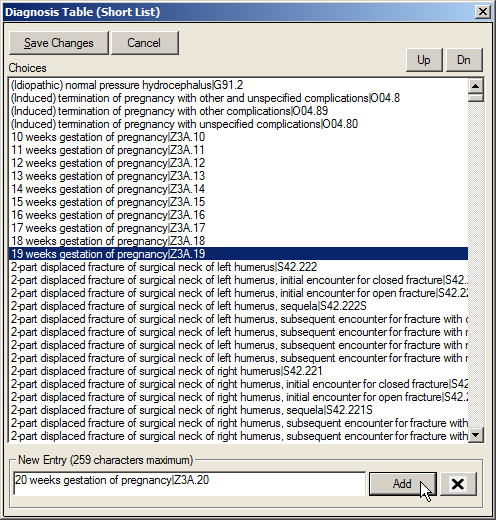
- Enter a diagnosis description and ICD10 code in the New Entry field in the Description|Code format.
- Click on the Add button to save the entered information.
- When finished, click on the Save Changes button.
Common Diagnosis Codes by Group
The Diagnosis Codes by Group table allows users to customize the Common Names Diagnosis List so that different diagnosis choices are displayed depending on where the user is in the Decision Tree. Like the Common Diagnosis Codes table, this table is accessible from the Delayed Billing screen, Finalize Appointment screen, Add/Edit Authorization screen, Enter Charge screen, and Problem List screen.
- Select 2 Common Diagnosis Codes by Group option from the Setup Clinical Tables list under Preferences on the Main Menu.
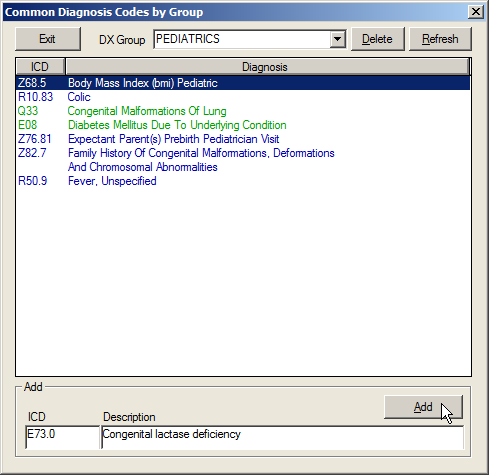
At the DX Group field, enter a Diagnosis Group.
Enter an ICD10 code and description in the New Entry field.
Click on the Add button.
- When finished, click on the Exit button
Complete Diagnosis Codes
The Complete Diagnosis Codes Table includes the complete listing of diagnosis codes that is updated yearly by MedInformatix with the AMA approved ICD10 codes. The ICD10 Search (Complete ICD10-CM) displays ICD10 codes that conform to the way physicians commonly view diagnosis description.
To allow for the possibility of identifying a diagnosis by a common name, each ICD9 may be listed several times, once for each common name. For example, “Athlete’s Foot” is also commonly known as “Tinea Pedis”. In the official ICD10 book, this is known by the less familiar term of “Dermatophytosis of Foot”. Because the term is unfamiliar, it may not be as easily found if searching the standard ICD10 list published by the AMA. On the other hand, the billing department may also get confused and concerned because each ICD10 code may result in different descriptions.
In a multi-specialty or primary care environment, this can be addressed by optionally loading two different lists of ICD10 codes: the standard ICD10-CM table with multiple code descriptions and the standard AMA ICD10-CM table for use in billing. Contact the system administrator or your reseller to configure this optional setup. Additionally, use of the AMA ICD10-CM list requires separate licensing from AMA that is not included and must be purchased from AMA.
- Select 3 Complete Diagnosis Codes from the Setup Clinical Tables list under Preferences on the Main Menu.
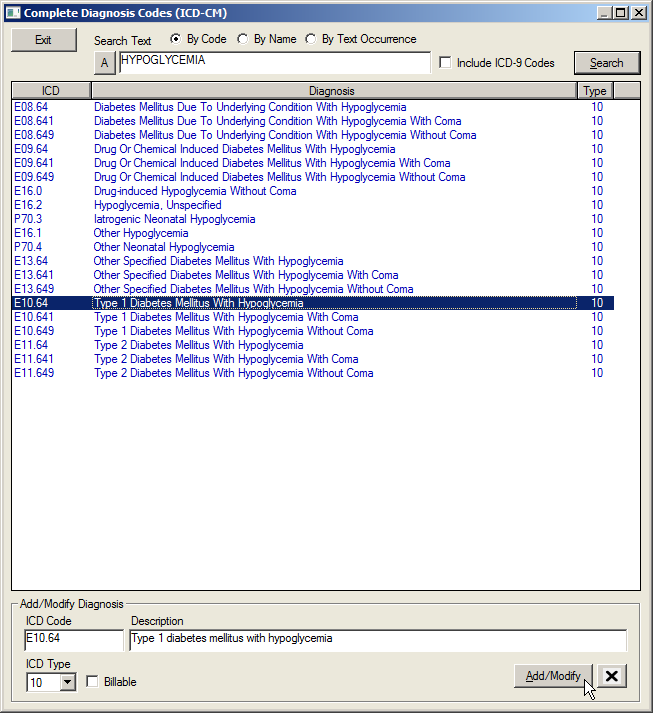
Enter an ICD10 code and description in the New Entry field.
Click on the Add button.
- When finished, click on the Exit button.
Allergy Reactions Table
 The Allergy Reactions
table is no longer managed by the user.
It has been replaced by the Value
Sets function. It will be removed from the dropdown list in
a future version of MedInformatix.
The Allergy Reactions
table is no longer managed by the user.
It has been replaced by the Value
Sets function. It will be removed from the dropdown list in
a future version of MedInformatix.
Chief Complaints Table
The Chief Complaints table contains a listing of the common chief complaints presented by patients. When adding Chief Complaints during charting of the triage process, the table is used to display a pull down list of Chief Complaints. Users can also indicate a Pain Level associated with the Chief Complaint.
- Select 5 Chief Complaints from the Clinical Tables List under Preferences on the Main Menu.
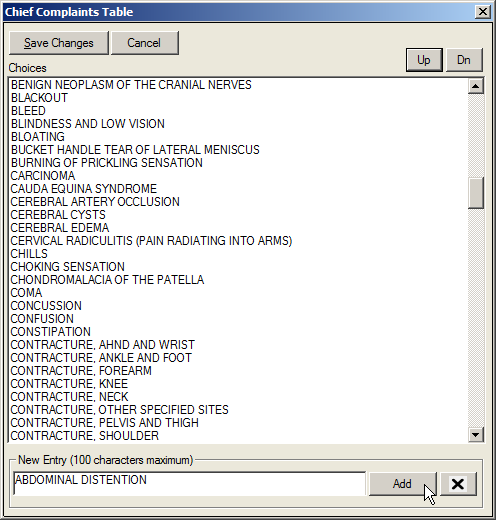
At the New Entry field, enter a complaint.
Click on the Add button.
Highlight the entry and click the Up or Dn buttons to change its position in the list.
- Click on the Save Changes button when finished.
Units of Measure Table
The Unit of Measure table
is no longer managed
by the user. It is replaced by a dataset from Newcrop. It
will be removed from the dropdown list in a future version
of MedInformatix.
Short Messages Table
The Short Messages Table contains a list of short, one-line messages that can be quickly selected when sending a message to other users. These messages can be any summary text that is commonly used to title electronic messages. The list will display as a pull down list when sending a new Message.
- Select 7 Short Messages from the Clinical Tables List under Preferences on the Main Menu.
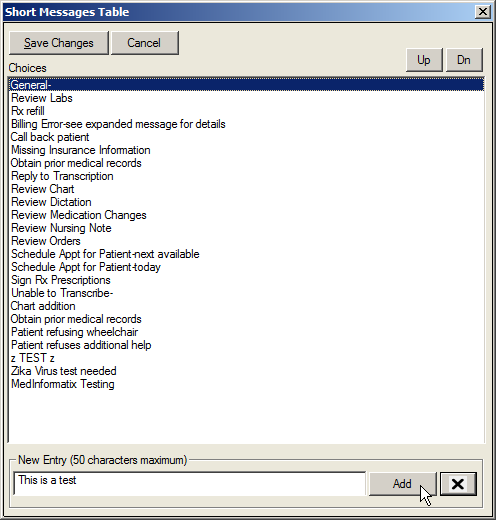
- At the New Entry field, enter a message.
- Click on the Add button.
Highlight the entry and click the Up or Dn buttons to change its position in the list.
- Click on the Save Changes button when finished.
Family History Table
The Family History
table is no longer managed by the user.
It has been replaced by the Value
Sets function. It will be removed
from the dropdown list in a future version
of MedInformatix.
Drug Formulary Types
The Drug Formulary Types table
is no longer managed
by the user. It is being replaced by the Newcrop Formulary look
up table. It will be removed from the dropdown list in a future
version of MedInformatix.
Drug Categories Type
The Drug Categories Table contains a list of drug categories that is used to pre-sort drugs when entering a pharmacy plan during treatment documentation. The list will be displayed as a pull down list when searching for specific drugs by category.
1. Select A Drug Categories from the Clinical Tables List under Preferences on the Main Menu.
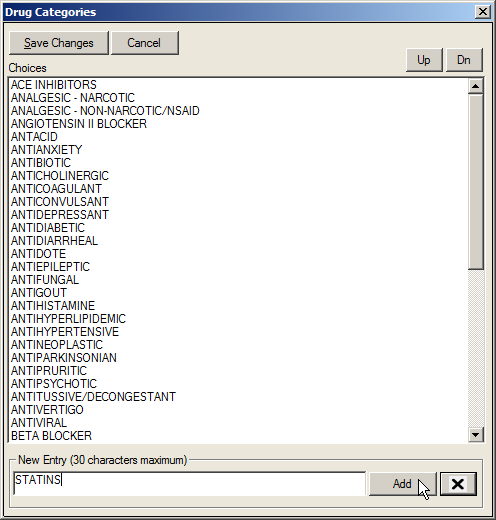
Enter a choice in the New Entry field.
Note: There is a limit of 30 characters in this field.
Click on the Add button.
Highlight the entry and click the Up or Dn buttons to change its position in the list.
- Click on the Save Changes button when finished.
Drug Master List
The Drug Master List table contains a complete drug list, which is provided by MedInformatix and is updated quarterly. It is important to note that when adding or deleting from this list, users should contact the system administrator or reseller for technical assistance to ensure these changes are included in the next upgrade.
Select B Drug Master List from the Clinical Tables List under Preferences on the Main Menu.
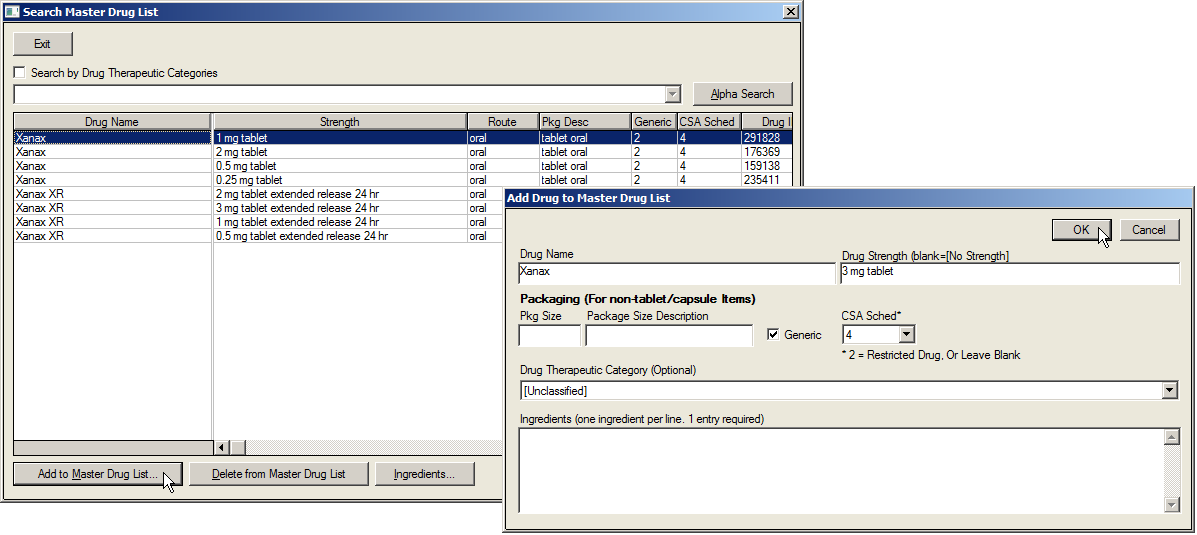
Click on the Add to Master Drug List button.
Complete the Drug Name, Strength, Package Size, and Description fields.
Click in the Generic field, if appropriate.
Use the CSA Sched dropdown to select an FDA Medication Schedule, if appropriate.
Enter the NDC Drug ID in the NDC Drug ID field, if appropriate.
Use the Drug Therapeutic Category dropdown to select a category, if appropriate.
Enter the appropriate ingredients in the Ingredients fields.
Click on the Ok button.
 Please note that any drug
that is entered into this list will not have a valid NDC Drug ID and cannot
be sent via ERX.
Please note that any drug
that is entered into this list will not have a valid NDC Drug ID and cannot
be sent via ERX.
Orders/LOINC
The Orders/LOINC table contains a list of orders sorted by department, such as Nurse, Lab, Pathology, etc, that are used to export orders to labs or other systems. When creating new orders through this table, each order must have a unique description and order code. Additionally, the LOINC Code and Export Order Description should be verified with the receiving facility to ensure that they receive the created order correctly.
- Select C Orders from the Setup Clinical Tables list under Preferences on the Main Menu.
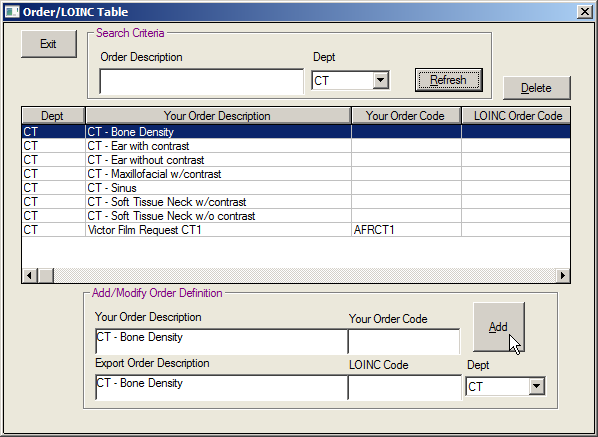
- Choose the desired department from the Dept dropdown.
- Click on the Refresh button so that the orders for the selected department are displayed.Move to the Add/Modify Order Definition section of the screen.
- Enter the appropriate information in the Your Order Description, Your Order Code, Export Order Description, and Export Order Code fields.
- Click on the Add button, which will save the information in the table and display it on the screen.
Orders Macros
Orders frequently include a series of tests or actions to be performed. The Order Macros table allows for the creation of one order selection that will automatically create a series of orders to be performed. Entries made in the Order Macro table must be completed in the following format:
[ORDER MACRO NAME]
1=Order Dept|Order Desc or Order Code|Units (1- 100)|Measure|Memo|Stat(YorN)|Due(Days)|Confirm Order (YorN)
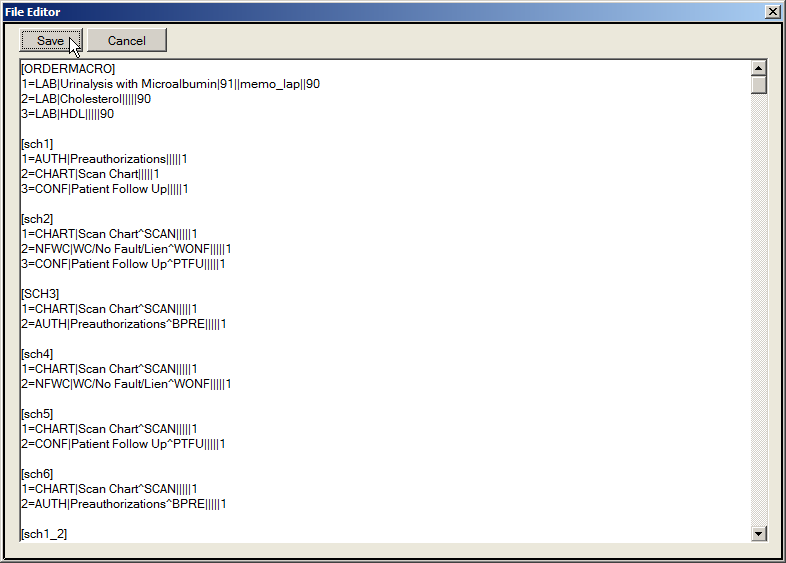
Example:
[MAMMOM3]
1=MAMTR|M3 - Routine Annual - Patient^MAM1Y|||||365
2=MAMTR|M3 - 6 Month Follow-Up - Ref MD^MAMFU|||||180
It is important to note that since the items entered in the Order Macros table need to be added to decision tree branches, it is recommended that users contact the system administrator or reseller for technical assistance.
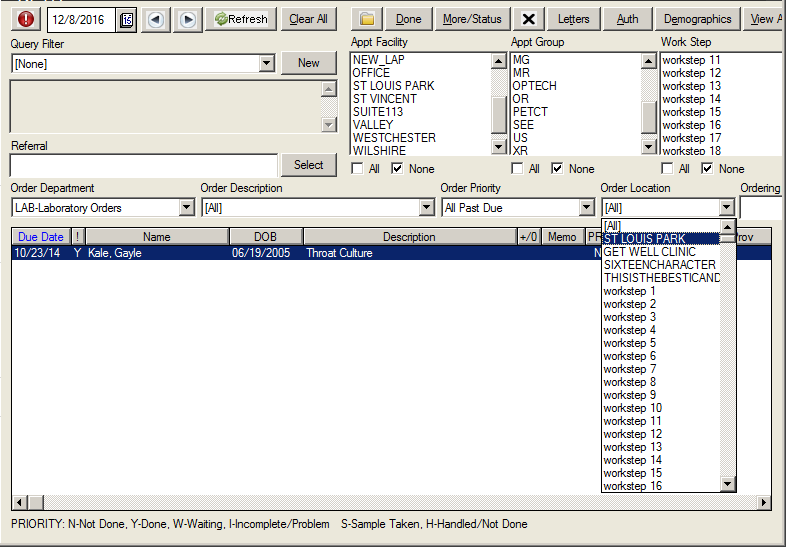
Order Locations
Order Locations are used to categorize orders for completion by a specific department or staff member. This provides the ability for staff members to view orders directed to them or their workgroup.
Select E Order Locations from the Setup Clinical Tables list under Preferences on the Main Menu.
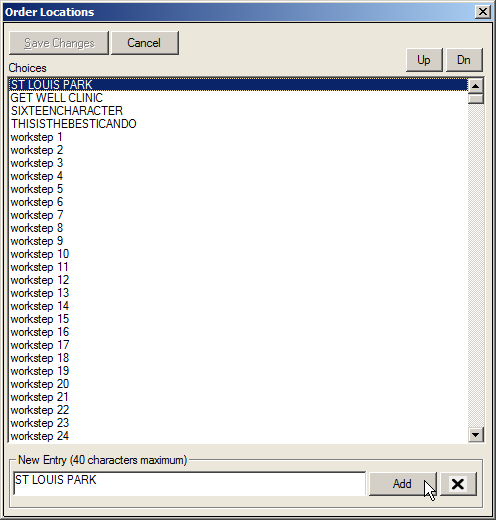
Click on the Add button.
Highlight the entry and click the Up or Dn buttons to change its position in the list.
- Click on the Save Changes button when finished.
The Order Location table enables users to create a listing of the different order locations that should display in the Confirm Order screen.
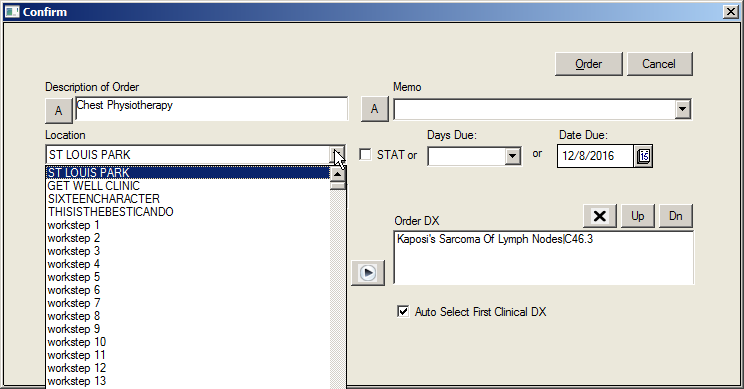
Additionally, there is an Order Location dropdown filter on the Orders screen that users can utilize to filter the listing of orders in the system for their workgroup.
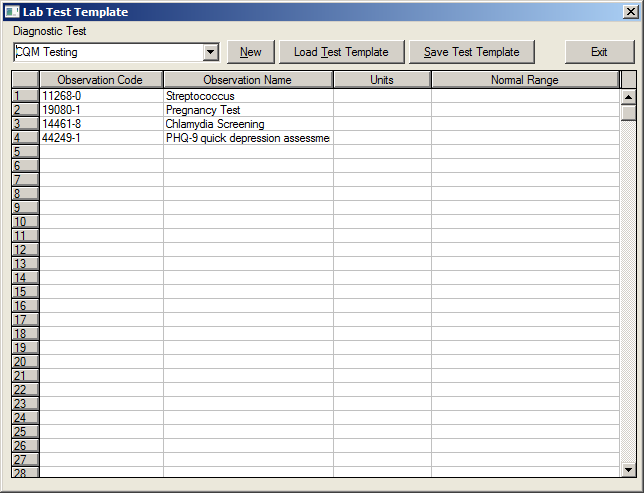
Lab Test Templates
The Lab Test Template table is used to define the Observation Codes for the manually entered lab results. The Observation codes are listed under the Diagnostic Code Name and contain the Lab Code, Description, Units, and Normal Range. It is recommended that users contact the system administrator or reseller for technical assistance before adding to or changing information in this table.
Lab Source Codes
The Lab Source Codes table is used to define the sources of lab results, which is typically an outside laboratory where specimens are sent for testing. The Lab Source is entered when lab results are manually entered by users and appears in the Source dropdown in the Diagnostic Test Data Entry screen.
- Select G Lab Source Codes from the Setup Clinical Tables list under Preferences on the Main Menu.
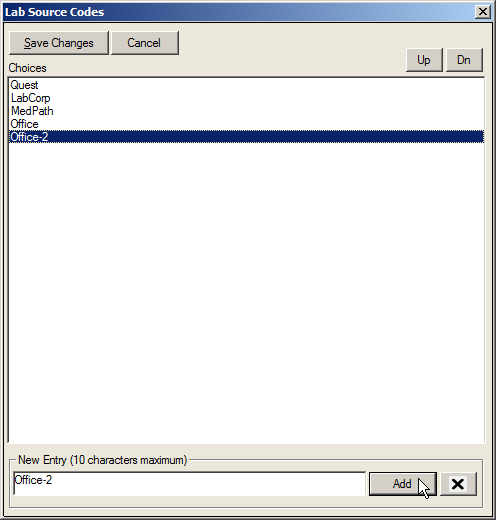
- Enter the appropriate information in the New Entry field.
- Click on the Add button.
Note: There is a limit of 10 characters in this field.
Highlight the entry and click the Up or Dn buttons to change its position in the list.
Click on the Save Changes button when finished.
General Alerts (Batch)
The General Alerts (Batch) table is used to create custom alerts that are manually generated and displayed for users when they are in the Alerts screen in the decision tree and that identify accounts where a specific scenario exists. In this table, the alert message that should be displayed for users is attached to a Patient List Query, which encompasses the specific scenario that the alert was designed for. For instance, a site may decide that they would like an alert created to identify all patients that have ‘SELFPAY’ as the patient type in their demographic file.
When making an entry to the General Alerts (Batch) table, users are able to select a Priority for the alert, which the system utilizes to determine the order that alerts should be displayed in when viewing the Alerts screen. For example, an alert that has a Priority of 1 will display at the top of the alerts listing. Additionally, alerts can be assigned to a specific workgroup so that only certain users will see the alert message. To help users launch into the necessary screens to complete the workflow for an alert, either a URL or Action Property can be attached to created alerts. When this feature is utilized, users can launch the programmed webpage or screen by double-clicking on the alert in the Alerts screen. Lastly, the Status Choices will need to be setup in the General Alerts (Batch) table screen so that users can assign a status to alerts as they are reviewed.
Because this feature requires an understanding of how to create a Patient List Query, users should contact their system administrator or reseller for technical assistance with setting up and utilizing the General Alerts (Batch) table.
- Select H General Alert (Batch) from the Setup Clinical Tables list under Preferences on the Main Menu screen.

- Enter the alert ID in the Alert ID field.
- Enter the alert message in the Alert Message field.
- Enter additional information regarding the alert message in the Expanded Alert Message field.
- Enter a webpage address in the Launch URL field, if necessary.
Note: the alert message that displays in the Alerts screen will be linked to the entered webpage address. The system will automatically launch the entered webpage when the alert message is double-clicked on by a user.
- Enter an action property in the Action Property field, if necessary.
Note: the alert message that displays in the Alerts screen will be linked to the entered action property, which will be executed when the alert message is double-clicked on by a user.
- Select the workgroup that should receive the alert message from the Workgroup dropdown, if necessary
Note: leaving this field blank will allow the entered alert message to be displayed for all workgroups.
- Select the priority for the alert message from the Priority dropdown.
- Click on the Select Query button to select the query that should be applied to the alert message.
- Click on the Add/Modify Alerts button to save the new entry.
- Click on the Exit button.
To Setup Status Choices For Alerts
- Click on the Set Status Choices button, which launches the Set Alert Status Choices screen.
- Enter the necessary status choice option in the Status Choice field.
- Click on the Add New button so that the new entry appears in the display portion of the screen.
- Repeat steps 2 – 4 as needed.
- When finished with entering status choices, click on the Exit button to be returned to the General Alerts (Batch) Setup Table screen.
General Alerts (Real – Time)
The General Alerts (Real - Time) table is used to create custom alerts that are manually generated and displayed for users when they are in the Alerts screen in the decision tree and that identify accounts where a specific scenario exists. In this table, the alert message that should be displayed for users is attached to a Patient List Query, which encompasses the specific scenario that the alert was designed for. For instance, a site may decide that they would like an alert created to identify all patients that have ‘SELFPAY’ as the patient type in their demographic file.
When making an entry to the General Alerts (Real - Time) table, users are able to select a Priority for the alert, which the system utilizes to determine the order that alerts should be displayed in when viewing the Alerts screen. For example, an alert that has a Priority of 1 will display at the top of the alerts listing. Additionally, alerts can be assigned to a specific workgroup so that only certain users will see the alert message. To help users launch into the necessary screens to complete the workflow for an alert, either a URL or Action Property can be attached to created alerts. When this feature is utilized, users can launch the programmed webpage or screen by double-clicking on the alert in the Alerts screen. Lastly, the Status Choices will need to be setup in the General Alerts (Real - Time) table screen so that users can assign a status to alerts as they are reviewed.
Because this feature requires an understanding of how to create a Patient List Query, users should contact their system administrator or reseller for technical assistance with setting up and utilizing the General Alerts (Real - Time) table.
- Select I General Alert (Real - Time) from the Setup Clinical Tables list under Preferences on the Main Menu screen.
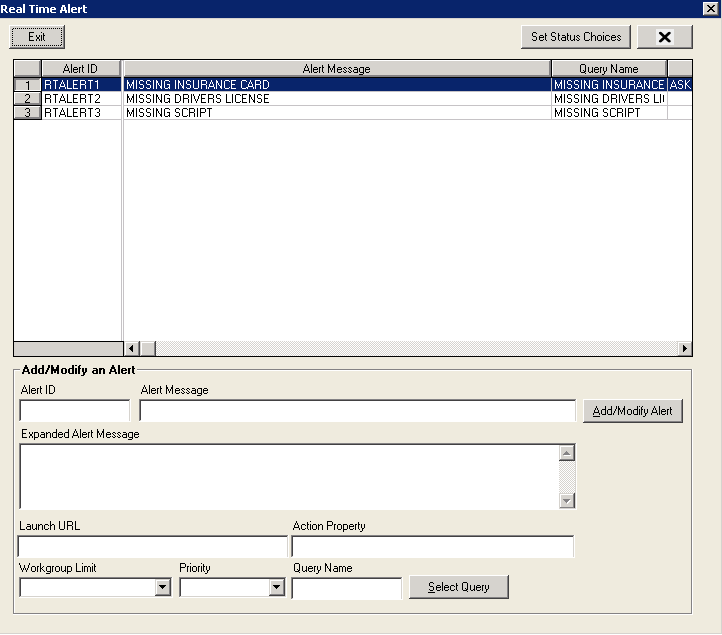
- Enter the alert ID in the Alert ID field.
- Enter the alert message in the Alert Message field.
- Enter additional information regarding the alert message in the Expanded Alert Message field.
- Enter a webpage address in the Launch URL field, if necessary.
Note: the alert message that displays in the Alerts screen will be linked to the entered webpage address. The system will automatically launch the entered webpage when the alert message is double-clicked on by a user.
- Enter an action property in the Action Property field, if necessary.
Note: the alert message that displays in the Alerts screen will be linked to the entered action property, which will be executed when the alert message is double-clicked on by a user.
Select the workgroup that should receive the alert message from the Workgroup dropdown, if necessary
Note: leaving this field blank will allow the entered alert message to be displayed for all workgroups.
- Select the priority for the alert message from the Priority dropdown.
- Click on the Select Query button to select the query that should be applied to the alert message.
- Click on the Add/Modify Alerts button to save the new entry.
- Click on the Exit button.
To Setup Status Choices For Alerts
- Click on the Set Status Choices button, which launches the Set Alert Status Choices screen.
- Enter the necessary status choice option in the Status Choice field.
- Click on the Add New button so that the new entry appears in the display portion of the screen.
- Repeat steps 2 – 4 as needed.
- When finished with entering status choices, click on the Exit button to be returned to the General Alerts (Batch) Setup Table screen.
Meds Alerts
The Meds Alerts table is used to create custom alerts that display for users after a medication is prescribed for a patient. Similar to Global Alerts, these alerts also identify accounts where a specific scenario exists. In the Meds Alerts table, users are able to enter in the alert message that they would like displayed and attach it to a Patient List Query, which encompasses the specific scenario that the alert should display for. Because this feature requires an understanding of how to create a Patient List Query, users should contact their system administrator or reseller for technical assistance with the Meds Alerts table.
- Select J Meds Alert from the Setup Clinical Tables list under Preferences on the Main Menu screen.
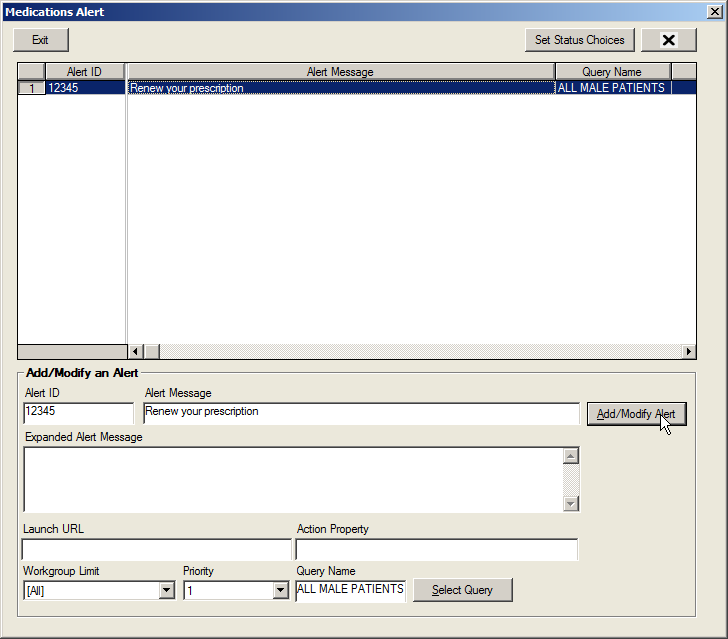
Enter the Alert ID in the Alert ID field.
- Enter the Alert message in the Alert Message field.
- Enter additional information regarding the alert message in the Expanded Alert Message field.
- Enter a webpage address in the Launch URL field, if necessary.
Note: the alert message that displays in the Alerts screen will be linked to the entered webpage address. The system will automatically launch the entered webpage when the alert message is double-clicked on by a user.
- Enter an action property in the Action Property field, if necessary.
Note: the alert message that displays in the Alerts screen will be linked to the entered action property, which will be executed when the alert message is double-clicked on by a user.
- Select the workgroup that should receive the alert message from the Workgroup Limit dropdown, if necessary
Note: leaving this field blank will allow the entered alert message to be displayed for all workgroups.
- Select the priority for the alert message from the Priority dropdown list.
- Click on the Select Query button to select the query that should be applied to the alert message.
- Click on the Add/Modify Alerts button to save the new entry.
- Click on the Exit button.
To Setup Status Choices For Alerts
- Click on the Set Status Choices button, which launches the Set Alert Status Choices screen.
- Enter the necessary status choice option in the Status Choice field.
- Click on the Add New button so that the new entry appears in the display portion of the screen.
- Repeat steps 2 – 4 as needed.
When finished with entering status choices, click on the Exit button to be returned to the Medications Alert Setup Table screen.
RX Instructions
Select K Rx Instructions from the Setup Clinical Tables list under Preferences on the Main Menu screen.

Move to the bottom of the appropriate area of the table and type the new information onto the screen in the exact format of the other entries.
Once completed, click on Save button, which will save the entered information in the table and exit the screen.
RX Dispense
The Rx Dispense Table is used to define a list of quantities or amounts to dispense when writing a prescription. The list allows the physician to quickly select from this list when creating a new prescription. The dispense quantity is printed on and becomes part of the prescription
Prescription Directions |
||
Term: |
Definition: |
Example: |
PO |
per os (by mouth) |
1 PO QD |
Q |
quaque (every) |
1 PO Q AM |
HS |
hara samni (at bedtime) |
1 PO QHS |
QD |
quaque die (every day) |
2 PO QD |
AC |
ante cibum (before meals) |
2 PO AC |
BID |
bis in die (twice a day) |
2 PO BID |
TID |
ter in die (three times a day) |
1 PO TID |
QID |
quarter in die (four times a day) |
2 PO QID |
q4h |
every four hours |
1 PO q4h |
prn |
pro re nata (as needed) |
1 PO TID, prn |
gtt |
gutta (drop) |
1 gtt OU QD |
OU |
both eyes |
1 gtt OU BID |
tsp |
teaspoon |
1 tsp TID |
puffs |
inhaler |
2 puffs q4h, prn |
OS |
Left Eye (Ocular Sinistrad) |
1 gtt OS BID |
OD |
Right Eye (Ocular Dextrad) |
1 gtt OD TID |
AM |
Morning |
1 PO Q AM |
PM |
Evening |
1 PO Q PM |
Select L Rx Dispense from the Clinical Tables List under Preferences on the Main Menu, which opens Dispense File Editor.
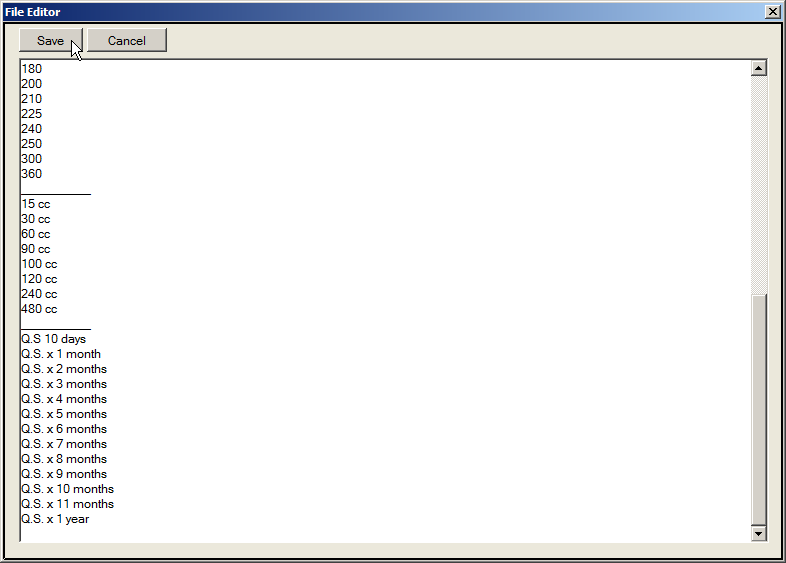
Move to the bottom of the appropriate area of the table and type the new information onto the screen in the exact format of the other entries.
For ERX, the format for dispensing medications has to be a specific number. The information such as 15 cc or Q.S. x 1 month should be defined that these are for paper printed prescriptions only and not for ERX.
Example:
360
400
540
__Below exclusively for paper printout__
#5 (Five) cc
#10 (Ten) cc
#15 (Fifteen) cc
#30 (Thirty) cc
#60 (Sixty) cc
#120 (One Hundred Twenty) cc
#240 (Two Hundred Forty) cc
_______________________________
#5 (Five) grams
#10 (Ten) grams
Once completed, click on the Save button.
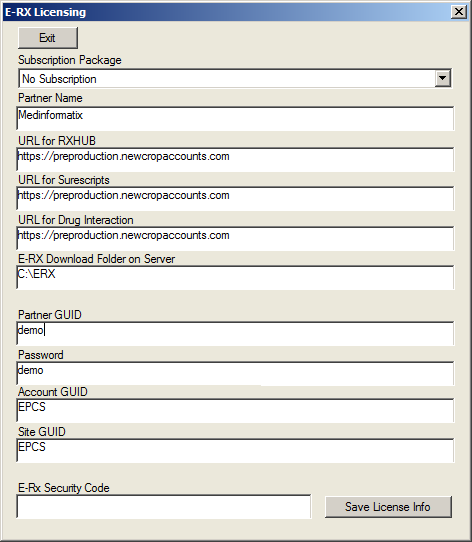
E-RX Licensing
The E-RX Licensing window provides easier implementation of the E-Prescribing Module. The screen allows for the selection of a subscription level for the practice, as well as the entry of the license information supplied by MedInformatix. The license information is obtained on signup and purchase of the E-Prescribing Module. The URLs for production level E-RX should always be entered as http://secure.newcropaccounts.com.
It is important to note that a password is required to make modifications to the E-RX screen. The password will be the same password assigned and used for the setup of E-RX and only users with Administrator and/or Supervisor rights will be able to modify the licensing information. Contact your system administrator or reseller for technical assistance with this feature.
Managing Specialties
The Managing Specialties screen allows users to enter and edit the physician specialties listed in Medinformatix. The specialties entered through this screen will appear in the Problem List in the system.
Select N Managing Specialties from the Setup Clinical Tables list under Preferences on the Main Menu screen.
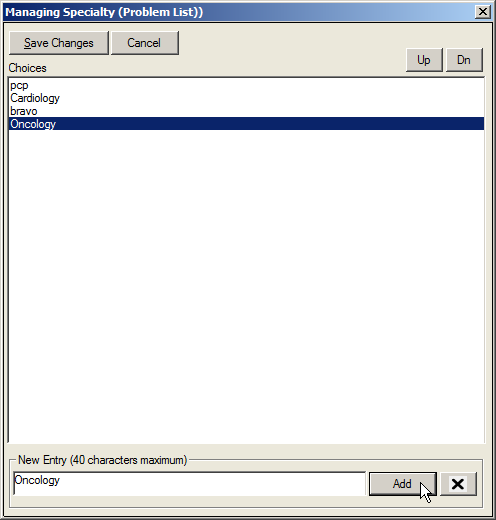
Enter in a specialty in the New Entry field.
Click on the Add button, which will cause the new entry to appear in the Choices portion of the screen.
Highlight the entry and click the Up or Dn buttons to change its position in the list.
Click on the Save Changes button when finished.
Drug Interaction Override Reasons
The Drug Interaction Override Reasons table enables users to make entries that are utilized in the Override dropdown in the Drug Interaction Evens History screen, which is accessed from the Medication History portion of the system.
- Select O Drug Interactions Override from the Setup Clinical Tables list under Preferences on the Main Menu screen
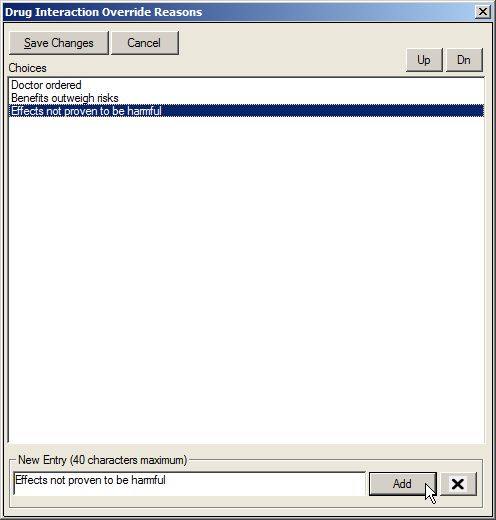
Enter in a drug interaction into the New Entry field.
Click on the Add button so that the entry appears in the Choices portion of the screen.
Highlight the entry and click the Up or Dn buttons to change its position in the list.
Click on the Save Changes button when finished..
PQRI Setup
The PQRI Setup table is no
longer managed
by the user. It is now an unsupported functionality. It will
be removed from the dropdown list in a future version
of MedInformatix.
Drug Manufacturers List
The Drug Manufacturers List table enables users to create a listing of the manufacturers that supply medications. The information that is entered into this table populates the dropdown list in the Manufacturer field in the Immunization Entry Information section of the Vaccine History screen. This screen is launched when users click the Vaccine History button in the Medication History screen.
- Select Q Drug Manufacturers List from the Setup Clinical Tables list under Preferences on the Main Menu screen.
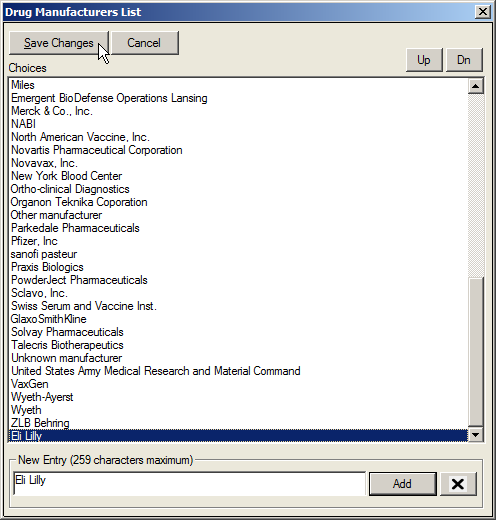
- Enter the name of the appropriate manufacturer in the New Entry field.
Note: the New Entry field will hold up to 254 characters.
Click on the Add button so that the entry appears in the Choices portion of the screen.
- Highlight the entry and click the Up or Dn buttons to change its position in the list.
- Click on the Save Changes button when finished.
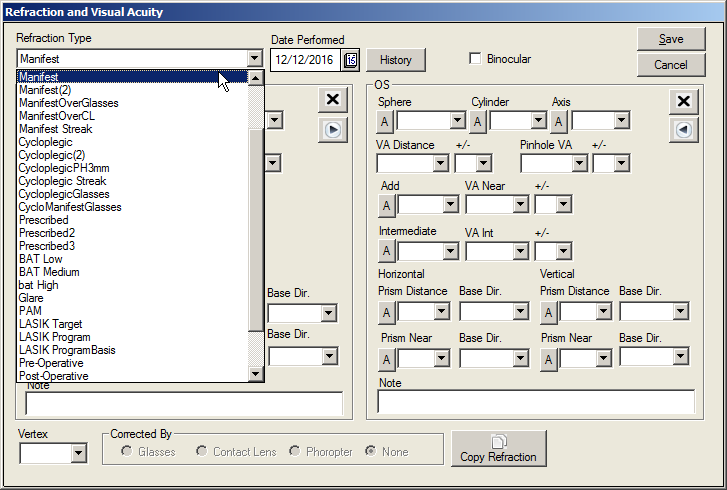
Refraction Type List
- Select R Refraction Type List from the Setup Clinical Tables list under Preferences on the Main Menu screen
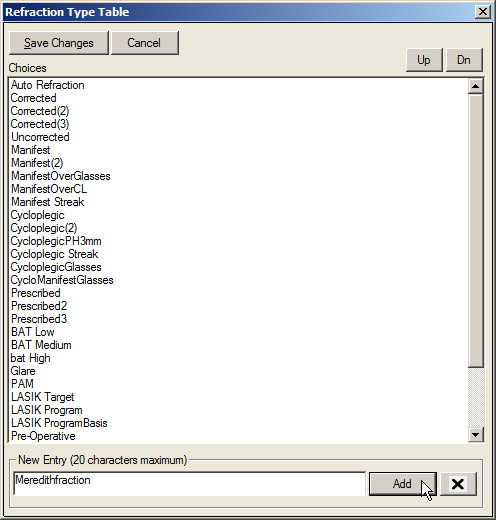
- Enter the name of the refraction type in the New Entry field.
Note: the New Entry field will hold up to 20 characters.
Click on the Add button so that the entry appears in the Choices portion of the screen.
- Highlight the entry and click the Up or Dn buttons to change its position in the list.
- Click on the Save Changes button when finished.
This list is utilized by the Refraction and Visual Acuity test screen.