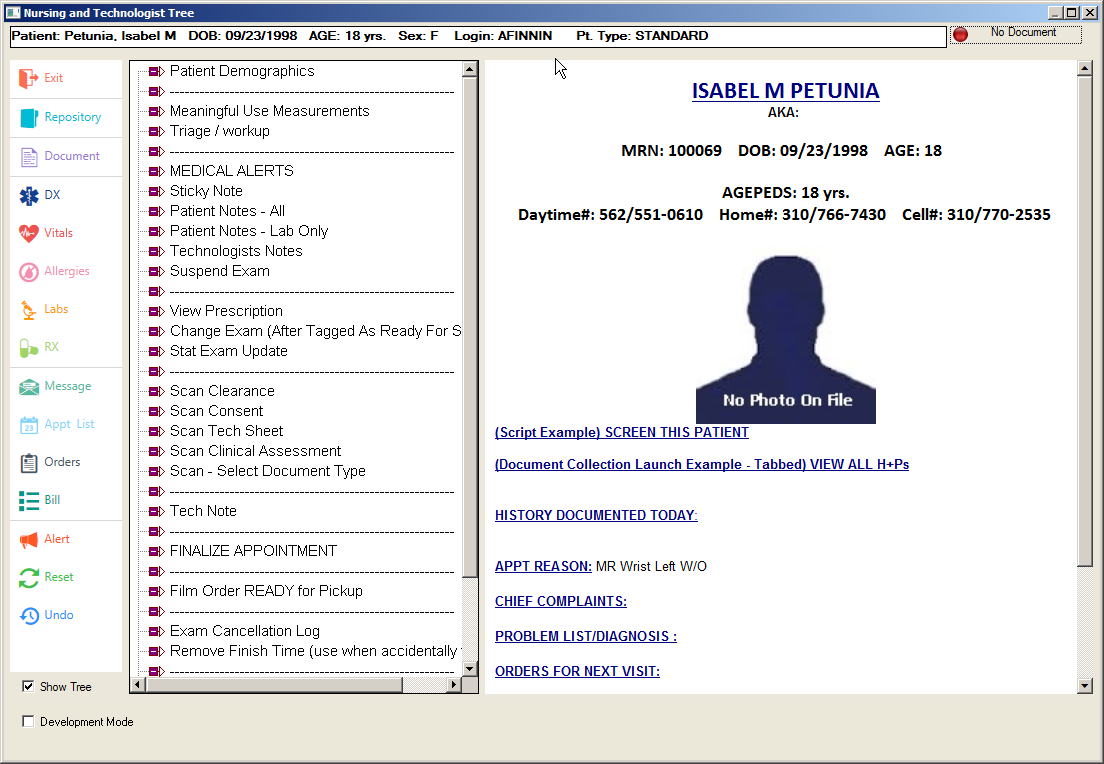
Decision Tree
The Decision Tree is displayed each time the user selects the Chart Icon shown below from any view and automatically sizes it to roughly the length of the current screen display.
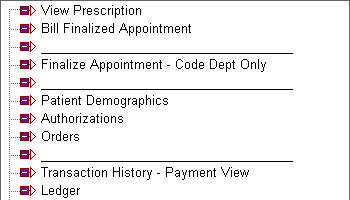
The Physician branch of the Primary Care Decision Tree, which ships as the standard on a new installation is shown below.
The Decision Tree provides an innovative interface that allows users to be guided through a workflow that may involve:
Viewing of Medical Records
Collection of medical records data,
Sending out orders,
Performing billing,
Creating prescriptions
Creating Documents
Alerts
Printing of Forms
Level of Service Calculations
Sound/Voice
Interacting with other applications
How the Decision Tree is Used
The Decision Tree window is made up of several sections. A Hierarchical list box occupies the left side. The right half is dedicated to a Clipboard viewing area where key information can be displayed to the user. The top section shows buttons for frequently used functions. The bottom section is used by those who modify the Decision Tree structure itself.
Users will interact primarily with the Hierarchical List box. This is where the term “Tree” applies since double clicking on each node opens branches of options or a new window with another list box. These different ways of branching are controlled by the person(s) who developed the Decision Tree.
Clicking on any node on a tree will cause some action to happen, depending on the properties assigned to the node. Each node may launch a Questionnaire Form, a Vital Signs entry window, or an EKG display. The designer of the Decision Tree (which may not necessarily be MedInformatix) will structure the nodes and branches of the nodes in such a way as to mimic a natural workflow in the thought process of the user.
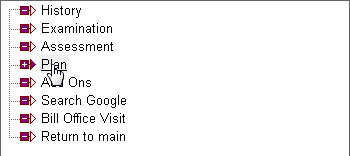
In the typical structure of the Primary Care - Decision Tree, physician interaction is often first grouped by “type of complaint” and then within this group, an additional subdivision of the main categories of physician activity called “History”, “Examination”, ”Assessment” and “Plan” are displayed.
The design is such that a physician using the tree will instinctively know where to navigate in order to take the patient’s “history” because the structure of the tree is already something familiar. This format allows the user many complex selections because of the possibility of unlimited and often intelligent branching.
An alternative format often used by other systems is to provide a “Tabbed” window. However, this option limits the physician interface since often, hundreds of possible branches can occur in a typical decision tree – more than is realistic to place in tabs or button format.
In addition to collecting data using the built in forms, the system also tracks which nodes have been accessed. This information is then used to indicate what aspects of the tree should be documented in a physician progress note. This is done automatically because each node has an assigned note-taking property.
When the encounter with the patient is complete, the user clicks the Document button, which compiles all the areas that the system knows should be included in the documentation and pulls all the applicable data from all the previously entered information. A final document is then presented to the physician that is already in the expected transcription format for medical documentation. This document is permanently saved in a special area called the Document Repository and the encounter is then complete.
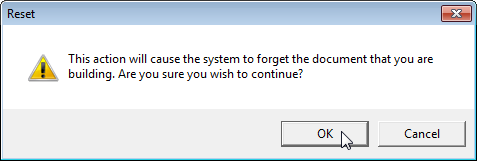
Clicking the Reset Button returns the tree to its original appearance, which means that all nodes are closed up and multiple layers of hierarchical list boxes are removed from view. This also makes the Decision Tree forget all the previous clicks that have been made and will thus cause it to remove the “document in progress” from memory.
When the rest button is clicked, a prompt will appear warning the user that all the documents will be erased from the system. The user must click the OK button to continue with the reset.
When a document is in progress (i.e. clicks were made to nodes with a property that indicates documentation should occur), the system automatically turns on the green light next to the Document button. You may notice that some decision trees can be used that will not cause the red light to turn green. This is because the designer of the tree decided that the users of the tree will not be allowed to create documentation. This is the case for example with the Front Desk trees and some Nursing trees.
Creating/Modifying Decision Trees
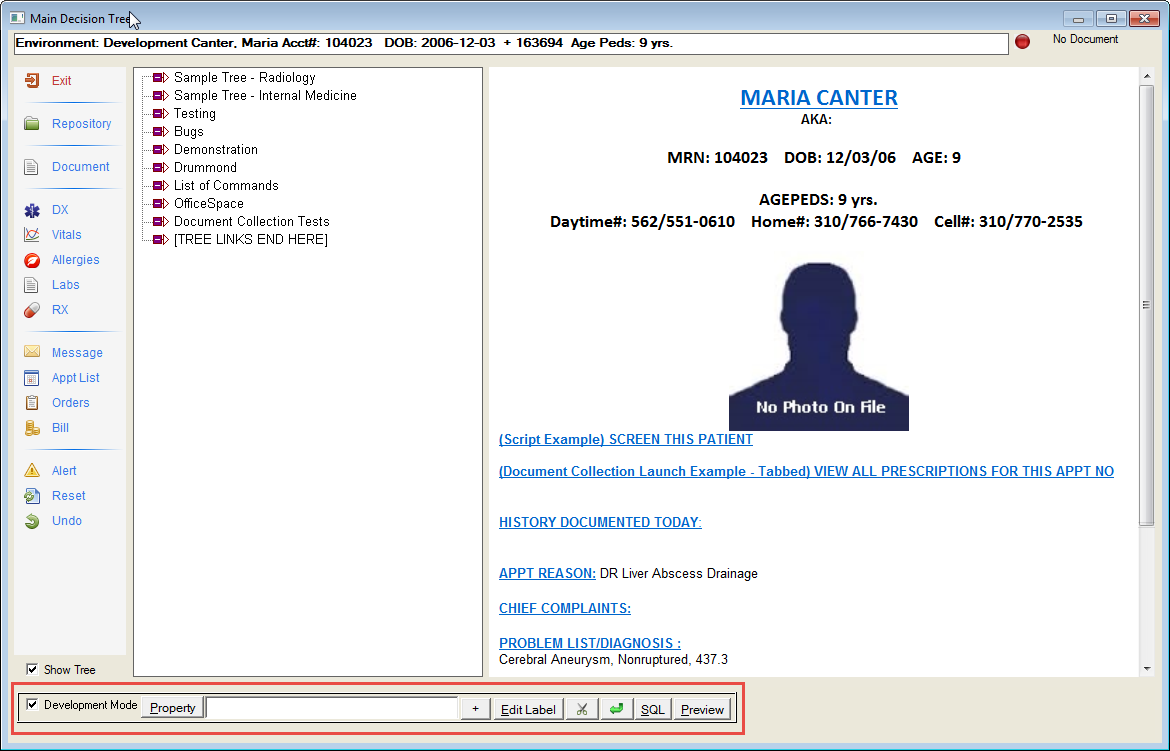
Development Mode
In order to make changes on the Decision Tree, one must first click on the “Development Mode” button at the bottom of the Decision Tree window.
If this is the first time this is used on the computer workstation, the system will have to turn off the caching feature. A message will indicate this situation. You will need to restart the software before proceeding in development mode.
After restarting, proceed to the Decision Tree and click the Development Mode button again.
![]() Move the mouse button over the parts of the image below
.
Move the mouse button over the parts of the image below
.
![]()
Adding Nodes to a Tree
To add nodes to a tree, it is important to be aware of any highlighted or selected nodes as branch nodes are always added to the item that is highlighted. If the node is highlighted, double-click to de-select it and remove the highlighting.
When adding nodes to the main tree, make sure that no item is highlighted. Enter the text to be added in the entry box to the left of the Add (+) button. Then click on Add, which adds the node to the bottom of any existing nodes already displayed.
If you are adding branches to an existing node, you must first double-click the existing node to select (highlight) it, and then add the text as described. The text will appear as a new branch. You may have unlimited sub-branching to an existing node but this affects readability so use it with care.
Deleting Node Branches from a Tree
If the node to be deleted has its own sub-branches, it is important to delete the sub-branches first. Otherwise, the space occupied by the branches will not be removed and will thus be wasted. This is an important consideration because each tree is limited to a maximum size of 64K.
To delete a node branch from a tree, highlight the item to be deleted and click on the Cut button. A prompt will appear verifying the action. The user must click the OK button to continue with the change.
Reordering Nodes in a Tree
There is no direct way to move nodes from one position to another. However, a button called Switch Position is provided which will allow you to switch positions with another node immediately before it. The other node will be placed on top and the original node will now appear below it. Using this method allows you to move nodes up and down to any position within a branching level. You cannot move a node to another branching level.
For example, if there are four branches on the tree and you add a fifth branch, it is automatically placed at the bottom of the list. In order to move it to the second position on the list, highlight the item above it and then click on the Switch Position button. The highlighted item is moved to the last position and the new item is now in the fourth position. Continue highlighting and “switching” until the item is in the correct position.
Renaming Nodes
You can alter the text of an existing node. First highlight the node to be altered. Then type the new text in the entry box on the bottom of the Decision Tree. Finally click on the Edit button. The text will then be replaced.
Creating a New Hierarchical Box Window
Instead of branching down in an unlimited way to more and more sub-branch nodes, it is more readable and easier for the user to open up a new window and start from the top again with the specific items for that branch. When this new window is closed, the user will be returned to the exact original position on the window below. This allows the user to have a visual cue to the flow.

From here on, clicking this node will cause the branches to appear in a new window.
Tree Files
Decision Tree files are stored in the OUTLINE directory. When you enter a Decision Tree window, the system automatically looks for the starting tree, which by default is “TREE.INI” and is located in the OUTLINE directory. If the Decision Tree file does not exist and a new node is added, a new TREE.INI file will be created.
By convention, all tree files that contain the information about the nodes and branching, ends with an INI file extension. A tree INI file is limited to a size of 64K. This limit is set for reasons of speed. However, this is not a real limitation since a node on a tree can branch to another tree INI file.
Creating a Tree INI File
Usually, tree design is done in modules with each INI file being limited to a specific purpose. (i.e. Physician - Primary Care, Physician – Pediatric, Registration.) The modules are also reusable, which means the same item can be copied into several different nodes. The Nurse and Provider will point to the same INI file from two different modules. For example, under the Nurse node, selecting Vitals opens the screen. The Provider has this same option under the Physician node, which points to the same INI file.
Finally, when organizing with modules, tree maintenance is much easier. When excessive node branches are planned, it is recommended that additional tree INI files are created.
Decision Tree files are stored in the Outline folder under MedInfo on the server. An Action Property must be entered in order for a new node to open for the user. (Action Properties will be outlined in detail here.)
To create a new Decision Tree Node:
To create a new node or Tree INI file, make sure that no item is highlighted and enter the name of the Decision Tree in the Entry field at the bottom of the Decision Tree screen. Click on the ‘+’ (plus) button. The new item appears on the list.
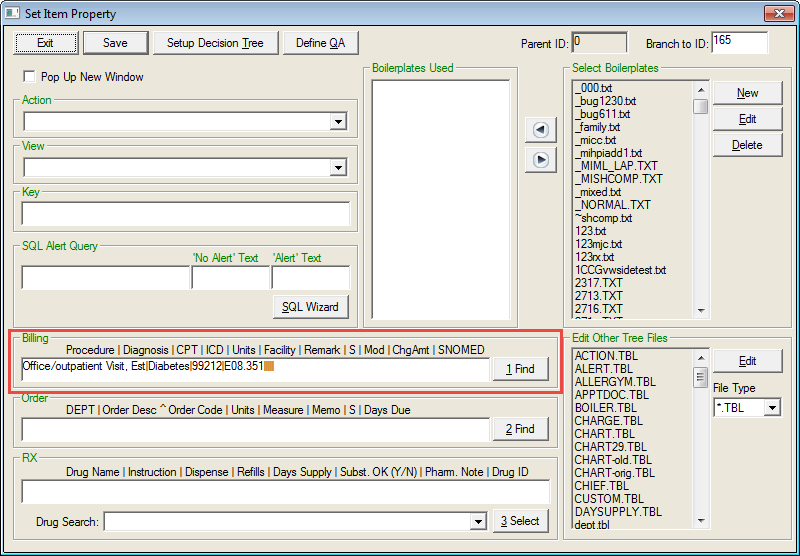
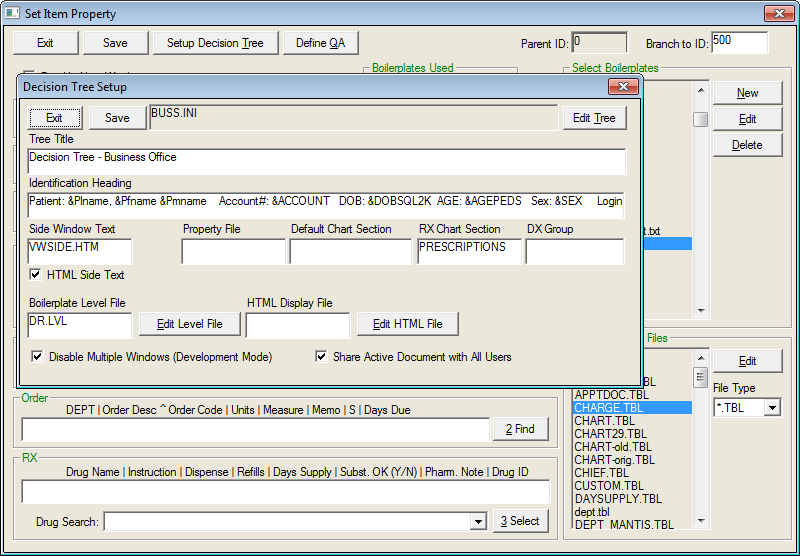
To open the new Decision Tree, an Action will need to be added to the Tree property. Select the Tree and then click on Property to open the Set Item Property screen of the item.
In the Action field, enter the name of the action along with the name of the new Decision Tree file in the following format: #TREE:FILENAME.INI (i.e. #TREE:PED.INI). The filename is limited to 8 characters. An Action Property can also be selected from the dropdown list. A description of all the Action Properties in the list can be found here.
The Decision Tree property window includes an Edit Other Tree Files section that allows the tree developer to edit any TBL file in the outline folder.
Before closing the Properties screen, click the Pop Up New Window checkbox, then click the Save button.
To open the new tree, double-click on the item. If a file has not been created and saved in the Outline folder, the following message will pop up:
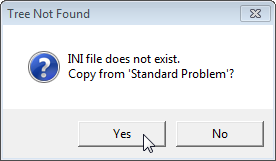
If the user selects “Yes”, a Standard Template is created with the new name assigned.
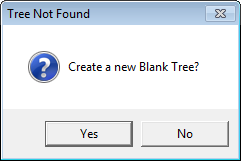
If the user selects “No”, a Create a new Blank Tree? Message appears. If the user selects “Yes”to this message, a new, blank tree opens.
Copying Tree Files
As previously stated, modules are also reusable, which means the same item can be copied into several different nodes. For example, the user may want both the Provider and the Nurse to be able to open and enter vitals on the Vitals screen. To do so:
Note or copy the desired properties of the existing node. (i.e. Navigate to Physician – Primary care and display the properties of the Vitals node and record the note/copy the properties.)
Add a new item to the Decision Tree by entering the name in the entry field at the bottom of the appropriate Parent screen and then click on the ‘+’ button. (i.e. under the Nurse node, add an item called Vitals.)
Open the Set Item Property screen of the new item and enter (or paste) the desired properties. Click the Save button. The new item should display the desired information.
Redirecting Notes
It is possible to redirect an existing node to a new Tree INI file. To do so, select the node and then click on the Property button to display the Set Item Property Window. Then, on the field marked Action Property, put in the following command:
#TREE:NewName.INI
Where NewName is the name you wish to assign to the new tree. This is limited to 8 characters.
To open the new tree, double-click on the item. If a file has not been created and saved in the Outline folder, the following message will pop up:
If the user selects “Yes”, a Standard Template is created with the new name assigned.
If the user selects “No”, a Create a new Blank Tree? Message appears. If the user selects “Yes”to this message, a new, blank tree opens.
Note: Redirecting the node does not rename the item on the Decision Tree. See Renaming Nodes to rename the item.
Relationships/Pointers
When displaying the property of any node of a tree, you will find that all nodes are automatically assigned a pointer called “Branch To ID” and a “Parent ID”. These pointers create a relationship of one node to another within a Tree INI file.
Advanced users can modify the Branch to ID of a tree node, which can cause it to point to another node than that originally created. This can allow unlimited looping to occur, which can be used for more complex decision trees.
Tips on Tree Design
Upper case letters are much harder to read. We recommend the use of mixed upper and lower case letters.
Use non-functioning lines (made up of underscores) to divide up long lists of branches. These should be used especially to break up natural groups of data and increases readability.
Avoid forcing the user to scroll whenever possible. This means that if the branching exceeds the size of the hierarchical tree box, scrolling will be necessary to view additional branches. It is typically more efficient to open up new nodes in a new window.
Split up big tree INI files into smaller tree INI files. This allows you to reuse (copy) many portions of repeating branches and will make the entire decision tree easier to maintain.
Adding a “Back” or “Return” node for each new screen of options is very helpful to the user. This will avoid having to Exit the Decision Tree in order to return to the previous or main menu screen. (Actions are explained in detail later in the manual.)
Throughout this manual, naming conventions are referenced when making Decision Trees. It is important to follow the naming conventions provided. Otherwise you will find it difficult to remember and catalog possibly thousands of files that may be created.
Decision Tree Files
For reference purposes, the following are the file extensions of files used in decision trees.
KEY FILES
*.CND – Conditional Tree Files
*.FLW – Flow Sheet Files
*.GRF – Graph Files
*.HTM – QA HTML Form Files
*.INF – Setup Information Files
*.INI – Tree Structure Files
*.LVL – Boilerplate Level Files
*.PRO – Property Files
*.QA – QA Form Definition Files
*.QCH - QUESTION.CH – Choice Box Files
*.QRY – Query Wizard Files
*.SQL – Questionnaire SQL Scripts
*.TBL – System Setup Files
*.TXT – Boilerplate Files
*.VAR – Questionnaire Files
Setting up Default Trees to Launch
Each security workgroup can be assigned to automatically launch a specific tree. By default, all users launch TREE.INI first. To override this, make an entry in the DIMPROF?.INI file of the workgroup as shown below:
[DIM]
Flow Chart File=DR.INI where DR.INI is an example of another Tree file in the OUTLINE directory.
In addition, the designer can add a node that allows the individual user to select a default Decision Tree to launch for a specific PC. To do so, add a node called Select Desired Start up Tree in the Decision Tree. Under the new node, add branches for each Decision Tree that includes the desired tree filename in the following format:
#SAVETREE:TreeFileName (#SAVETREE:DR.INI)
This function stores the name of the decision tree, which should be loaded first in DIM.INI
Conditional Tree Launching -- Tree File to Display
A tree designer is given complete control over which tree can be launched depending on various conditions. When opening the Decision Tree, the system automatically searches for a file called “TREE.SQL” in the outline directory. This file must contain a query that will return the name of the INI file to launch as a result row. A sample query is as follows:
SELECT TreeFileName =
CASE SEX
WHEN 'M' THEN 'DRMALE.INI'
WHEN 'F' THEN 'DRFEMALE.INI'
END
FROM CLMASTER WHERE ACCOUNT='&ACCOUNT' AND COMPANY='&COMPANY'
Since the SQL query can contain any logic, including the checking of who the user is currently logged in or what characteristics the patient has, one can build a fairly robust logic for deciding which tree to launch automatically. This has the effect, when used with a lot of forethought, of cutting down the mouse clicks necessary to jump to a particular tree. The query may be up to 64K in length and will be pre-processed by the Document Interpreter before execution to all global variables is available.
For further flexibility, it is possible to launch different SQL statements depending on the user’s workgroup instead of using TREE.SQL. To launch an alternate SQL script, make the following entry in DIMPROF?.INI:
[DIM]
Tree Query File=TREE1.SQL
Conditional Tree Launching -- Open Tree After Appointment Confirmation
When confirming an appointment, it is possible to automatically launch the Decision tree immediately after setting an appointment. A SQL Query can provide a condition that will determine if the tree should be launched or not. This is helpful if one wishes the user to follow a protocol for handling a specific type of patient based on various conditions such as the reason for appointment. The specific tree INI that will be launched can be controlled by the query described above (TREE.SQL). This query will simply determine if the tree should be launched at all. By default the system looks for the file name TREEAPPT.SQL in OUTLINE directory to perform this query. This can be overridden by the following DIMPROF?.INI setting:
[DIM]
Appointment Tree Query File=TREEAPPT1.SQL
A sample query is as follows:
SELECT 'LAUNCH TREE' FROM CLMASTER WHERE ACCOUNT='&ACCOUNT' AND COMPANY='&COMPANY'
AND PTYPE='MEDICARE'
Conditional Tree Launching – Open Tree After Appointment Tagging
It is possible to launch a specific Decision Tree after an appointment is tagged. This will allow the site to force the execution of a workflow within the decision tree and can thus utilize the side text and alerts features, as well as guide the user into a sequential series of processes.
To accomplish this, make the following entries in the DIMPROF?.INI files.
[DIM]
Tag Launch Tree=FRONT.INI
Finish Launch Tree=FRONT.INI
In the settings described above, you may replace FRONT.INI with any valid Tree file name that is in the user’s current OUTLINE directory.
Note: When using this feature with the Tag button, the Appointment Alert (if exists) will not be executed upon tagging as before. Thus the launching of a decision tree replaces the Appointment Alert.
Conditional Tree Launching -- Open Tree After Appointment Tagging with Specifications
When tagging an appointment, it is possible to automatically launch the Decision tree immediately after tagging. A SQL Query can provide a condition that will determine if the tree should be launched or not. This is helpful if one wishes the user to follow a protocol for handling a specific type of patient based on various conditions such as the reason for appointment. The specific tree INI that will be launched can be controlled by the query described above (TREE.SQL). This query will simply determine if the tree should be launched at all. By default the system looks for the file name TREETAG.SQL in OUTLINE directory to perform this query. This can be overridden by the following DIMPROF?.INI setting:
[DIM]
Tag Appointment Tree Query File=TREETAG1.SQL
A sample query is as follows:
SELECT 'LAUNCH TREE' FROM CLMASTER WHERE ACCOUNT='&ACCOUNT' AND COMPANY='&COMPANY'
AND PTYPE='MEDICARE'
Conditional Tree Launching -- Open Tree After Appointment Finish
When finishing an appointment, it is possible to automatically launch the Decision tree immediately after marking the appointment as finished. A SQL Query can provide a condition that will determine if the tree should be launched or not. This is helpful if one wishes the user to follow a protocol for handling a specific type of patient based on various conditions such as the reason for appointment. The specific tree INI that will be launched can be controlled by the query described above (TREE.SQL). This query will simply determine if the tree should be launched at all. By default the system looks for the file name TREEFIN.SQL in OUTLINE directory to perform this query. This can be overridden by the following DIMPROF?.INI setting:
[DIM]
Finish Appointment Tree Query File=TREEFIN1.SQL
A sample query is as follows:
SELECT 'LAUNCH TREE' FROM CLMASTER WHERE ACCOUNT='&ACCOUNT' AND COMPANY='&COMPANY'
AND PTYPE='MEDICARE'
Decision Tree with HTML Format
Users have the option to change Decision Trees to take the form of HTML files. This allows format flexibility in the tree user interface and also allows seamless connection to other web sites.
 Creating
the file: MedInformatix
provides a utility to convert trees to HTML files within development mode
of the Decision Tree Setup window. The
name of the HTML file can be specified here. (By
convention, one should use the tree name with an HTM extension, e.g. DR.INI
should be DR.HTM.) When clicking on “Auto Create HTML File,” the system
will create an HTML file that includes all tree branches from the original
tree. Once created,
the HTML file will be stored in the Decision Tree Folder. The tree nodes
will be shown in the HTML file with each tree level being given an additional
indent.
Creating
the file: MedInformatix
provides a utility to convert trees to HTML files within development mode
of the Decision Tree Setup window. The
name of the HTML file can be specified here. (By
convention, one should use the tree name with an HTM extension, e.g. DR.INI
should be DR.HTM.) When clicking on “Auto Create HTML File,” the system
will create an HTML file that includes all tree branches from the original
tree. Once created,
the HTML file will be stored in the Decision Tree Folder. The tree nodes
will be shown in the HTML file with each tree level being given an additional
indent.
Formatting: After the HTML file is generated, one can then use an HTML editor such as Microsoft Front Page to add additional features like color, images, and hyperlinks. For those expert HTML users, customization of the auto-generate feature allows use of custom fonts and styles via Cascading Style Sheets (CSS). The style sheet for the Decision trees is “treestyle.css”, which is automatically installed into the client folder.
HTML Files: It is important to note that the HTML file will contain special encoding that can only be recognized by the MedInformatix Decision tree program and cannot be used in any other context. However standard web pages can be called from an HTML tree file using regular hyperlinks.
HTML files are automatically called when using the #TREE action property and the selected tree includes an assigned HTML file. Tree Properties (Action, Boilerplate, Orders, etc.) are assumed to be stored in the original INI file so the original INI file and the HTM file are assumed to belong to a set.
At the client side, when a tree is loaded that has an HTML file, that file will be downloaded onto the user’s HTML cache directory. When referencing other HTML files or graphic files, it is necessary to preload them into this cache directory. This can be done by specifying the files to be used by HTML in an HTML.INF file (found in the installation root on the server, usually \MEDINFO).
The format of HTML.INF is:
[Cache Files]
1=med1.gif
2=med3.gif
3=test.jpg
4=index.htm
Each file to be transferred should be assigned a number, beginning with 1. (i.e. 1. File One, 2. File Two, etc.) Any file extension can be transferred and a sample HTML file is included in the standard installation, which works with the primary care decision tree. The sample file includes a TREE.INI (Main) and NURSE.INI (Nurse Tree) that have been converted to HTML for testing purposes.
When working with the Decision Tree in development mode, the HTML file will be hidden and the original tree hosting the HTML file will be displayed. An HTML file is easily identified as it is displayed with the numeric ID numbers of each node in this view. Users are able to convert to standard trees or HTML trees without restriction.