Scheduling a Patient: The Appointment Search Wizard
The Appointment Search Wizard screen allows multiple resources to be scheduled with one search. Wizard searches can be predefined so that scheduling users are able to quickly select appointment types from a list that may include complex multi-resource appointments. Or, users can use the Appointment Book and Reason fields to select the resources desired manually.
Aside from being able to schedule multiple appointments for a patient, the Appointment Search Wizard screen contains a multi-facility feature, which enables users to search the books for each of their sites when schedule appointments. Furthermore, the screen also contains a Lag field for each appointment, which is used to tell the system when each appointment in the series being scheduled should occur. Users also have access to the Day Lag field where they can indicate if appointments should occur on a separate day.
Click on the Search Wizard button on the left sidebar in the Workflow View screen.
The Search Wizard (called the Search for Appointments) screen will open.
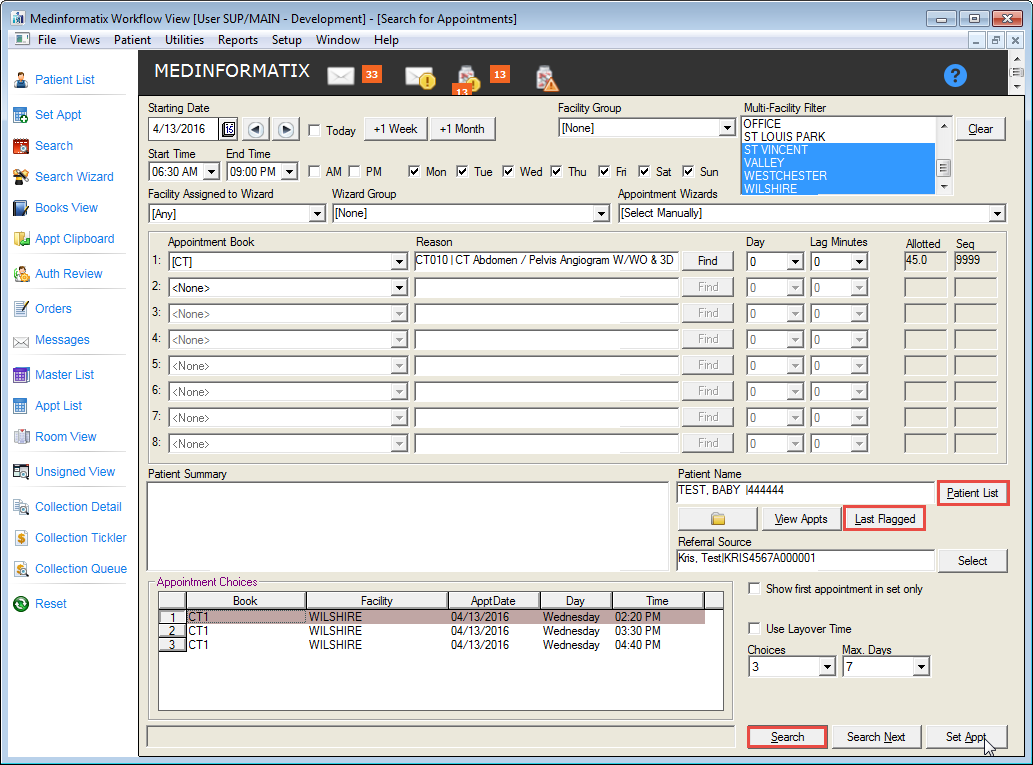
Select the desired appointment date using the Starting Date field icon. Click the front and back arrows, the Today checkbox or the +1Week or +1Month buttons to quickly select a future or past date.
Select a Start Time and an End Time from the pulldown lists.
Click either the AM or PM checkbox.
Click the checkbox for a desired day of the week.
Select the desired facility from the Facility Group dropdown list. Highlight selection from the Multi-Facility Filter menu if appropriate.
Click the Clear button to return to a blank screen if desired.
Enter the preferred timeframe of the appointment using the Start Time and End Time field dropdown lists and click the checkboxes of the preferred days of the week.
Select the Facility Assigned to Wizard from the pulldown list.
Select the Wizard Group from the dropdown list if activated.
Select one of the Appointment Wizards from the dropdown list. When selected, the appointment will automatically display all resources required and the time needed for each in the Appointment Book and Reason slots. If there are no selections, then the [Select Manually] entry will appear.
Click the #1 Appointment Book field and select a book from the dropdown list.
Click the Find button next to the Reason field and highlight the appropriate appointment reason from the list in the Appointment Reason Selection screen.
Click the Select button to return to the Search for Appointments screen.
Click the Lag Minutes field dropdown list to select the lag time from one appointment to the next.
Click on the Patient List button next to the Patient Name field to open the Patient List screen.
Search for and select the desired patient. The patient information will appear in the Patient Summary field. Use the scroll bar to scroll down to access the complete screen.
 The Patient Summary field can also display an HTML page and can use action properties to launch keyviews, QAs, Document Collections, etc., without entering the chart. The setting that defines the Patient Summary file can auto-detect an HTML file for display with the file extension is HTM.
Click the Chart button to open the Decision Tree for that patient.
Click the View Appts to view all the appointments for that patient.
Click the Last Flagged button to view all the appointments that were flagged as needing rescheduling.
Click the Select button next to the Referral Source field to open the Referring/Related Provider List screen. Choose a provider from the provider list.
Click the Show first appointment in set only checkbox if desired.
Click the Layover Time checkbox if desired, to indicate that a layover time is desired for a designated number of appointments. What is Layover Time?What is Layover Time?
Enter the number of appointment Choices from the pulldown list.
Enter the number of days in which the appointment should take place using the Max. Days pulldown list.
Click the Search button. The appointments matching the criteria will display in the Appointment Choices area of the screen. If the appointment choices displayed are not acceptable, change the appropriate criteria and search again.
Click the number of the desired appointment.
Click the Set Appt button to open the Confirm Appointment screen.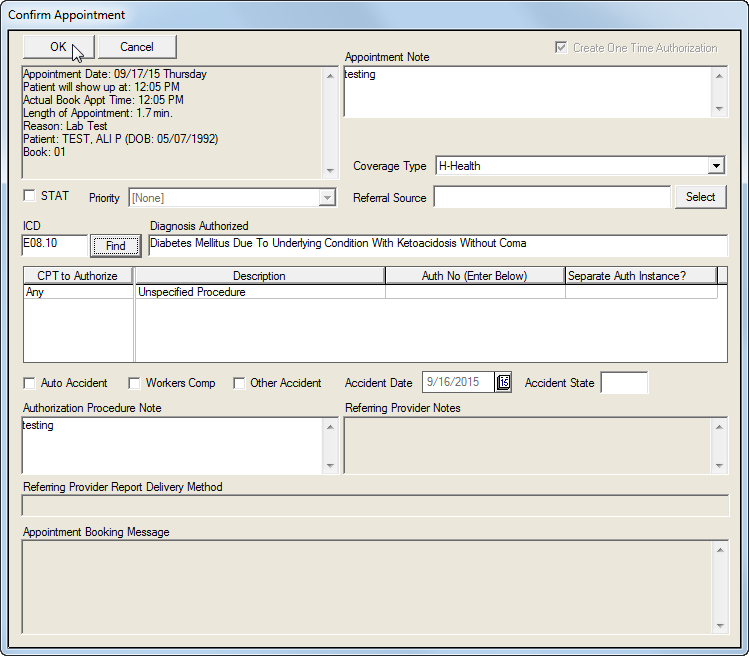
Complete the Confirm Appointment screen(s) as needed.
Click on the OK button to save the information entered into the Confirm Appointment screen(s) and to complete setting the appointment.