Document Repository Tables
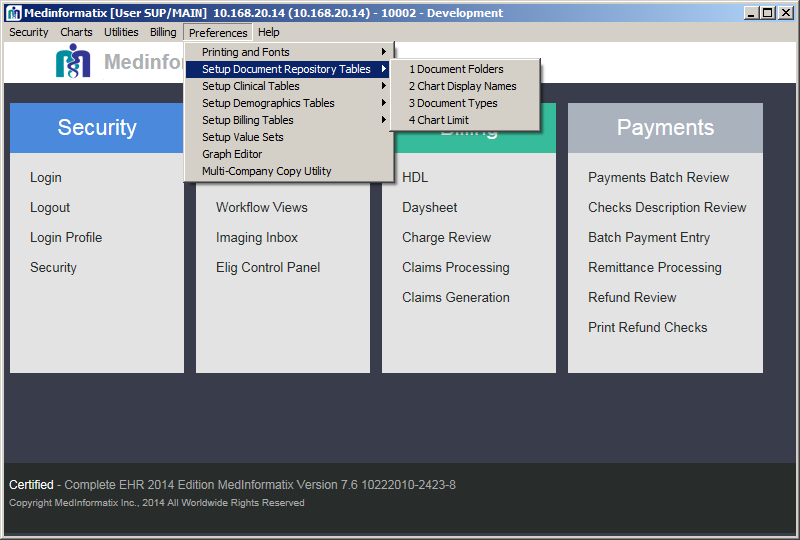
The Document Repository Setup Tables allow users to easily add new chart sections into the system. These tables are located under the Preferences option on the top menu bar on the Main Menu screen
When adding information into these setup tables, users should remember to eliminate punctuation. When it is necessary to separate information, use an underscore “_” and never use the pipe symbol “|” unless specifically indicated.
The following information will outline each of the different Document Repository Setup Tables and the steps needed to add information to them .
At the Main Menu screen, click on the Preferences option in the upper toolbar.
Click on the Setup Document Repository Tables option from the dropdown menu.
Click on the setup table name to display the selected setup tables screen.
Document Folders Table
The Document Folders table allows users to create document folders and designate specific paths for saved documents to be stored in. Additionally, users also have the ability to indicate where graphic files for specific document folders should be stored by creating a virtual document path and enabling the Always Store Graphic Files as Virtual Files field.
Select the Setup Document Repository Tables from the Preferences tab.
Click 1 Document Folders from the pulldown menu.

Open the Document Folders screen.
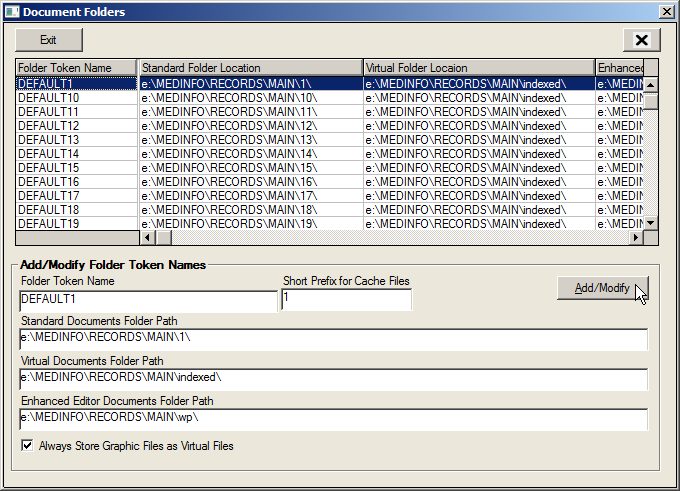
- Enter a Folder Token Name into the Folder Token Name field.
Note: The Folder Token Name should be a three digit number and will usually have either one or two leading zeros to fulfill this requirement.
- Enter the same Folder Token Name information into the Short Prefix for Cache Files field.
- Enter in the correct path locations into the Standard Documents Folder Path, Virtual Documents Folder Path, and Enhanced Editor Documents Folder Path fields.
- Click on the Add/Modify button to save the entered information.
- Repeat the steps to add any additional Document Folders.
- When finished, click on the Exit button
Chart Display Names Table
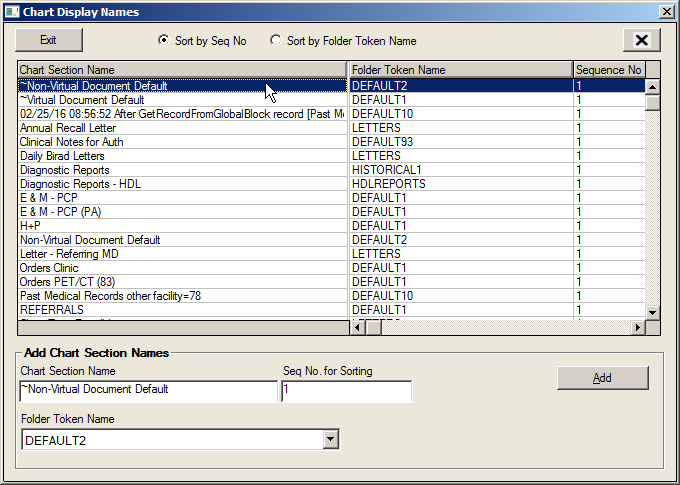
The Chart Display Names table allows users to create new chart sections in which documents can be saved. The Chart Display Names Table works in conjunction with the Document Folders Table and enables users to link the document folder paths to the name of the chart section. The entries in this setup table can be seen by users in the Chart Section dropdown in the Document Repository screen.
- Select 2 Chart Display Names from the Setup Document Repository Tables list under Preferences on the Main Menu.

- Enter in the Chart Section Name into the Chart Section Name field.
Note: This should be a description of the type of documents that will be stored in this chart section.
- Enter a sequence number into the Seq. No. for Sorting field.
- Select the Folder Token Name in the Folder Token Name dropdown.
- Click on the Add button to save the entered information.
- Repeat this step to add any additional Chart Display Names.
- When finished, click on the Exit button
Document Types Table
The Document Types table allows users to assign a document type to created chart sections. Additionally, users can use this screen to assign chart sections to specific workgroups and to indicate in the system if the chart section should receive saved documents from the Decision Tree or the Imaging Inbox.
Select 3 Document Types from the Setup Document Repository Tables list under Preferences on the Main Menu .

Select a workgroup from the Workgroup dropdown.
Select a Save Area from the Save Area dropdown.
Enter in a Document Type into the Document Type field. Note: This often will be similar to or exactly the same as the Chart Section Name.
Enter in a Sequence Number into the Seq. No. field.
Select the Chart Section Name from the Chart Section Name dropdown.
Click on the Add/Modify button to save the entered information.
- When finished, click on the Exit button
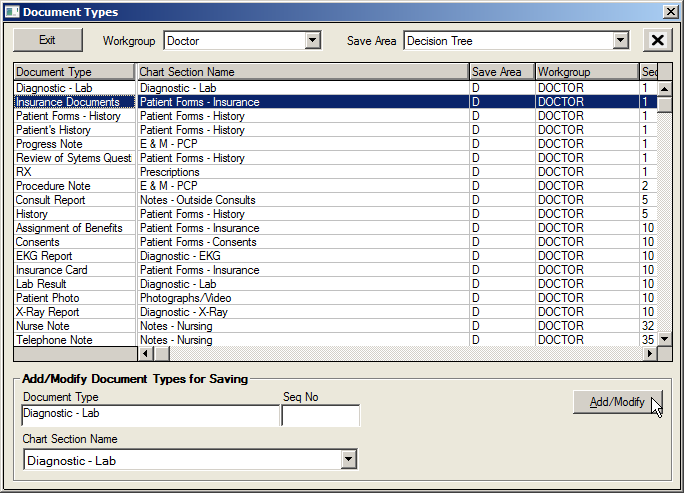
Chart Limit Table
The Chart Limit table enables users to limit the viewable chart sections for workgroups within a specific program area so that users are only able to view chart sections necessary to complete their tasks. For example, the Radiologist workgroup may be limited to the chart sections containing Previous Diagnostic Reports, the scanned prescription, and patient history questionnaires in the Document Repository.
In addition, when the “Use Appt No” Workgroup Profile setting is enabled, the Administrator has the option to select chart sections that should display the Appointment Description rather than the Document Description in the Document History window. This is done by selecting the Doc History/Use Appt Desc option in the Program Area field and then proceeding with the steps outlined below.
- Select 4 Chart Limit from the Setup Document Repository Tables list under Preferences on the Main Menu.

- Open the Chart Limit screen.
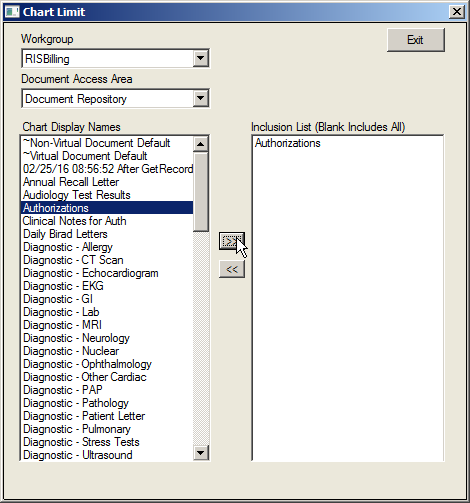
Select the desired workgroup from the Workgroup dropdown.
- Select the desired program area from the Program Area dropdown.
Program Area: |
Description: |
Document Repository |
Choose Chart Sections that should appear in the Document Repository for the selected workgroup. |
Unsigned/Unsaved Documents |
Choose Chart Sections that should appear in the Unsigned/Unsaved Documents view for the selected workgroup. |
Review/Not Sign |
Used to assign Chart Sections where documents will be marked as Reviewed rather than Signed. These Chart Sections are typically used when additional/authorizing signatory will review document and add final signature. |
Document History / Use Appt Desc |
Used with security setting Use Appt No is selected, typically in Radiology setting. Chart Sections specified will display Appointment Description rather than Chart Section description. |
Document History |
Choose Chart Sections that should appear in the Document History screen for the selected workgroup. |
View Signed / Preliminary Only |
Used to define the chart documents that should have a preliminary text statement attached at the top. This text statement will only appear if the document is unsigned in the system |
Disallow Print Unsigned |
Used to define in the system the chart documents that should not be printed if they are unsigned. |
Appt. Request View |
Used to define the chart documents available from the buttons in the Appointment Request View screen. |
- Select the chart section to be added to the Inclusion list.
- Click on the right arrow button so that the item appears in the Inclusion list.
Note: To remove an item from the list, select the item and click on the left arrow button.
- Repeat the steps to add additional chart sections to the Inclusion list.
- Click on the Exit button to save the changes entered and exit the table