Demographics Setup Tables
Patient Demographics are an essential piece of the patient record. The demographic screen provides a wealth of information that is linked to many other areas within the MedInformatix system. The Demographic Setup tables, which are located under the Preferences option in the upper toolbar on the Main Menu screen, provide the information vital to these links.
-
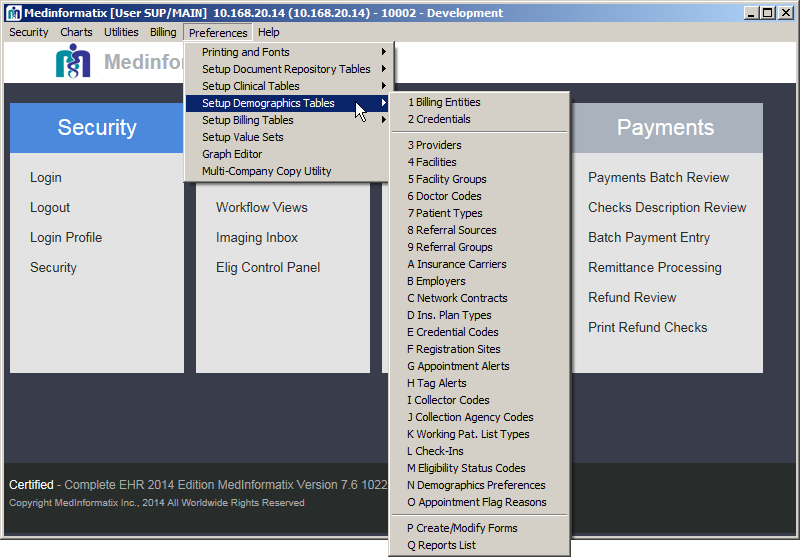
At the Main Menu screen, click on the Preferences option in the upper toolbar.
-
Click on the Setup Demographics Tables option from the dropdown menu.
-
Click on the setup table name to display the selected setup tables screen.
 Click on the desired link in the following list to go
directly to the description of that setup table.
Billing Entities
The Billing Entities table allows users to automatically generate multiple Doctor Codes for the providers at their site. Each Doctor code is based on the 3 digits of the Facility Code and the 7 digits of the Provider Code for the doctor. If a provider offers services at several facilities, that doctor will need to be setup with a unique doctor code for each facility. In this case, the Billing Entity Setup table allows the administrator to enter the billing facility information once and create multiple doctor codes with the billing facility information included for each provider-facility code combination.
-
Select 1 Billing Entities from the Demographics Tables list under Preferences on the Main Menu.
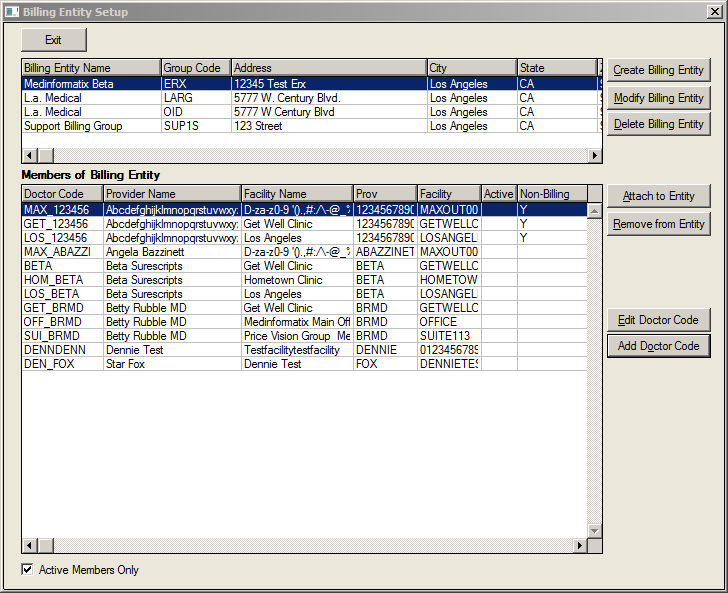
- Click on the Create Billing Entity option.
- Enter the billing organization information into the Create Billing Entity screen.
- Click on the Save button, which will return you to the Billing Entity Setup screen.
- Click on the Attach to Entity button, which will launch the Attach Provider/Facility to Billing Entity screen.
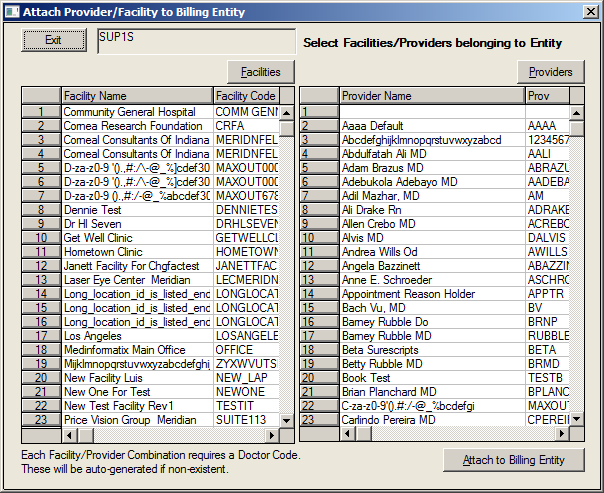
- Click on the Provider(s) and Facility(s) to highlight.
- Click on the Attach to Billing Entity button.
- Click on the Exit button.
Credentials
Credentials are an essential piece of the Doctor Code setup. It is important to enter each of the doctor’s credentials in order to submit an appropriate claim form for payment. Both the Doctor Code Setup screen and the Credentials screen can be utilized to enter in providers’ credentials.
The Credentials table screen allows users to enter credentials for multiple doctors at a time. The filters available on the feature allow the entered credentials to be assigned based on Facility, Provider Code and/or Doctor Code. Additionally, the Credentials Setup screen has several buttons in the lower portion of the screen that allow users to retrieve Surescripts Prescriber Status from Surescripts’ database. The following will outline how users can enter a provider’s credentialing information in the Credentials table.
-
Select 2 Credentials from the Setup Demographics Tables list under Preferences on the Main Menu screen.
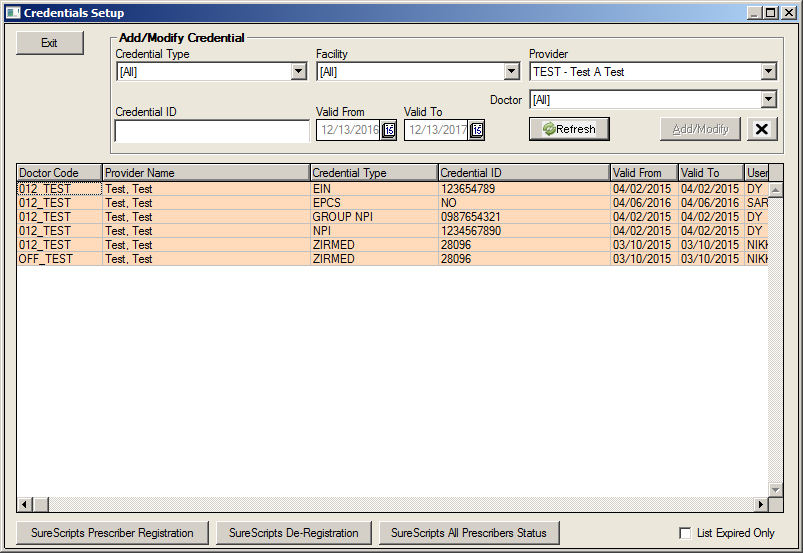
-
Select the credential from the Credential Type dropdown.
-
Select the facility from the Facility dropdown.
-
Select the provider using the Provider dropdown.
-
Select the Doctor Code from the Doctor dropdown.
-
Click on the Refresh button to review the selected options.
-
Enter the credential information into the Credential ID field.
Providers
The Provider Code is a 7-digit code used to refer to a physician, provider, or modality. Each code is unique and can not be used twice. Provider Codes provide a link between the scheduling system and the billing system in MedInformatix. A Provider Code is required when creating a Doctor Code and an Appointment Book.
In an Outpatient Radiology setting, a Provider Code should be created for each Radiologist solely for the purpose of linking to a Doctor Code in Demographic Tables setup. A Provider Code should also be created for each Modality that will have an Appointment Book in the scheduling system.
-
Select 3 Providers from the Setup Demographics Tables option under Preferences on the Main Menu screen.
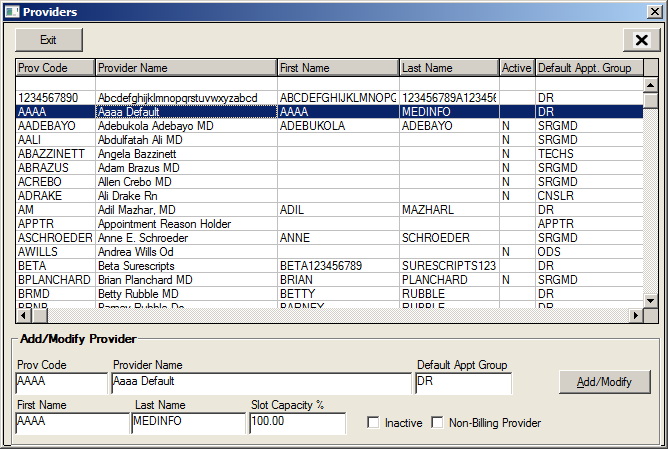
-
Enter the desired code in the Provider Code field.
-
Enter the Provider/Modality Name in the Provider Name field.
-
Enter the appointment group in the Appointment Group field.
-
Enter the provider’s first name in the First Name field.
-
Enter the provider’s last name in the Last Name field.
-
Enter 100 for each provider in the Slot Capacity % field. What is Slot Capacity %?What is Slot Capacity %?
-
Click on the Add/Modify button.
-
Click on the Exit button.
Facilities
The Facility Code is used to define a particular facility where services are rendered. Many processes, from setting an appointment to entering charges, require that a facility code be selected. Furthermore, there are several screens within MedInformatix that contain a Facility dropdown filter, including the Books View, Appointment Scheduling Wizard screen, Master List screen, Enter Charge screen, Delayed Billing screen, Edit Charge screen, and the Collection Views.
Establishing a list of facility codes is a one-time setup and requires updating only when an item is to be added, edited or inactivated. Additionally, information entered in this table will be used for billing and will appear in the appropriate areas of electronically generated claims or CMS 1500 claim forms. There is a limit of 15 characters in the Facility Code field and it is recommended that codes be entered as uppercase with no spaces or punctuation. For example, SWSVC may be selected as the code to represent South West Services.
Furthermore, the setup of a Facility Code requires the assignment of Place of Service Codes. Information on The Base POS (Base Place of Service) and a table of CMS Place of Service Codes are presented in the documentation following the Facility Code setup steps for user reference.
- Select 4 Facilities from the Demographics Tables list under Preferences on the Main Menu.
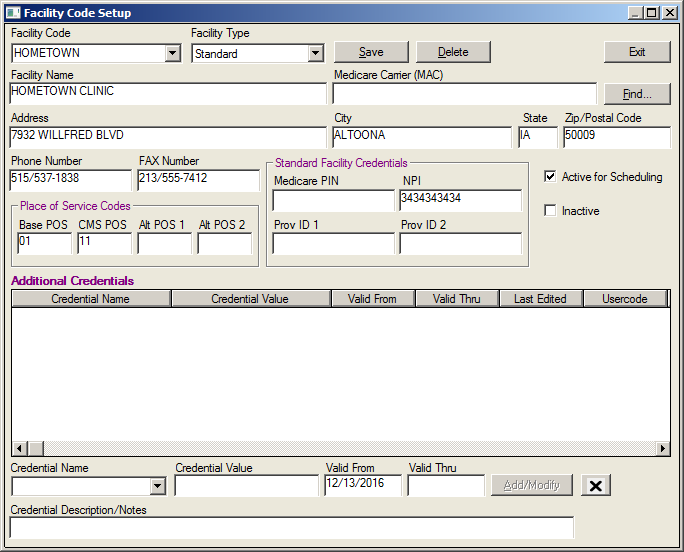
- Enter a previously determined facility code in the Facility Code field.
- Enter the facility name, address and phone information in the appropriate fields.
Note: This information will appear on claims forms exactly as it is entered in.
- Enter the appropriate POS codes in the Base POS, CMS POS, Alt POS 1, and Alt POS 2 fields.
Note: Base and CMS POS codes may default to 01 and 11. The Alt POS fields hold alternate POS codes requested by a particular payer and are otherwise left blank.
- Enter the Outside Facility Credentials information in the Medicare PIN, NPI, Prov ID 1, and Prov ID 2 fields.
- Click on the Save button.
- Click on the Exit button.
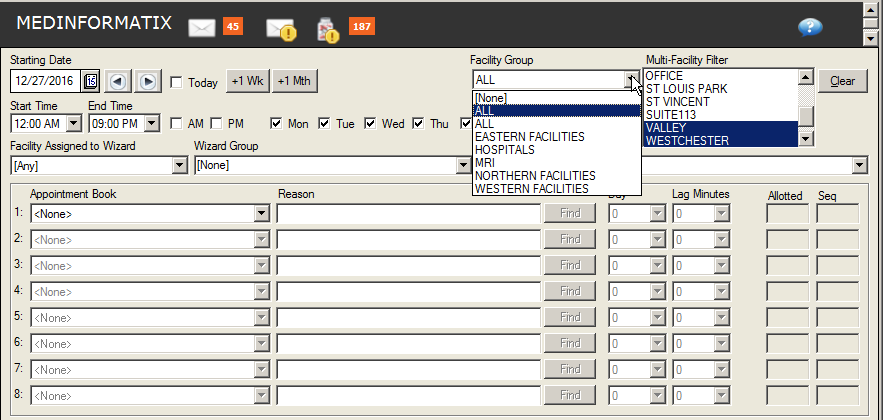
Facility Groups
The facility groups are logical grouping of one or more facility to be used in scheduling, specifically the search wizard. Facilities can exist in multiple groups.
- Select 5 Facility Groups from the Demographics Tables list under Preferences on the Main Menu.
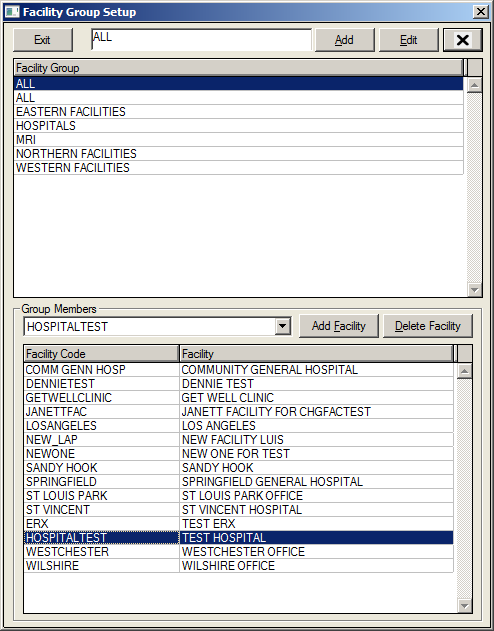
To add a group:
- Enter the name in the Facility Group Setup field
- Click the Add button.
The group name will appear in the Facility Group list.
To add a facility:
- Select the Facility Group.
- Select the group member from the Group Members field dropdown.
- Click the Add Facility button to add the Facility into the group.
The Facility will appear in the Facility Code list.
These are the groups that are found in the Facility Group dropdown list on the Search Wizard screen.
Doctor Codes
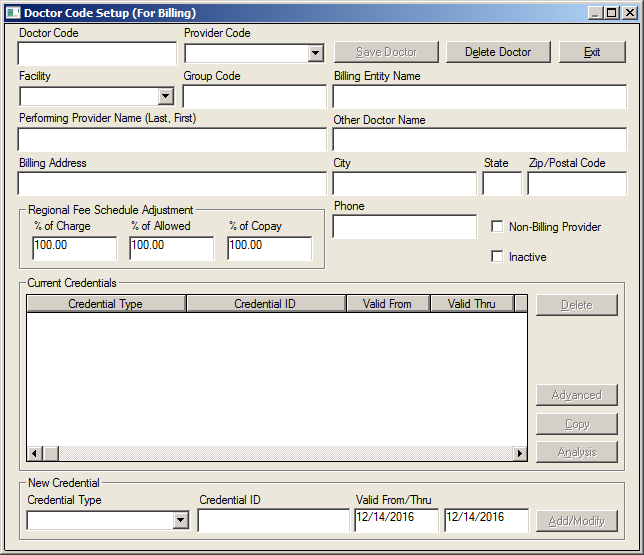
The Doctor Code is a unique code used to link a rendering provider to a billing entity. The Doctor Code table screen provides an area where physician-specific information required for billing insurance carriers is entered. It is also important to enter the provider’s appropriate credentials, or provider ID numbers, in this area. There are additional fields on this screen that enable users to enter in contact and fee schedule related information. These fields are outlined in the table located on the following page of this manual.
Before entering the setup table, it is important to determine what each Doctor Code should be. For consistency, it is recommended that each code should match the Provider Code for each provider, although this is not required. Additionally, the created Doctor Code can be seen by users in a variety of locations throughout the system, including the Weeks Provider View, Edit Charge screen, and the Collection Views.
-
Select 5 Doctor Codes from the Demographics Tables list under Preferences on the Main Menu screen.
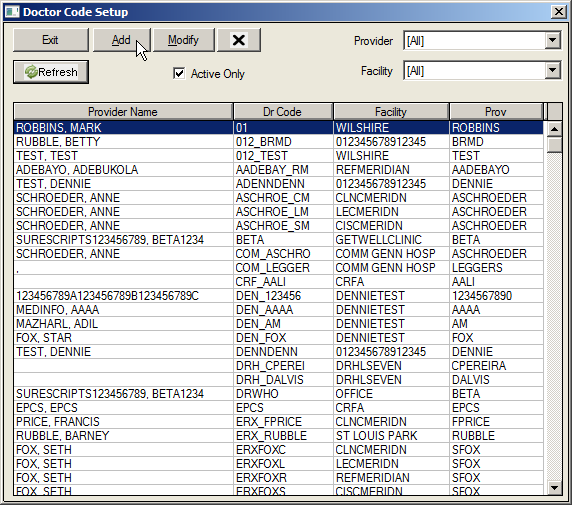
- Click on the Add button to open the Doctor Code Setup screen.
|
Field: |
Description: |
|
Doctor Code |
The code used to identify the rendering doctor at a billing entity. |
|
Provider Code |
The code used to refer to a particular physician or provider. |
|
Facility |
The Primary Facility for this provider. |
|
Group Code |
A code used to group multiple providers together for reporting purposes only. This field is typically only used in large multi-specialty clinics. It can be left blank. |
|
Billing Entity Name |
The name of the billing facility as registered with insurance payers. This is typically the name of the imaging center or clinic. This appears on Box 33 of a CMS 1500. |
|
Performing Provider Name |
The name of the billing provider entered Last Name, First Name. This appears in box 31 of a CMS 1500. Example: Robbins, Tim |
|
Other Doctor Name |
The name of the billing provider entered First Name, Middle Initial, Last Name. This field is used for inclusion on letters and documents. |
|
Billing Address |
The address of the billing facility. This is typically the address where insurance payments should be directed. This appears on Box 33 of a CMS 1500 |
|
City/State/Zip |
The City, State and Zip Code of the billing facility. This is typically the address where insurance payments should be directed. This appears on Box 33 of a CMS 1500 |
|
Regional Fee Schedule Adjust |
Percentages used to adjust the Charge, Allowed and Copay amounts for charges entered for this provider when using Regional Fee Schedules. This is a very rare need. These percentages should remain unchanged at 100%. |
|
Phone |
The phone number of the billing facility. This is typically the phone number for the billing office. This appears on Box 33 of a CMS 1500 |
|
Non-Billing Provider |
Check box to identify a provider (such as a Nurse Practitioner or Physician Assistant) who provides medical services, but is not credentialed for billing by the state or insurance carriers. Doctor Codes marked Non-Billing Providers will appear in the Rendering Prov – Internal Use drop-down in the charge entry screens. |
|
Inactive |
Check box to mark a provider inactive so the entry will not appear in drop down boxes for new charge entry. |
|
Current Credentials |
List of provider credentials and insurance identification numbers necessary for insurance billing. |
- Enter the code in the Doctor Code field.
- Using the dropdown arrow, choose the appropriate Provider Code.
- Using the dropdown arrow, choose the appropriate Facility.
- Enter the appointment group in the Group Code field, if needed.
- Enter the facility name in the Billing Entity Name field.
- Enter the billing provider name in Last Name Degree, First Name format in the Performing Provider Name field.
- Enter the Other Doctor Name in the Other Doctor Name field, if desired.
- Enter the address information in the appropriate fields.
Note: This information should be entered as it would appear in Box 31 & 33 on the CMS 1500 form.
- Leave the Regional Fee Schedule Adjustment fields unchanged at 100%.
- Click on the Save button and move to the New Credentials area of the screen to complete the fields as appropriate.
To Add A New Credential For A Provider
- In the Doctor Code Setup screen, select the Provider and Facility option using the dropdown arrows.
- Click on the Refresh button, which will populate the doctor’s matching criteria in the display area.
- Double-click on the desired Doctor Code to open the Doctor Code Setup screen.
- Navigate to the bottom of the screen and use the Credential Type dropdown to select the desired Credential Type.
- At the Credential ID field, enter the appropriate information.
- Click on the Add/Modify button to add the credential.
- Click on the Save Doctor button and then the Exit button to save the information.
Note: Valid From/Thru dates are for reference only. The default date is typically left in these fields.
To Modify An Existing Credential
-
In the Doctor Code Setup screen, select the Provider and Facility option using the dropdown arrows.
- Click on the Refresh button, which will populate the doctor’s matching criteria in the display area.
- Double-click on the desired Doctor Code to open the Doctor Code Setup screen.
- At the Credential ID field, enter the appropriate information.
- Click on the Add/Modify button to add the credential.
- Click on the Save Doctor button and then the Exit button to save the information.
To Copy An Existing Credential To Another Provider
- At the Doctor Codes Setup screen, select the doctor code with the ID to be copied to other providers.
- Click on the Copy button so that the Doctor Code Copy screen opens.
- From the list displayed, select only the credentials to be copied.
- Using the dropdown arrow, select the desired provider and facility to receive the credentials
- Using the right and left arrows move the appropriate providers from the Provider list to the Target List.
- Click on the Copy button so that the selected credentials appear under each of the targeted providers.
- Click on the Exit button.
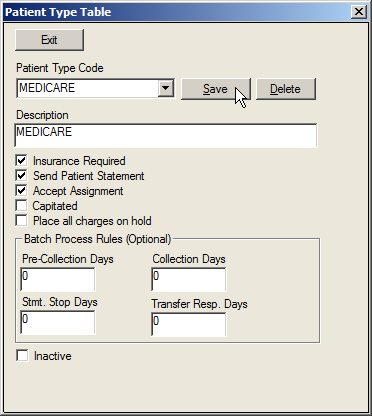
Patient Types
The Patient Types table establishes a patient categorization that is most commonly associated with the type of insurance coverage the patient has. For example, if a patient does not have insurance coverage and will be responsible for the claim, then CASH or SELF PAY would be selected in the Patient Type dropdown on the patient’s demographic file so that the system appropriately processes charges and payments for the patient’s account. The patient types created in this table are visible in the dropdowns on the Demographics, Insurance Carrier Entry, Dunning Message Setup Table, and Collection Views screens, as well as in columns on the Orders and Master List screens.
As in most setup tables, it is important to determine the appropriate codes before entering them into the table. An item may not be deleted after attaching; however, it can be marked as Inactive if it is no longer needed or was entered incorrectly. Once it is marked inactive, it will not be available in the system for selection but will still be available in the Edit Charge and Day Sheet screens for edit and review of older claims and charges.
The Batch Process Rules on the lower portion of the screen are not used by any standard process and are intended only for specialized use by customized SQL statements in customized batch SQL runs. Contact Technical Support for assistance with this portion of the screen.
- Select 6 Patient Types from the Demographic Tables list under Preferences on the Main Menu screen.
|
Patient Type Check Fields |
||
|
Field |
If Checked |
If Unchecked |
|
Insurance Required |
Charges will be submitted to insurance. |
Charges are posted and made patient’s responsibility when entered. |
|
Send Patient Statement |
System will send patient a statement. |
No statement will be sent. |
|
Accept Assignment |
Assignment accepted. Charges remain insurance responsibility. Should be checked for contracted payers. |
Assignment is not accepted. Charges are submitted to insurance but become patient’s responsibility when posted. Should be un-checked for un-contracted payers. |
|
Capitated |
Patient is capitated; Co-pay Per Visit functionality is enabled. (See Capitated Copays below. |
Patient is not capitated. |
|
Place All Charges On Hold |
Entered charges will be placed on hold and no claim will be generated until hold is removed. |
Charges are not placed on hold. |
|
Batch Process Rule |
|
|
Rule: |
Definition: |
|
Pre-Collection Day |
Number of days after patient responsibility date that line item will go to “Pre-Collection” mode. |
|
Collection Days |
Number of days after patient responsibility date that line item goes into “Collection Mode” |
|
Statement Stop Days |
Number of days after patient responsibility date that line item goes into “Collection Mode” |
|
Transfer Responsibility Days |
Number of Days past Billing Date that line items previously “Insurance Responsible” are automatically transferred to patient responsibility. |
- At the Patient Type Code field, use the dropdown arrow to select or simply enter the previously determined Patient Type Code.
Note: There is a limit of 10 characters for this field.
- Enter a brief description in the Description field.
- Check the boxes that apply to the patient type.
- Click on the Save button.
- Click on the Exit button.
Referral Sources
The Referral Source table establishes a list of referral sources a patient may present with, such as a referring doctor or non-physician referral. The information is designed and entered to allow for follow-up contact with the referral source. Additionally, the referral source can be viewed on the Demographics, Add/Edit Existing Authorization, Confirm Appointment, Edit Appointment Info, Master List, Delayed Billing, and Edit Episode screens
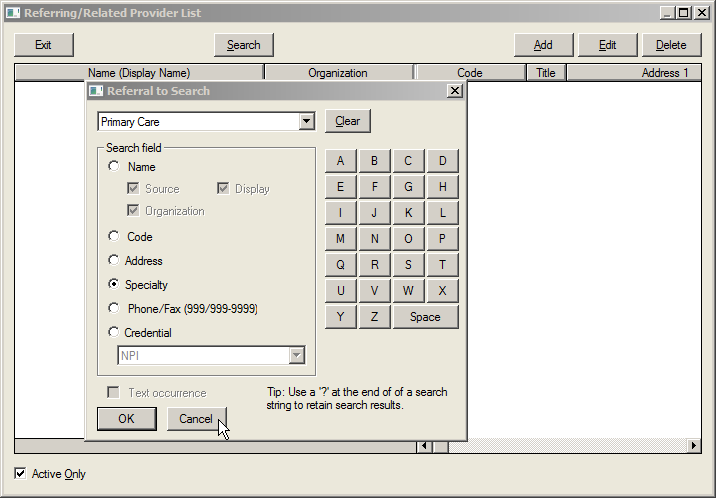
Upon entering the table, a Referral to Search screen appears, allowing the user to search for a previously defined referral entry. Simply close or Cancel this screen and click on the Add button to get to the Referral Source Entry screen. MedInformatix will automatically generate the actual referral code once all detail information has been entered into the table.
Additionally, the Referring/Related Provider List table can also be found in the Workflow View under the Setup menu option and Referrals.
-
Select 7 Referral Sources from the Demographic Tables list under Preferences on the Main Menu screen.
To Add A New Referral Source
- Click on the Cancel button to close the Referral to Search screen.
- Click on the Add button.
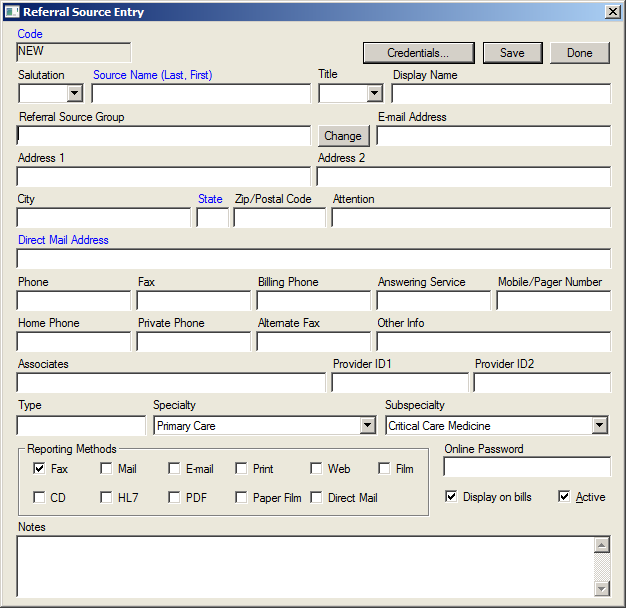
- At the Referral Source Entry screen, enter the Source Name, which must be entered Last Name, comma, space, and then First Name.
- Enter the appropriate prefix for the name in the Title field.
- Enter the appropriate Display Name, which should be formatted as First Name, Middle Initial, Last Name.
- Enter the Organization Name, address, and phone information in the appropriate fields.
- Enter the Attention, E-mail, Associates and Other Info fields as appropriate.
- Enter the UPIN# in Provider ID1 field.
- Enter the MEDICAID ID# in Provider ID2 field.
- Complete the Type (MD, DO, RN) and Specialty fields.
- Select the Reporting Methods as appropriate.
Note: This setting is used by the MedInformatix Print/Fax Server to determine how to deliver/route the signed diagnostic reports to the referring providers.
- Enter notes in the Notes field, as appropriate.
- Click on either the Display or Do Not Display options.
Note: Choosing Display indicates the referral source is a physician referral and will be listed on claims. Choosing Do Not Display indicates a non-physician referral that will not be printed on claims.
- Click on the Save button.
To Edit An Existing Referral Source
- Enter the desired search criteria in the search fields on the Referral to Search screen.
- Click on the OK button so that the matching referrals will be displayed in the list area.
- Choose the appropriate referral and click on the Edit button.
- Edit the fields as needed.
- Click on the Save button so that the table displays the updated information.
Referral Groups
The Referral Group function creates a list of organization names for grouping referral resources. The naming field is standardized, which facilitates the search function.
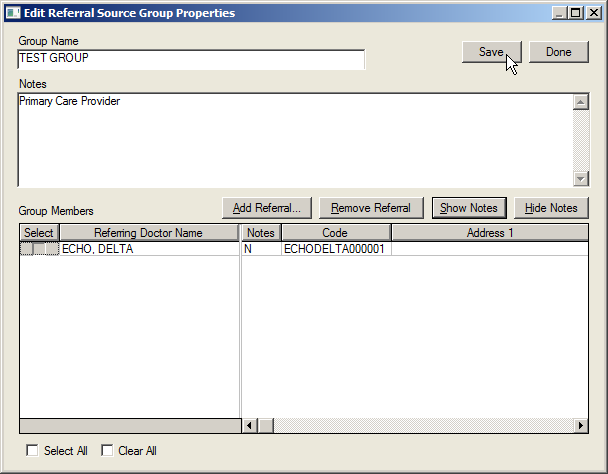
Additionally, a note can be associated with a group and that same note can be associated with referral resources in the group, rather than having to create the same note for each resource.
- Enter a name in the Name Search field.
- Click the Refresh button to show a list of Group Names.
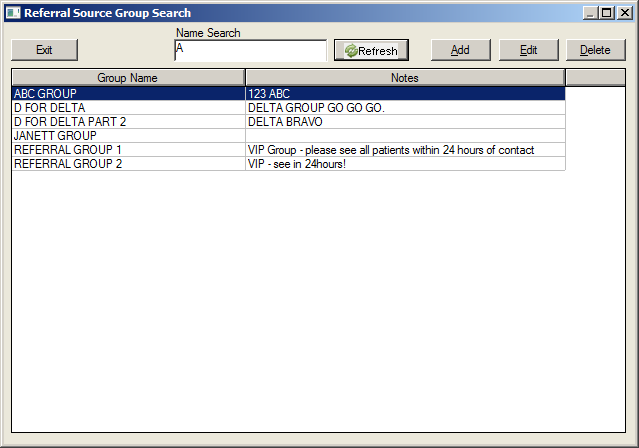
To Add a Referral Source Group:
- Enter the new Referral Source group name in the Name Search field.
Note: Entering "%" in the Name Search field and clicking the Refresh button will verify that the new group doesn't already exist.
- Click the Add button. The new group will appear in the Group Name list.
To Edit a Referral Source Group:
- Enter the name of the group into the Name Search field.
- Click the Edit button. The Edit Referral Source Group Properties screen will open.
- Enter any notes in the Notes field.
- Click the Show Notes button to show the notes.
- Click the Hide Notes button to hid the notes.
To Add a Referral:
- Click the Add Referral button to open the Referring/Related Provider List.
- Select the desired name from the Name field and click the Select button. The name will appear in the Group Members list.
To Delete a Referral:
- Click the Select checkbox or the Select All checkbox below the field to select the desired names.
- Click the Remove Referral button to delete the selected names.
Insurance Carriers
The Insurance Carriers table contains a list of insurance carriers stored in the MedInformatix system. This list is used to add insurance coverage to a patient’s record and can be accessed from the Demographics and Employer Entry screens. Furthermore, users will see a patient’s insurance carrier displayed in the Add/Edit Existing Authorization, Edit Episode, and Collection Views screens.
A search capability is added to this feature and, before adding a new carrier to the table, a search can (and should) be performed to prevent duplicate insurance carrier entries. It is possible to search not just by name, but by such parameters as Code, PO Box/Zipcode, Form, Phone/Fax) and Insurance Plan Type. Note that using a "?" at the end of a search string to retain the search results.
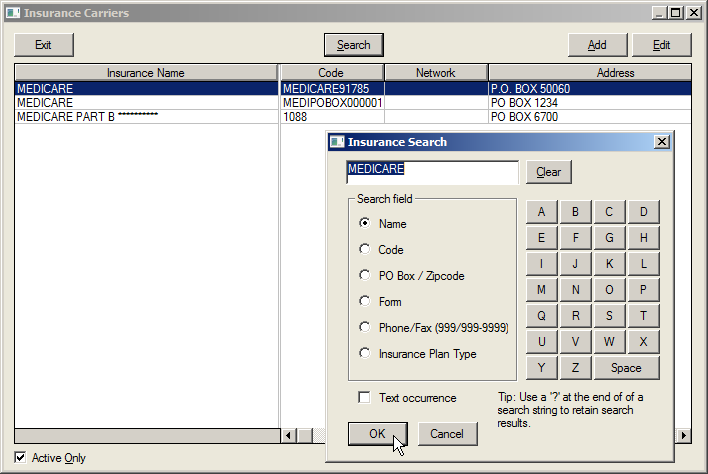
Once a carrier is selected or added, it can be further enhanced by adding an Insurance Plan Profile Setup for tracking Copays. The following sections outline the Insurance Carrier features.
|
Feature: |
Descriptions: |
||||||||||||||||||||||||||||||||||||||||
|
Insurance Code |
The system will automatically assign an insurance carrier code once the carrier name is added. |
||||||||||||||||||||||||||||||||||||||||
|
Ins Plan Type |
This field provides a list of payers (or plan types) who assign special ID numbers (credentials) to each provider. If a payer does not require an ID, select Standard. |
||||||||||||||||||||||||||||||||||||||||
|
Coverage Type |
Allows selection of the type of insurance. I.e. Health, Vision, Auto, etc. |
||||||||||||||||||||||||||||||||||||||||
|
Ins Carrier Name |
This field is used to record the name of the Insurance Carrier being added. |
||||||||||||||||||||||||||||||||||||||||
|
Payor Group Code |
Payor Group Codes are used to group multiple payers together, for example Aetna may be entered as an Insurance Carrier multiple times under different addresses. Assigning a Payor Group Code of “AETNA” to all of them will group them together for reporting and Batch Payment Entry purposes. |
||||||||||||||||||||||||||||||||||||||||
|
Network Contract |
For reporting purposes only. Used to record a network contract, if known. |
||||||||||||||||||||||||||||||||||||||||
|
Address fields |
These fields are used to record the address and contact information of the insurance carrier, which is where the claims will be mailed. |
||||||||||||||||||||||||||||||||||||||||
|
Valid From/Thru |
For information only. If valid from and through dates are unknown, leave these fields blank. |
||||||||||||||||||||||||||||||||||||||||
|
Plan Profiles |
Opens the Plan Copay Profile screen allowing copay information to be entered. |
||||||||||||||||||||||||||||||||||||||||
|
Phone Number Fields |
These fields are used to enter a variety of phone numbers for the plan, including claims phone and fax, benefits phone and prior auth phone and fax. |
||||||||||||||||||||||||||||||||||||||||
|
Attention |
This field is used to record a name, department, etc. where claim should be directed at the address entered above. |
||||||||||||||||||||||||||||||||||||||||
|
Email Address |
Used to record the Insurance Plan email address. |
||||||||||||||||||||||||||||||||||||||||
|
Form |
This field allows the entry of the standard form required by the carrier.
|
||||||||||||||||||||||||||||||||||||||||
|
EMC ID |
The Electronic Media Claims ID is entered here. This is typically a 5 or 9 digit number, often referred to as a Payer ID number that identifies payers that accept electronic claims. For information, please refer to your claims clearinghouse. |
||||||||||||||||||||||||||||||||||||||||
|
OCNA / COBA |
Other Carrier Name and Address (N-Key Id Number) or COBA ID (Coordination of Benefits Agreement ID). This is a five-digit number assigned by Medicare to “Medi-gap” secondary payers that accept electronic secondary claims from Medicare. Enter in the Medi-gap number here for claims that Medicare should automatically forward to the secondary payer electronically. NOTE: The system will NOT automatically bill secondary payers with an OCNA number when primary payments are entered. Enter “00000” in this field to suppress secondary billing to payers that Medicare will automatically forward secondary claim information. Contact Medicare for a list of Medi-gap and Crossover companies. |
||||||||||||||||||||||||||||||||||||||||
|
Patient Type |
Clicking this dropdown arrow allows the selection of a Patient Type. The Patient Type selected here will update the patient’s demographic screen when this payer is added as primary coverage, but will not update any existing charges. |
||||||||||||||||||||||||||||||||||||||||
|
Fee Type |
This dropdown arrow allows the selection of fee schedule that will be used for charges entered for this patient. A typical default is Standard. The Fee Type selected here will update the patient’s demographic screen when this payer is added as primary coverage. |
||||||||||||||||||||||||||||||||||||||||
|
CPT to Use |
The default of “1” is the typical selection. |
||||||||||||||||||||||||||||||||||||||||
|
Drug Type |
This field is used to identify a drug formulary for the carrier. If no type is identified, select Standard. The Drug Type selected here will update the patient’s demographic screen when this payer is added as primary coverage. |
||||||||||||||||||||||||||||||||||||||||
|
Drug Type |
This field is used to identify a drug formulary for the carrier. If no type is identified, select Standard. The Drug Type selected here will update the patient’s demographic screen when this payer is added as primary coverage. |
||||||||||||||||||||||||||||||||||||||||
|
Authorization Type |
This field is used to record required authorization. Appointments scheduled without required prior authorization can be viewed in the Workflow view under Views; Appts Needing Authorized. |
||||||||||||||||||||||||||||||||||||||||
|
Collection Class |
This dropdown records the Collection Class that is associated with the insurance carrier. The Collection Class is another grouping, similar to Patient Type, that users can utilize to link insurance carriers together and that can be used in the creation of Collection Queues. |
||||||||||||||||||||||||||||||||||||||||
|
Remittance Write-off Code |
This field enables users to attach an insurance carrier’s default Remittance Write-off Code so that when claims are submitted to the carrier and a remittance response is received the write-off code is automatically attached to the charge. |
||||||||||||||||||||||||||||||||||||||||
|
Other Info |
A free form field used to record any other pertinent information. There is a limit of 80 characters in this field. |
||||||||||||||||||||||||||||||||||||||||
|
Deny/Reason Codes |
This field enables users to attach payor provided deny/reason codes and link them to an appropriate ANSI code. Additional information regarding this feature is described in the Insurance Carrier Default Deny/Reason Code section of this manual. |
||||||||||||||||||||||||||||||||||||||||
|
Credentials |
This field enables users to enter in payor specific credential codes so that they are pulled onto claims for that insurance carrier. |
||||||||||||||||||||||||||||||||||||||||
|
Active |
Provides the ability to mark the plan as Active, or if no longer valid, Inactive. If marked as Inactive, the plan will not appear in an active search. |
||||||||||||||||||||||||||||||||||||||||
-
Select 8 Insurance Carriers from the Demographic Tables list under Preferences on the Main Menu screen.
-
Enter the search criteria on the search screen to rule out that the carrier does not already exist.
-
Click on the Ok button so that the search results are displayed.
-
Click on the Add button to open the Insurance Carrier Entry screen.
Note: The Insurance Code is automatically assigned by the system.
-
Select the appropriate Insurance Plan Type from the dropdown list.
-
Use the Coverage Type dropdown to select the appropriate coverage type.
-
Enter the carrier name and the Payor Group Code.
-
Select a Network Contract from the dropdown, if desired.
-
Enter the address and phone information in the appropriate fields.
-
Valid dates can be entered for informational purposes only, or left as defaulted.
-
Enter the appropriate information in the Form, EMC ID, and OCNA fields, if applicable.
-
Using the dropdown, choose the default Patient Type, Feetype and CPT fields for the Payer.
-
Choose the Drug and Authorization Types, if needed.
-
The Other Info field box should not be used.
-
Click on the Deny/Reason Codes screen to attach any payor specific deny/reason code, if needed.
-
Click on the Ok button to save the information.
To Edit An Existing Insurance Carrier
-
Select and enter the appropriate search criteria.
-
Click on the Ok button.
-
Select a carrier and click on the Edit button to open the Insurance Carrier Entry.
-
Make the appropriate changes in the necessary fields.
-
Click on the Ok button to save the changes made.
Employers
The Employers table is comprised of a list of employers in the community and their contact information. This is extremely helpful in sending claims or billing information to the appropriate company contact and/or address location. The information can also be accessed and used for letters or special reports and displays in the Demographics screen for those patients that have an employer attached to their account.
- Select 9 Employers from the Demographic Tables list under Preferences on the Main Menu screen so that the Employer List screen and the Search screen appear.
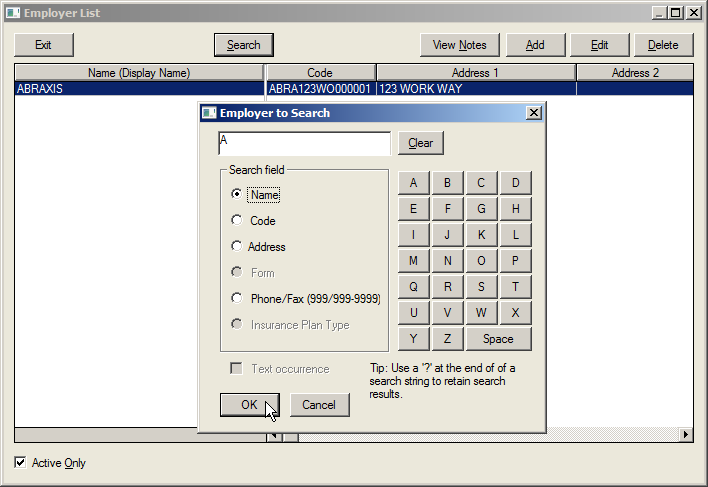
-
Click on Cancel to close the search screen.
-
At the Employer List screen, click on Add to open the Employer Entry screen.
-
Enter the Employer Name and Address in the appropriate fields.
-
If appropriate, move to the Insurance Carrier portion of the screen and enter the carrier information associated with the employer.
Note: This information will be used as the default insurance carrier if this employer is selected when adding insurance coverage to a patient’s demographic record.
-
Click on the Ok button so that the Employer Code is created and displays in the Employer List screen.
Network Contracts
The Network Contracts table is used to identify specific carrier contracts and links to the Insurance Setup tables. Network contracts are agreements with specific contractors who provide the physician’s office with contracts to one or more insurance providers. Once available, this information is selected on the Insurance Carrier setup screen, but is used primarily for reporting.
- Select A Network Contracts from the Demographic Tables list under Preferences on the Main Menu screen.
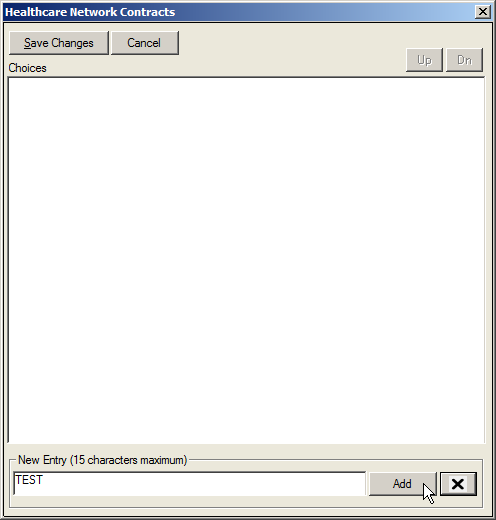
-
Enter the appropriate Network Contract in the New Entry field.
-
Click on the Add button.
Note: There is a limit of 15 characters for this field.
-
Repeat the process until all contracts are entered.
-
Click on the Save Changes button to save the data and close the screen.
Ins. Plan Types
The Insurance Plan Types table is used to link providers’ Credential Codes to one or more Insurance Payers. An Insurance Plan Type code must be created for each carrier that assigns unique group or provider numbers for each physician.
The ANSI Transaction Set and Plan Type Properties fields are not required to be completed at this time. These fields will be completed, if necessary, once claims are ready to be sent electronically and/or electronic remits are ready to be received. The ANSI Transaction Sets fields direct the system as to what format these items should be sent and/or received.
The Insurance Plan Type Properties are used when a payor requires a unique identifier to overwrite a standard identifier. For example, BlueCross may require a particular identifier for all claims. However, in a particular area those plan members who are participating in the BlueCross Family plan require a unique identifier, which is used to identify those Family Plan members when the claims are received.
- Select B Insurance Plan Types from the Demographic Tables list under Preferences on the Main Menu screen.
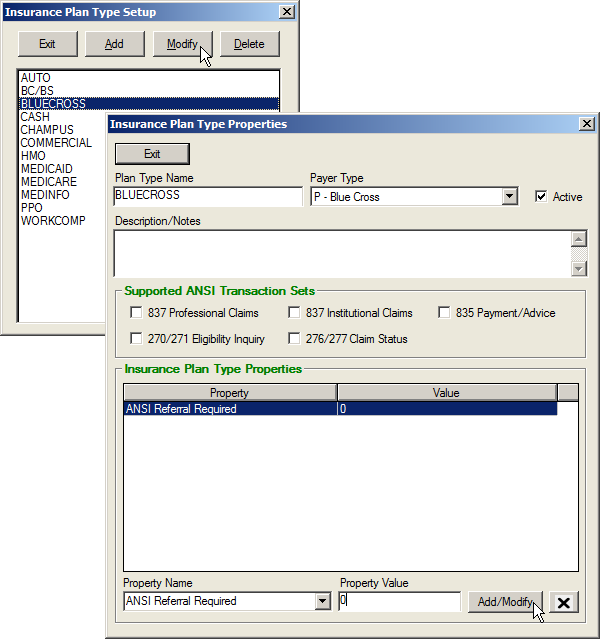
- Click on the Add button to open the Insurance Plan Type Properties screen.
- Enter the appropriate Insurance Plan Type name in the Insurance Plan Type Name field.
- Use the Payer Type dropdown arrow to select the appropriate payer type.
- Enter additional description and/or notes in the Description/Notes field.
- Select the appropriate Supported ANSI Transaction Set, if known.
- Select and enter appropriate Property Name and Property Value if needed and/or known.
- Once all Insurance Plan Types are added, click on the Exit button to close the screen and save the changes.
Credential Codes
The Credential Codes table enables users to enter the different types of credentials that will be entered into the system for the entered providers. For example, adding Medicare into the Credential Codes table allows users to select Medicare in the Credential Type field on the Credentials screen or the Doctor Code setup screen.
-
Select C Credential Codes from the Demographic Tables list under Preferences on the Main Menu screen.
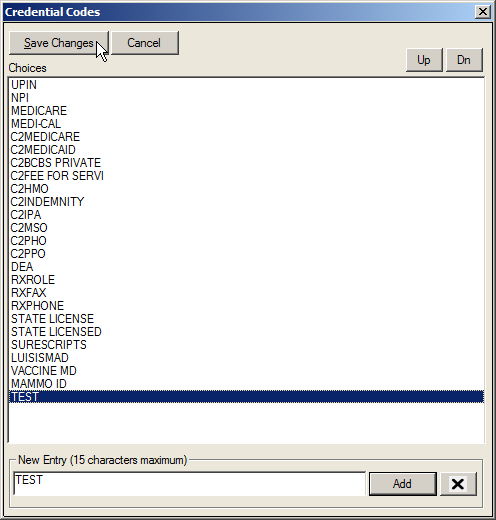
- At the New Entry field, enter the Credential Code.
- Click on the Add button.
- Click on the Save Changes button to save the information and close the screen.
Registration Sites
The Registration Sites table allows users to create a listing of registration doctors that are attached to patients’ demographic files. In the Demographics screen, the Registration Dr field will display the entries in this table and allows practices to record the physician a patient is normally seen by. If the Registration Sites table is left empty, the choices for Registration Dr in the Demographics screen are the Doctor Codes defined in the system. Or, if requested, the Registration Sites table can be configured to display an alternate list defined by a site. In a practice with multiple facilities or locations, the Registration Sites table can be used to indicate the facility or location where the patient is normally seen at.
- Select D Registration Sites from the Demographic Tables list under Preferences on the Main Menu screen.

- Enter the Site Code in the New Entry field.
Note: There is a limit of 10 characters for this field.
- Click on the Add button.
- Click on the Save Changes button to save the data and close the screen.
Appointment Alerts
Appointment Alerts allow the system administrator to warn the scheduler before scheduling certain appointments or patients. It also provides reminders to the operator so that certain questions can be asked of patients over the phone. The Appointment Alert is displayed for users after the Confirm Appointment screen is completed during the scheduling process. For example, if a carrier requires an authorization prior to evaluation, an alert can be defined and assigned to that patient type.
- Select G Appointment Alerts from the Demographic Tables list under Preferences on the Main Menu screen.

- Select a patient type from the Patient Type dropdown.
- Enter the alert message in the Add an Alert field.
- Click on the Add New Alert button so that the Query Wizard opens.
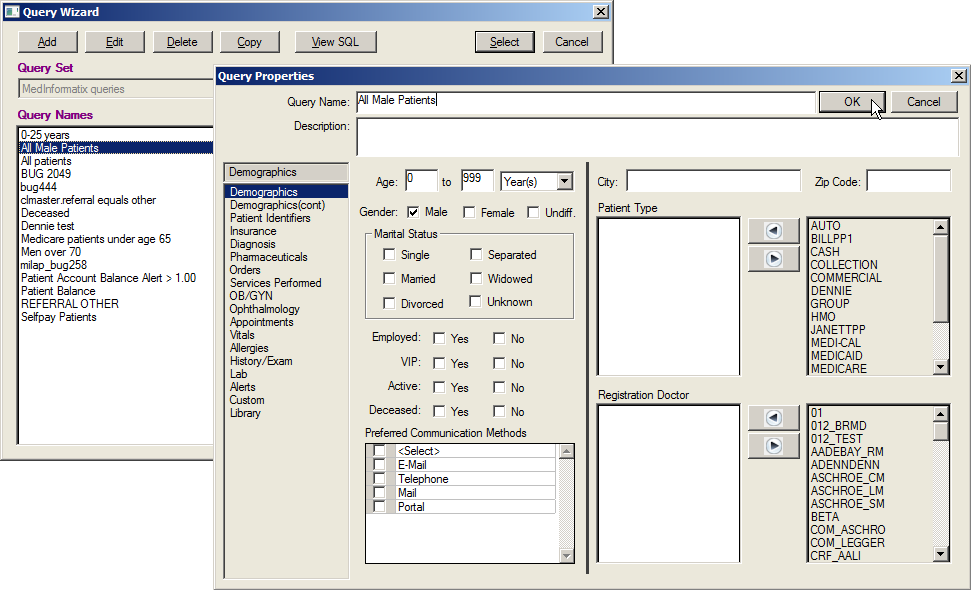
- Select a existing query, which acts as the alert criteria, from the list.
Note: If a existing query is selected, skip to step 10. If none of the existing queries contain the criteria needed for the new alert, a new query can be created.
- To create a new query, click the Add button to open the Query Properties screen.
- Enter the Query name and the Query Description.
- Click the appropriate category from the list of categories on the left side of the screen.
- At each category, select the information needed for the alert by entering where appropriate or clicking in the box next to the item.
- Once all selections are complete, click the OK button to return to the Query Wizard screen.
- Select the desired query.
- Click on the Select button, which launches the Appointments Alert Setup screen.
- Click on the Save Alerts button.
- Click on the Exit button once completed.
Tag Alerts
Tag Alerts allow the system administrator to warn the scheduler before tagging certain appointments or patients. It also provides reminders to the operator so that certain questions can be asked of patients over the phone. The Tag Alert is displayed for users after the Tag button is clicked. For example, if a carrier requires an authorization prior to evaluation, an alert can be defined and assigned to that patient type.
- Select H Tag Alerts from the Demographic Tables list under Preferences on the Main Menu screen.
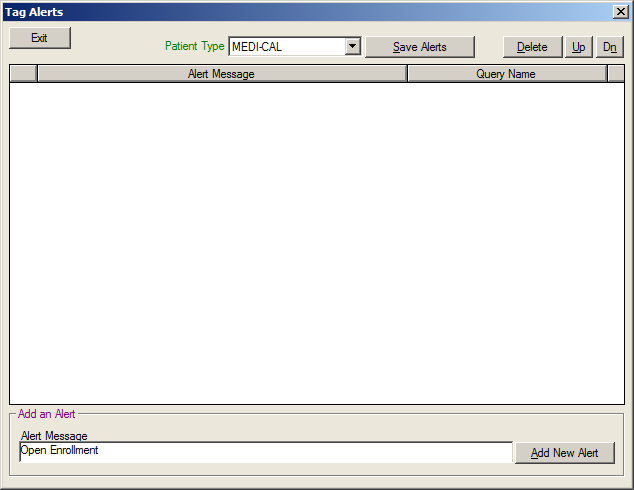
- Select a patient type from the Patient Type dropdown.
- Enter the alert message in the Add an Alert field.
- Click on the Add New Alert button so that the Query Wizard screen opens.
- Select a existing query, which acts as the alert criteria, from the list.
Note: If a existing query is selected, skip to step 10. If none of the existing queries contain the criteria needed for the new alert, a new query can be created.
- To create a new query, click the Add button to open the Query Properties screen.
- Enter the Query name and the Query Description.
- Click the appropriate category from the list of categories on the left side of the screen.
- At each category, select the information needed for the alert by entering where appropriate or clicking in the box next to the item.
- Once all selections are complete, click the OK button to return to the Query Wizard screen.
- Select the desired query.
- Click on the Select button, which launches the Appointments Alert Setup screen.
- Click on the Save Alerts button.
- Click on the Exit button once completed.
Collector Codes
The Collector Codes table allows the practice to create a list of internal or external Collectors that can be assigned to delinquent accounts. This information is selected from the Special Information screen in the patient’s demographic profile.
- Select G Collector Codes from the Demographic Tables list under Preferences on the Main Menu screen.

-
Enter the collector name in the New Entry field.
Note: There is a limit of 10 characters for this field.
- Click on the Add button
- Click on the Save Changes button to save the data and close the screen.
Collection Agency Codes
The Collection Agency Codes Table allows the practice to create a list of Collection Agencies they may interact with on a regular basis. This information is selected from the Special Information screen in the patient’s demographics.
-
Select H Collection Agency Codes from the Demographic Tables list under Preferences on the Main Menu screen.

-
Enter the collection agency in the New Entry field.
Note: There is a limit of 10 characters for this field.
-
Click on the Add button.
-
Click on the Save Changes button to save the data and close the screen.
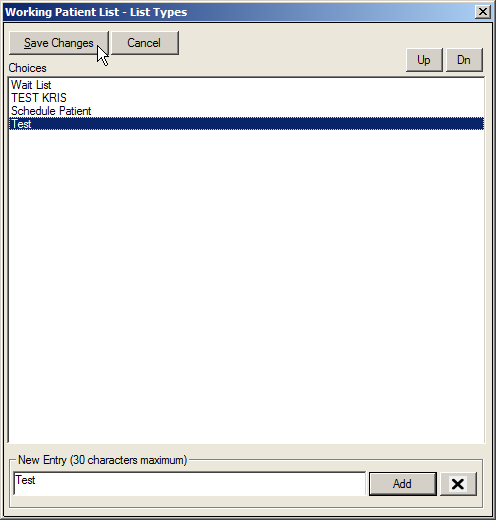
Working Pat. List Types
The Working Patient List is an option that allows each user or the practice to create a patient list that can be manually created or auto-populated based on a query. The list can be as simple as a ‘cancellation’ or ‘call back’ list or as detailed as a list of female patients over 40 who have not scheduled a mammogram in the past year. The Working Patient List Types table allows the user to enter the list options that appear in the List Type dropdown on the Working Patient List screen.
- Select I Working Pat List Types from the Demographic Tables list under Preferences on the Main Menu screen.
-
Enter the list type in the New Entry field.
Note: There is a limit of 30 characters for this field.
-
Click on the Add button.
-
Click on the Save Changes button to save the data and close the screen.
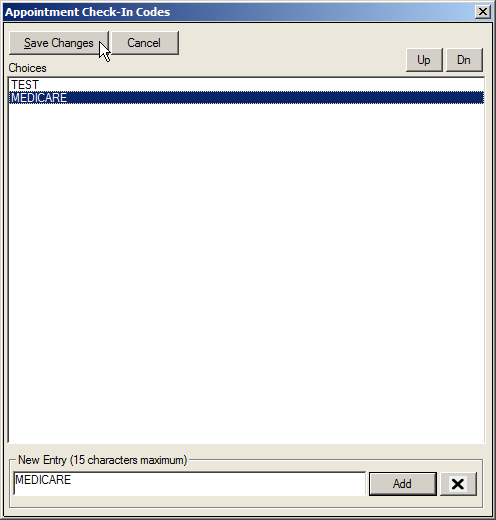
Check-Ins
The Check-Ins table allows the practice to create a list of Check-In areas assigned to a provider when creating the provider’s Book Code and that provides users in the Front Desk workgroup with the ability to filter appointments for the selected area. Each book code can be assigned only one Check-In Code. Therefore, a provider may not be assigned to more than one Check-In area at each facility. The Check-In Code is displayed in a dropdown filter on the Master List screen so that users can select to view appointments for a specific Check-In area.
-
Select J Check-Ins from the Demographic Tables list under Preferences on the Main Menu screen.
-
Enter the Appointment Check-In Code in the New Entry field.
Note: There is a limit of 15 characters for this field.
-
Click on the Add button
-
Click on Save Changes to save the data and close the screen.
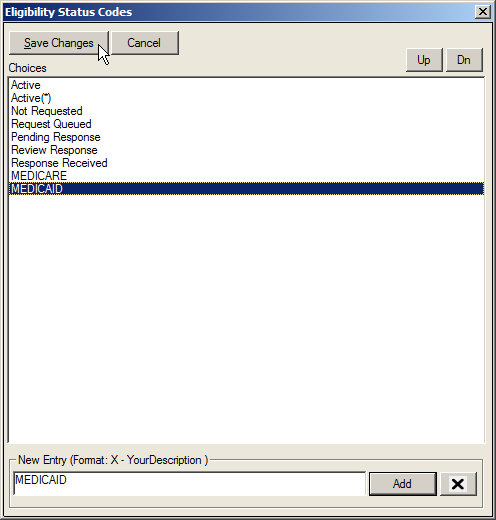
Eligibility Status Codes
The Eligibility Status Codes table enables users to create a listing of different insurance eligibility verification statuses that can be attached to a patient's insurance record. The entries made in this table will display in the Verification Status dropdown in the Patient's Insurance Information screen and are manually attached into the patient's record. Furthermore, the entries made in this table will display in the Eligibility dropdown on the Master Appointment List screen and the Eligibility Status dropdown on the Edit Info screen.
-
Select K Eligibility Status Codes from the Demographic Tables list under Preferences on the Main Menu screen.
-
Enter the Eligibility Status Code in the New Entry field
Note: entries should be formatted as CODE – Description.
-
Click on the Add button.
- Click on the Save Changes button to save the entered information.
Demographics Preferences
The Demographic Preferences table allows practices to modify the preferences and defaults on the Demographics screen. For example, if the Emergency Contact field should be completed by staff but is often missed, the administrator is able to make it a required field through the Demographic Preferences screen. Additionally, administrators are able to setup different Demographics Preference properties per workgroup by updating the workgroup specific configuration file associated with each workgroup..
The tables that follow outline the sections that can be modified in the Demographic Preferences screen, as well as a description of each option. It is important to note that in many cases, the default is “0” so that the feature is turned off. It is suggested that users contact the MedInformatix Technical Support for assistance with this feature.
Settings
|
Feature: |
Value: |
Comments |
|
Inactive Ins Valid To |
1= ON 0 = OFF |
When on, the Coverage Dates on the Patient’s Insurance Information screen become mandatory when changing the plan to Inactive. |
|
Address Mismatch Message |
1= ON 0 = OFF |
Provides an alert if a new patient is being added and the patient and guarantor's first and last name match, but the address and guarantor address do not. And, If an existing patient whose patient and guarantor address match is being modified and the addresses do not match when the account is being saved. |
|
Zipcode Lookup |
1= ON 0 = OFF |
When on, this setting will enable the automatic zip code lookup and fill in the correct city and state for the entered zip code. |
|
Zipcode Validation |
1= ON 0 = OFF |
When on, the Zip code validation is enabled. When enabled, checks to see if the zip code entered is less than 5-digits in length. Note: Zip Code field must be set as Required in order to enable this feature. |
|
County |
1= ON 0 = OFF |
When on, the Country field displays as County to allow users to capture patient’s county of residence. |
|
Dupcheck |
1= ON 0 = OFF |
When on, the duplicate patient search window is enabled. The following options control the duplicate patient search feature. The settings toggle the inclusion/exclusion of attributes as criteria to determine potential duplicates in the patient database when adding a new entry. The two length settings can be used for wildcard search capability on the First and Last names. The default settings will search for existing entries with matching Last name, Date of birth, and SSNO. Example: To check for entries with matching Last name, DOB, and First initial, the settings would be : [DUPCHECK] Fname=1 Fname length=1 Mname=0 Lname=1 Lname length=0 DOB=1 |
|
Restrict Employer |
1= ON 0 = OFF |
When set to one (1), prevents user from typing in an employer name in the main Demographics Screen and forces user to use the Change button |
|---|---|---|
|
Disable Save Button |
1= ON 0 = OFF |
When this is set to one (1), the Save button in the Demographics window will be disabled until the user makes a change. This will force users to use the Cancel button to leave the window. |
|
SMARTSAVE |
1= ON 0 = OFF |
This is a setting designed to minimize network traffic. It checks to see if any of the main demographic fields have changed before saving to the SQL tables or accessing the MPI. If no changes, pressing the Save button acts the same as Cancel button. |
|
Demographics Confirm Cancel |
1= ON 0 = OFF |
When set to one (1), provides a Confirm Cancel alert when user presses cancel on open Demographic screen |
|
Disable Copy Account Button |
1= ON 0 = OFF |
When this is set to one (1), the Copy button in the Demographics window will be disabled. |
|
MPIMRNO |
1= ON 0 = OFF |
When set to one (1), it sets the Medical Record Number equal to the MPI ID for a new patient. Note: This setting should not be combined with the MPIACCOUNT=1 setting |
|
MPIACCOUNT |
1= ON 0= OFF |
(Default=0) When set to one (1), it sets the Account Number equal to the MPI ID for a new patient. The Auto button will be disabled and the user will be unable to modify patient account numbers. Note: This setting is normally used in conjunction with MPIMRNO=1 |
|
MPIAACCOUNT use Prefix |
1= ON 0= OFF |
When set to one (1), the company account prefix will be appended as part of the MPI ID. Note: This setting is only to be used in conjunction with MPIACCOUNT=1. |
|
MPIMRNO Auto Button |
1= ON 0= OFF |
When set to one (1), the Auto button is enabled even when the MPIMRNO=1 option has been set. Note: This setting should not be combined with the MPIACCOUNT=1 setting. |
|
MRNOLZ
|
1= ON 0= OFF |
When set to one (1), the system will allow leading zeroes in Medical Record Numbers. |
|
MPI manual MPIID
|
1= ON 0= OFF |
When set to 1, allows the user to manually specify the MPI ID when manually adding a new MPI entry. When set to 0 (default), the MPI ID is automatically generated and not accessible to the user. |
|
MPI ignore Ptype |
1= ON 0= OFF |
When set to one (1), the Ptype field is ignored in the criteria to detect changes in MPI demographic information. This will also prevent the Ptype field from being updated when demographic information is updated company wide |
|
Auto Button First Name Focus |
1= ON 0= OFF |
When set to one (1), after using the Auto button to populate the medical record and account number, the user is directed to the First Name field rather than the Salutation field. |
|
Action Label
|
Enter label name |
One of five possible button labels that appear at the bottom of the Demographics screen. Enter a button description. |
|
Action |
Enter label action. |
Enter the action that is to occur when pressing the correlating Action Label. |
|
AutoFormatPhone |
1= ON 0= OFF |
Automatically adds slashes and dashes – so that phone numbers in the demographic screen are in the form XXX/XXX-XXXX; the user only types the numbers. |
|
AutoFormatSSNO |
1= ON 0= OFF |
Automatically adds dashes (-) so that the patients Social Security numbers appear in the demographic screen in the form XXX-XX-XXXX; the user only types the numbers. |
|
AutoFormatDate |
1= ON 0= OFF |
Automatically adds slashes / / so that DOB in the demographic screen displays in the form XX/XX/XXXX; the user only types the numbers. |
|
AutoInscode
|
1= ON 0= OFF |
Insurance codes can be automatically generated by the system, which is recommended since the insurance carrier is typically searched for by the plan name or PO Box. When set to (1), user will not be able to manually enter a code. |
|
AutoRefcode |
1= ON 0= OFF |
The Referral Code can be automatically generated by the system, which is recommended since the referral source is typically searched for by the referral’s name. When set to (1), user will not be able to manually enter a code. |
|
AutoEmpcode |
1= ON 0= OFF |
Employer codes can be automatically generated by the system, which is recommended since the Employer is typically searched for by the name. When set to (1), user will not be able to manually enter a code. |
|
AutoAttycode
|
1= ON 0= OFF |
Attorney codes can be automatically generated by the system, which is recommended since the Attorney is typically searched for by the name. When set to (1), user will not be able to manually enter a code. |
|
Medicare InsID Check
|
1= ON 0= OFF |
This setting will turn on or off the Insured ID validation for hard coded ptype values of MEDICARE" or "MEDIMEDI". It checks to make sure the Insured ID is ten (10) or eleven (11) characters in length for those ptypes. |
|
Referral Group Type
|
GRP |
This is actually an ANSI-related Dclaim Referral Sources setting. The ANSI spec requires that referral sources be differentiated as to whether the referral source is an individual Provider / person, or a group entity, such as a hospital. To facilitate this new requirement, A solution has been implemented using the TYPE entry field in the Referral Source Entry screen. The referral is always assumed to be an individual provider / person unless the TYPE field is filled in with a user-defined code. |
Defaults
|
Feature: |
Value: |
Comments |
| Sex | This setting affects the Sex Radio Buttons in the Demographics Screen. The possibilities for SEX are M, F. The field is typically left blank and when a required filed, forces user to make a selection rather than “tabbing” by it | |
| Country | This setting affects the Country field. The field is typically left blank, but can default to other entries such as USA. | |
| Phone | This setting affects the Home Phone and Daytime Phone Fields in the Demographics Screen. Often set to the area code, for example: Phone=310/. | |
| City | If Zip code lookup is turned on City should be left blank. This affects the City Field on the Demographics screen and can be populated to display a default city. (i.e. Columbus) | |
| State | If Zip code lookup is turned on State should be left blank. This Default setting affects the State Field in the Demographics Screen and can be populated to display a default State. (i.e. OH) | |
| SSNO | This setting affects the Social Security Number field. Default setting is blank, which when required, forces user to make entry. | |
| Marital | This setting affects the Marital Status field in the Demographics Screen. The possibilities for Marital are: U, Unknown, M, Married, S, Single, D, Divorced, X, Separated, and W, Widowed. | |
| Doctor | This setting affects the Registration Dr Field in the Demographics screen. Can be left blank, which forces the user to make a selection. | |
| Ptype | This setting affects the Ptype (Patient Type) field. Some common defaults are Cash, Self Pay, Medicare, and Medicaid. May be any Valid Ptype defined in the Login Screen under Preferences, Setup Demographic Tables, Patient Types. When required and default is set to UNKNOWN, user is forced to make a selection from the dropdown options. | |
| Feetype | STANDARD | This setting affects the Feetype Field in the Demographics screen and can be set to default to any Fee Type defined in the Login Screen under Preferences, Setup Billing Tables, Fee Types. |
| Drugtype | STANDARD | This setting affects the Drug Type field in the Demographics screen and typically defaults to 'U' for unknown. May be set to any valid formulary defined in the Login Screen under Preferences, Setup Clinical Tables, Drug Formulary Types. |
| Patient is Guarantor | 1=Yes 2=No | Setting affects the Same As Patient field in the Guarantor section of the Demographic screen. Zero (0) removes the check and one (1) inserts the check in the Patient is Guarantor check block. |
| Patient Active | 1=Yes 2=No | Setting affects the Active field on the Demographic screen. Zero (0) removes the check and one (1) inserts the check in the Active check block. |
| Collstatus | Y | The Possibilities for Collstatus are Y and N |
| Sigonfile | Y | Setting affects the Billing Flag of Sign On File on the Demographic screen. A variety of options: Y, N, B, C, S, M, or P. B= Signed signature authorization forms for both block 12 and block 13 are on file, C= Signed CMS Claim Form on file, S= Signed signature authorization for block 12 on file, M= Signed Signature for block 13 on file., and P= Signature generated by provider because the patient not physically present for services. |
| Statement Cycle | Setting affects the Billing Flag of Statement Cycle on the Demographic screen. Usually set to one (1) however zero (0) can be used if no statements are to be sent or if Statement Cycles are not used. | |
| Student | Setting affects the Billing Flag of Student Status on the Demographic screen. N=No, F=Full Time, P=Part Time | |
| VIP | Setting determines if VIP patient status is enabled, which warns user when they enter the patient chart. Y=Yes or N=No | |
| Employment | Setting affects the Billing Flag of Statement Cycle on the Demographic screen. The possibilities are F, Full Time, P, Part Time, U, Unemployed, and R, Retired. | |
| Accept Assignment | Y=Yes or N=No | Setting affects the Billing Flag of Accept Assign on the Demographic screen. |
| Finance | Y=Yes or N=No | Setting affects the Billing Flag of Finance on the Demographic screen. |
| Release of Information | Y=Yes or N=No | Setting affects the Billing Flag of Release Of Info on the Demographic screen. |
| Delinquency Flag | Setting affects the Billing Flag of Delinquency on the Demographic screen. Can be set to any setting defined in the Main Menu screen under Preferences, Billing Tables, Denial Codes. | |
| Medicare Status | Setting affects the Billing Flag of Medicare Status on the Demographic screen. Currently not used. | |
| Patient Relation | Setting affects the Patient Relation field on the Insured Information field of the Patient’s Insurance screen. The possibilities are 1-Self, 2-Spouse, 3-Child, and 4-Other. | |
| Referral Active | 1=Yes 2=No | Setting affects the active checkbox on the Referral Source Entry Screen. One (1) inserts a check and zero (0) removes a check. |
| Insurance Active | 1=Yes 2=No | Setting affects the active checkbox on the Insurance Carrier Entry Screen. One (1) inserts a check and zero (0) removes a check. |
Required
|
Feature: |
Value: |
Comments |
|
Salutation |
1= Req 0= OFF |
When set to one (1), the Salutation field becomes a mandatory field and must be completed prior to saving the demographic. |
|
Nickname |
1= Req 0= OFF |
When set to one (1), the Nickname field becomes a mandatory field and must be completed prior to saving the demographic |
|
Address |
1= Req 0= OFF |
When set to one (1), the Patient Street Address field becomes a mandatory field and must be completed prior to saving the demographic |
|
City |
1= Req 0= OFF |
When set to one (1), the City field becomes a mandatory field and must be completed prior to saving the demographic |
|
State |
1= Req 0= OFF |
When set to one (1), the State field becomes a mandatory field and must be completed prior to saving the demographic. |
|
Zipcode |
1= Req 0= OFF |
When set to one (1), the Zip Code field becomes a mandatory field and must be completed prior to saving the demographic |
|
Country |
1= Req 0= OFF |
When set to one (1), the Country field becomes a mandatory field and must be completed prior to saving the demographic |
|
County |
1= Req 0= OFF |
When set to one (1), the County field becomes a mandatory field and must be completed prior to saving the demographic |
|
Homephone |
1= Req 0= OFF |
When set to one (1), the Home Phone field becomes a mandatory field and must be completed prior to saving the demographic |
|
Workphone |
1= Req 0= OFF |
When set to one (1), the Work Phone field becomes a mandatory field and must be completed prior to saving the demographic. |
|
SSNO |
1= Req 0= OFF |
When set to one (1), the Social Sec Number field becomes a mandatory field and must be completed prior to saving the demographic. |
|
PID |
1= Req 0= OFF |
When set to one (1), the Other Patient ID field becomes a mandatory field and must be completed prior to saving the demographic. |
|
|
1= Req 0= OFF |
When set to one (1), the E-Mail Address field becomes a mandatory field and must be completed prior to saving the demographic |
|
GAdress |
1= Req 0= OFF |
When set to one (1), the Guarantor Address field becomes a mandatory field and must be completed prior to saving the demographic. |
|
GCity |
1= Req 0= OFF |
When set to one (1), the Guarantor City field becomes a mandatory field and must be completed prior to saving the demographic. |
|
GState |
1= Req 0= OFF |
When set to one (1), the Guarantor State field becomes a mandatory field and must be completed prior to saving the demographic |
|
GZipcode |
1= Req 0= OFF |
When set to one (1), the Guarantor Zipcode field becomes a mandatory field and must be completed prior to saving the demographic. |
|
GSSNO |
1= Req 0= OFF |
When set to one (1), the Guarantor Social Sec Number field becomes a mandatory field and must be completed prior to saving the demographic |
|
Referral |
1= Req 0= OFF |
When set to one (1), the Current Referral Source field becomes a mandatory field and must be completed prior to saving the demographic. |
|
Employer |
1= Req 0= OFF |
When set to one (1), the Patient Employer field becomes a mandatory field and must be completed prior to saving the demographic. |
|
Legal Rep |
1= Req 0= OFF |
When set to one (1), the Legal Representative field becomes a mandatory field and must be completed prior to saving the demographic. |
|
Emergency Contact |
1= Req 0= OFF |
When set to one (1), the Emergency Contact field becomes a mandatory field and must be completed prior to saving the demographic. |
|
Emergency Phone |
1= Req 0= OFF |
When set to one (1), the Emergency Phone field becomes a mandatory field and must be completed prior to saving the demographic. |
|
Ethnic |
1= Req 0= OFF |
When set to one (1), the Race/Ethnic Group field becomes a mandatory field and must be completed prior to saving the demographic. |
|
Language |
1= Req 0= OFF |
When set to one (1), the Language field becomes a mandatory field and must be completed prior to saving the demographic. |
|
Collector |
1= Req 0= OFF |
When set to one (1), the Collector field becomes a mandatory field and must be completed prior to saving the demographic. |
|
Coll Agency |
1= Req 0= OFF |
When set to one (1), the Collection Agency field becomes a mandatory field and must be completed prior to saving the demographic. |
|
InsEmployer |
1= Req 0= OFF |
When set to one (1), the Employer field on the Patient’s Insurance Information screen becomes a mandatory field and must be completed prior to saving the demographic. |
|
InsAddress |
1= Req 0= OFF |
When set to one (1), the Insured Information Address field on the Patient’s Insurance Information screen becomes a mandatory field and must be completed prior to saving the demographic. |
|
InsCity |
1= Req 0= OFF |
When set to one (1), the Insured Information City field on the Patient’s Insurance Information screen becomes a mandatory field and must be completed prior to saving the demographic. |
|
InsState |
1= Req 0= OFF |
When set to one (1), the Insured Information State field on the Patient’s Insurance Information screen becomes a mandatory field and must be completed prior to saving the demographic. |
|
InsZipcode |
1= Req 0= OFF |
When set to one (1), the Insured Information Zip Code field on the Patient’s Insurance Information screen becomes a mandatory field and must be completed prior to saving the demographic |
|
InsPhone |
1= Req 0= OFF |
When set to one (1), the Insured Information Phone field on the Patient’s Insurance Information screen becomes a mandatory field and must be completed prior to saving the demographic |
|
InsGroup |
1= Req 0= OFF |
When set to one (1), the Insured Information Insured Group field on the Patient’s Insurance Information screen becomes a mandatory field and must be completed prior to saving the demographic. |
|
InsSpecial |
1= Req 0= OFF |
When set to one (1), the Special Information field on the Patient’s Insurance Information screen becomes a mandatory field and must be completed prior to saving the demographic. |
|
InsPlan |
1= Req 0= OFF |
When set to one (1), the copay (Set Plan Profile) field on the Patient’s Insurance Information screen becomes a mandatory field and must be completed prior to saving the demographic |
|
InsAdjustor |
1= Req 0= OFF |
When set to one (1), the Claim Adjustor field on the Patient’s Insurance Information screen becomes a mandatory field and must be completed prior to saving the demographic. |
|
InsAdjPhone |
1= Req 0= OFF |
When set to one (1), the Claim Adjustor Phone field on the Patient’s Insurance Information screen becomes a mandatory field and must be completed prior to saving the demographic. |
|
InsValidFrom/To |
1= Req 0= OFF |
When set to one (1), the Coverage Period fields on the Patient’s Insurance Information screen become mandatory and must be completed prior to saving the demographic. |
DupCheck
|
Feature: |
Value: |
Comments |
|
Fname |
1= On 0= OFF |
When set to (1), the system will search for matching (duplicate) First Names |
|
Fname length |
1= On 0= OFF |
When set to (1), the length setting can be used for wildcard search capability on the First name. |
|
Mname |
1= On 0= OFF |
When set to (1), the system will search for matching (duplicate) Middle Names |
|
Lname |
1= On 0= OFF |
When set to (1), the system will search for matching (duplicate) Last Names |
|
Lname length |
1= On 0= OFF |
When set to (1), the length setting can be used for wildcard search capability on the Last name |
|
DOB |
1= On 0= OFF |
When set to (1), the system will search for matching (duplicate) Dates of Birth. |
|
SSNO |
1= On 0= OFF |
When set to (1), the system will search for matching (duplicate) Social Security Numbers. |
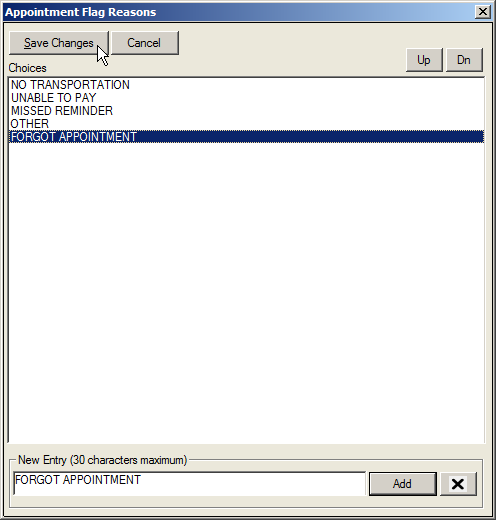
Appointment Flag Reasons
In some cases, appointments will not be kept because of cancellations, or missed appointments. The cancellation may be at the request of the patient or at the provider’s request. These appointments can be flagged to indicate to the system that they are no longer active while documenting the reason why. The common reasons for missed or cancelled appointments can be set in the Appointment Flag Reasons table.
- Select O Appointment Flag Reasons from the Demographic Tables list under Preferences on the Main Menu screen.
-
Enter the Appointment Flag Reason in the New Entry field.
Note: There is a limit of 30 characters for this field.
-
Click on the Add button
-
Click on Save Changes to save the data and close the screen.
Create/Modify Forms
The Create/Modify Forms option provides users with the ability to directly edit the letter templates used to create merge letters in the Workflow View. Additionally, formatting can be added to a new or existing letter by right-clicking in the document and using the Format Menu. Prior to using the Create/Modify Forms table, it is important to contact the system administrator or reseller for technical assistance.
- Select N Create/Modify Forms from the Demographic Tables list under Preferences on the Main Menu screen.
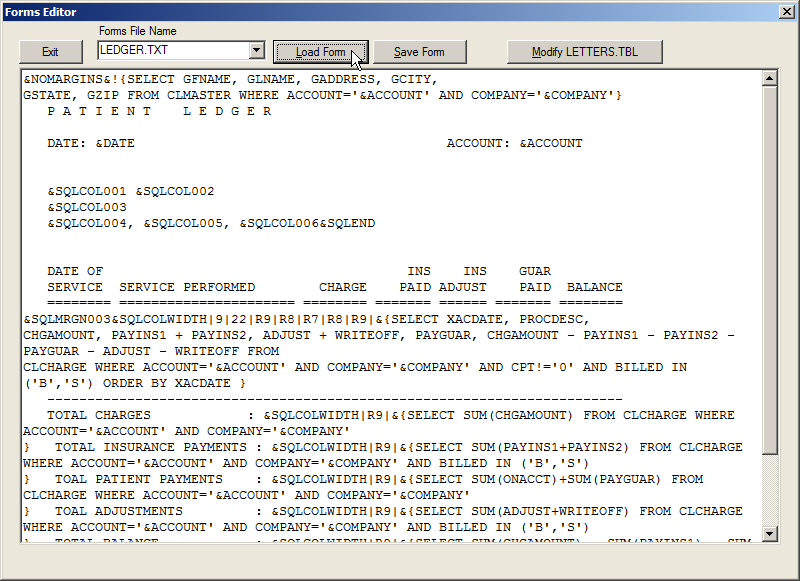
-
Select the Forms File Name from the dropdown list.
-
Click the Load Form button.
-
Edit the form as necessary and click the Save Form button.
-
Click the Modify LETTERS.TBL button to open the Letters Table.
-
Note: in the window, the letters list can be directly modified. New letters can be added to the list, unused letters can be deleted, and existing letters in the list can be modified.
-
Click the Save button to save the data and close the screen.
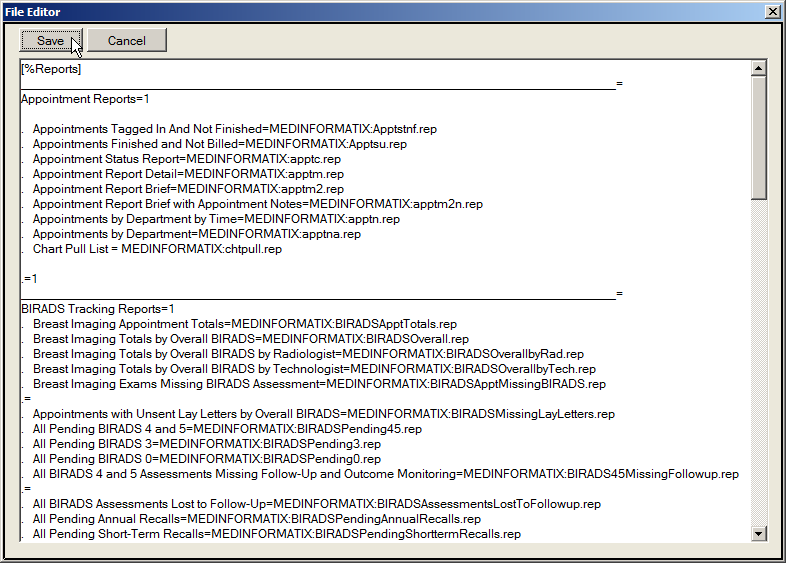
Reports List
The Reports List table provides users with the ability to directly edit the list of Reports available for users to run from the Reports menu in Workflow View. Prior to using the Reports List table, it is important to contact the system administrator or reseller for technical assistance.