Technologist
Once the front office has completed registration and tagged the patient Ready for Service, the technologist then escorts the patient back for their exam.
The Technologist has his/her own branch in the Decision Tree. Workflow differs from center to center, but generally the Technologist is responsible for the following interaction with the system.
Procedure Worksheet / Work Ups
- From the Technologist branch in the Decision Tree, the Technologist can review the scanned copy of the prescription/order/referral for the exam received from the referring provider.
The Technologist documents any allergies and completes any screening forms or work-ups for the patient.
- After completing the procedure, the Technologist selects the branch to Finalize the Appointment. This sends an order to the Radiologist to read the images. When the Technologist Finalizes the appointment he or she can select a different exam code or diagnosis if the performed exam was different than the scheduled exam. A change of diagnosis will update the authorization created for this appointment. Finalizing the Appointment also marks the appointment as Finished on the Master List screen.
- Depending on the facility, some technologists manually bill charges (via the Bill button or branch selection) for contrast and other miscellaneous items that cannot be included in the Billing Profile for the exam.
Working with Preps and QA Forms
When a user clicks on the answer field or pencil tool of the desired Question, a Select From list appears that allows the selection or entry of an answer(s). The type of prompt that appears depends on how the QA is set up. By default, the standard user prompt for entry is the Choice Box, which is the most complex and is discussed below. Other data entry styles are self-explanatory and include:
Date Keypad
Numeric Keypad
Phone Numeric Keypad
Yes/No buttons
Time Keypad
The QA window includes a “Normals” button option for the user. Clicking on this button will cause preset entries to be created as defaults.
The View Text button is used to view the responses to the QA in an actual boilerplate format. Thus, the View Text button is actually used to display the contents of a boilerplate after being processed by the Document Interpreter.
![]()
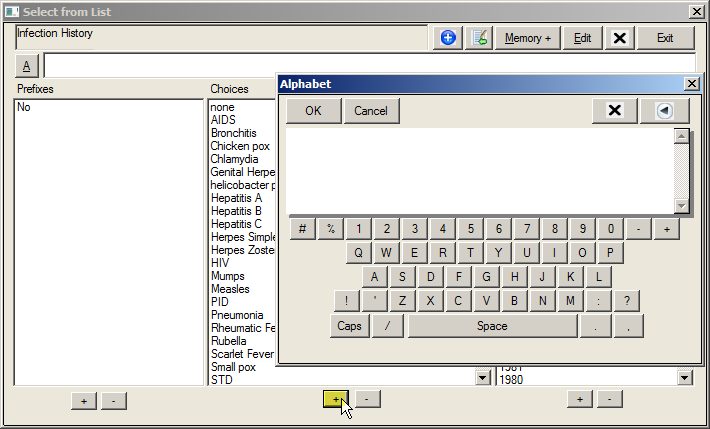
Choice Box
A Choice Box as shown above allows the user to make multiple selections. Each value selected from the Choices list will be stored as a separate entry in the database.
CHOICE BOX SCREEN FEATURES |
|
Field/Button |
Description |
Select From List button |
Allows the user to add, modify and remove items from the QA form. The following is a brief description of each button. Steps on using these options are outlined below. |
Add button (+/-) |
The user is also able to insert an additional choice(s) to existing text in a QA Form choice. Once in the Select from List screen, this is done by selecting the desired choices and then the “^” symbol. The existing entry will be appended with the new selections. For example, to add fatigue to the item above, open the choice and select:
These options present “Mild weight gain; Recurrent body aches; Mild fatigue” on the QA form. |
Add To button (^/-) |
Allows the user to select and add items to the previously selected choices for the item. |
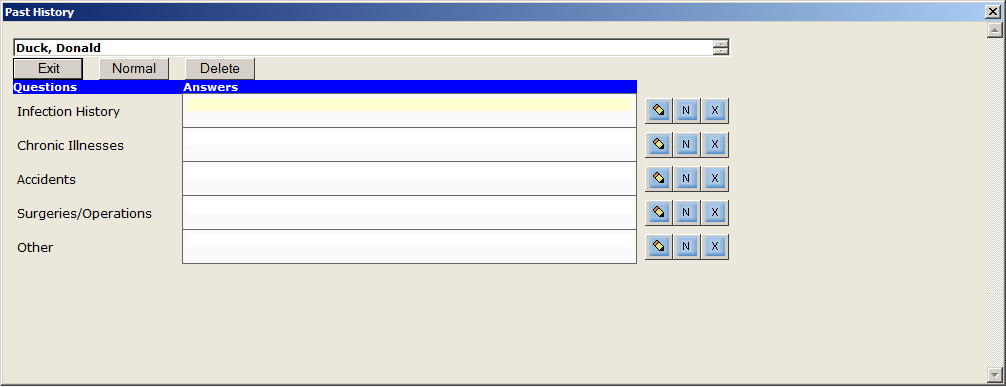
Edit |
Clicking this button will display all existing choices in a list and gives the user the option to delete individual items, edit the text, or bring up the choice box again for additions or insertions. This saves keystrokes when changing entries in a QA form, particularly in Past History. |
Memory button (+/-) |
|
Delete button (X) |
The user is able to delete the existing contents of the answer. |
Exit |
Saves the selected choices and closes the screen. |
Free Form Text field |
entered on the QA form by using the free text field located above the Choice Box on the Select from List screen. Text is entered directly into the field or can be entered using the Alphabet screen by clicking on the “A” button. A free form text entry is equivalent to making another choice from the choice list and will be added as a separate entry in the database. If adding text to previous selections, remember to use the “^” button. It should also be noted that the free text field has a limit of 255 characters. |
List Boxes/+ Add button |
The Prefixes and Suffixes list boxes, located on the left and right sides of the screen are the “adjectives” and are used to modify the text of the main choices. Items selected from the “Prefixes” box will be added as prefixes to the choices while items selected from the “Suffixes” box will be appended to the choices. When multiple adjectives are selected from either the prefixes or suffixes list boxes, the adjectives will be applied to each of the main choices and will be presented in the exact order these appear in the list boxes. For example, select:
These options present “Denies weight gain” on the QA form. This process is repeated for subsequent choices. |
To Enter Answers In a QA Form
- At the question you wish to answer, click on the Pencil button. A Yes/No, Number, Date or List screen opens.
- If Yes/No, click the appropriate response. The screen will close and the selected answer is populated in the field.
- If Number, select or enter the appropriate number (typically of days, months or years) in which the item should occur and then click OK. The screen will close and the selected answer is populated in the field.
- If Date, click on or enter the appropriate date and click OK. The screen will close and the date is populated in the selected field.
- If Select from List, select words from the Prefixes, Choices and Suffixes columns.
- Or type the answers that that best describe the patients responses or your findings directly in the text field.
- Click the “+” button to save the new answers.
- Click the Exit button to close the “Select From List” screen without saving the selections.
Adding Additional Answers To A Saved QA Form
- At the question you wish to add another answer, click the Pencil button.
- Click the desired choices and then click on the “^” button. The additional items are now displayed in the answer field. (Memory+ button allows for multiple selections to be made.)
Adding Additional Answers To A Saved QA Form
- To view the text created for the responses currently selected, use the following steps:
- Click the View Text button. The selected answers are displayed in a document format.
- Click the Exit button to close the View Text screen.
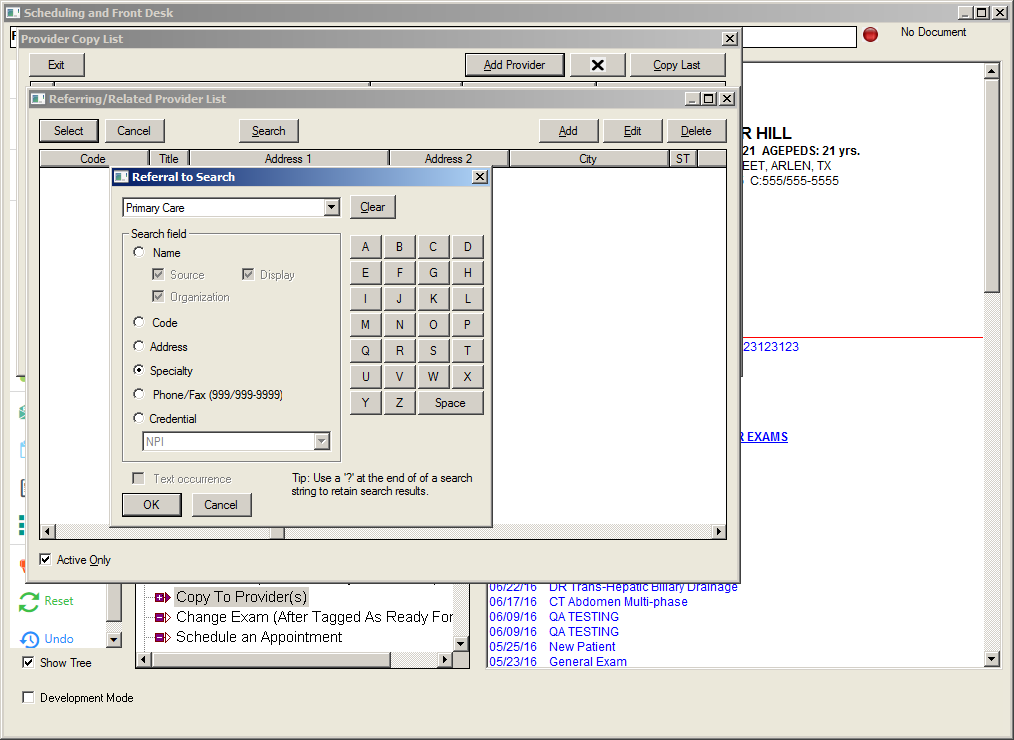
Adding A Provider To Receive A Report Copy
If additional medical providers need to receive a copy of a patient’s diagnostic report for the exam, those providers need to be added via the patient’s electronic medical record onto the Provider Copy List screen. The steps to add an additional provider to the Copy To list are below.
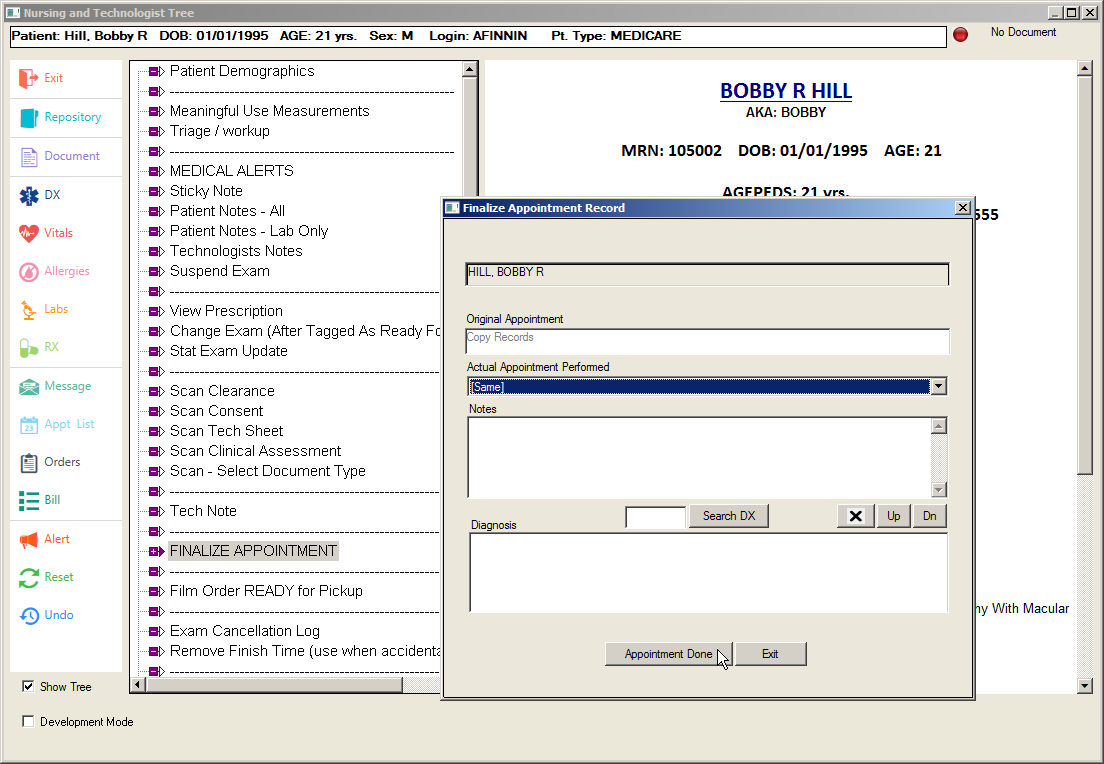
To Finalize An Appointment
Once an exam has been completed, Technologists are responsible for marking the exam as finalized in the system. This is a vital step in the Technologists’ workflow since a patient will not appear on the Radiologists’ worklist for image review and dictation until their exam is marked as completed in the system. To mark an appointment as finalized, users will utilize the available Finalize Exam branches in the Technologist Decision Tree screen. Additional steps for this process are listed below.
While in either the Master Appointment List screen or the Appointment List screen, locate the appropriate appointment for the patient.
Click the patient’s name so that it is highlighted.
Click the Chart button to enter into the Decision Tree screen.
Locate the appropriate Finalize Exam branch in the Technologist Decision Tree screen, which will launch the Finalize Appointment Record screen.
Make an appropriate selection from the Actual Appointment Performed dropdown, if appropriate.
Click the Search DX button to search for and attach diagnosis codes for the appointment, if applicable.
Click the Appointment Done button, which will close the Finalize Appointment Record screen and return users to the Technologist Decision Tree screen