SQL Questionnaire
SQL Questionnaires are advanced data entry forms that allow direct access to existing or custom SQL Tables. You must know SQL very well to make SQL Questionnaires. Using this feature, data entry screens can be quickly generated without requiring any programming. It also presents a consistent interface throughout the Decision Tree.
SQL Questionnaires also have the advantage of being designed for one-to-one tables as well as more complex one-to-many tables. This capability almost entirely eliminates the need for programming data entry screens using another programming language such as Visual Basic.
Difference Between QA Forms and SQL Questionnaire
QA Forms |
SQL Questionnaires |
| QA’s allow design of forms without direct database access | Questionnaires require direct access to the database |
| QA’s access one SQL table only (CLDICTIONARY) | Questionnaires can access any table |
| QA’s restrict data to text of up to 255 characters with multiple occurrences | Questionnaires can store data in any format that the SQL table allows |
| Design of QA’s require no special knowledge | Design of Questionnaires requires strong knowledge of SQL. |
| QA Forms use up more space in database than Questionnaires | Questionnaires allow better control over SQL data queries later. |
Two Versions of SQL Questionnaires
One to One Tables:
There are two versions of SQL Questionnaires available. The version used for simpler one-to-one tables (one row per patient) has an action property of:
#QUESTIONNAIRE:QuestionnaireName
This version of the SQL Questionnaire is very easy to build since the only SQL knowledge required is to know how to create a SQL table. Built-in “Wizards” do almost all the work.
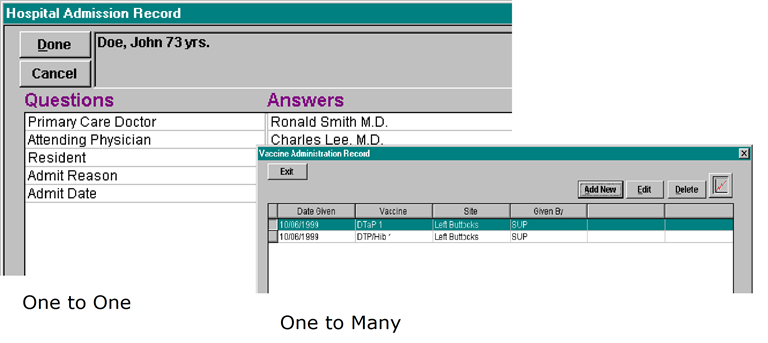
One to Many Tables:
The more complex version used for one-to-many tables (multiple rows of data per patient) has an action property of #KEYVIEW. This type of SQL Questionnaire requires a person experienced in SQL to modify SQL scripts created by the wizard. The wizards do most of the tedious work, but the SQL expert needs to tie the relationships (primary keys) between the multiple records that will be created for each patient and the SQL scripts, which will be used to edit or delete them.
Again, to further clarify the differences between SQL Questionnaires, a clear distinction must be made between One-to-One tables and One-to-Many tables.
One-to-One SQL Tables, in the context of the SQL Questionnaires, refer to those tables that keep only one possible record for each patient. In other words, this may be stated as One Patient –to-One Record.
If for example, you decided to create a new table that would add some fields to the patient demographics; this information can be kept in a brand new table. Since there is only one demographics record per patient, such a table would also be expected to have only one record per patient.
In contrast, One-to-Many tables can be expanded to mean One Patient-to-Many Records. Examples of this would be tables that stored multiple transactions per patient such as tables that keep charges, payments, prescriptions, and historical vital signs.
The following steps outline creating a simple one-to-one SQL Questionnaire and then progress to the more advanced one-to-many SQL Questionnaire.
Creating a One-to-One SQL Table
Before a SQL Questionnaire is designed, one must first create a new SQL Table (unless an existing one will be used) that must be done using the Query Analyzer in SQL Enterprise Manager.
It is important to consider this portion of the manual to be an exercise, however the actual SQL scripts provided here could be used to actually duplicate the steps shown to create a SQL Questionnaire.
Below is a sample SQL script that you can safely run in Query Analyzer. It will create a test table called TSTPROV. The purpose of this table (in theory – remember, this is only for practice – do not use this in a real installation) will be to maintain the information about the doctors who are treating the patient admitted to the hospital. This has been designed to be a one-to-one table only. This means if the patient returns to the hospital more than once, the old information will have to be overwritten since there will be only one record per patient.
On close examination of the SQL script defining the table below, you will notice that the primary key is made up only of the Medical Record number and the Company. No other key is provided, thus, the table will not allow multiple occurrences of a record per patient. Notice also that this table contains two fields that must ALWAYS be included in any table used by the SQL Questionnaire. The system assumes that you have a column called COMPANY and SSNO defined as shown below
CREATE TABLE dbo.TSTPROV (
COMPANY varchar (10) NOT NULL ,
SSNO varchar (15) NOT NULL ,
PRIMARYDR varchar(40) NULL,
ATTENDING varchar(40) NULL,
RESIDENT varchar(40) NULL,
ADMITREASON varchar(80) NULL,
ADMITDATE datetime NULL,
ENTERED datetime NULL,
USERCODE varchar(10) NULL,
CONSTRAINT TST_SSNO PRIMARY KEY
(
SSNO, COMPANY
)
)
GO
GRANT SELECT , INSERT , DELETE , UPDATE ON TSTPROV TO mwuser
GO
Important Note:
In order to prevent potential future conflicts with tables created by MedInformatix, a naming convention should always be used. All MedInformatix tables start with the following prefixes: CL, MW, and MP. These prefixes reflect the modules that use these tables. If creating your own tables, it is necessary to use a consistent prefix in the table names and must not be the prefix reserved for MedInformatix. The above example uses a prefix of TST (test) and will never conflict with existing or future planned SQL Tables.
One-to-One tables should only have two possible primary keys: SSNO and COMPANY or ACCOUNT and COMPANY. These keys are the only guaranteed way to match the data to an existing patient.
Since the data entry fields in the system are limited to 255 characters, it is important not to create columns with field sizes that are greater.
Creating a One-to-One SQL Questionnaire
Once the table has been created, proceed to the Decision Tree by pulling up the record of a test patient. Then, click on the SQL button at the bottom of the Decision Tree window located next to the Property field. This will bring up the screen shown below:
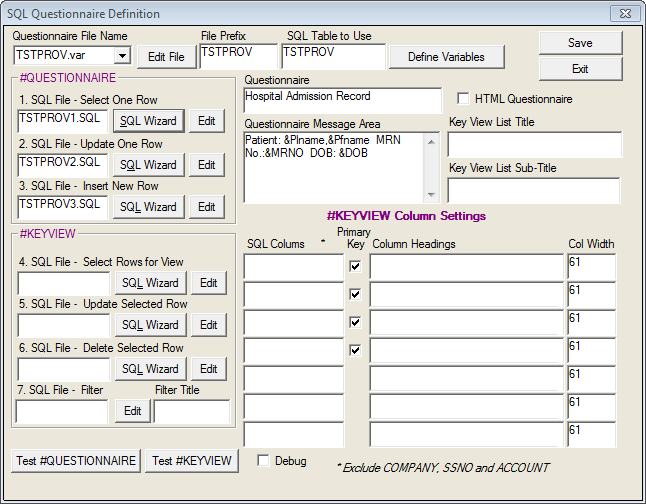
Fill out the Questionnaire File Name field with the Questionnaire File name. By convention, this should be a short name, preferably with 6 letters but may be up to 8 letters and must have an extension of “.VAR”. Note that the Questionnaire will thereafter be known by the first part of the file name. In this case it is “TSTPROV”.
Indicate the SQL Table that this Questionnaire will use.
Fill in a Window Title in the Questionnaire field and fill in the Questionnaire Message Area as shown. The system will automatically fill in the SQL File Prefix, which is the first 6 letters of the Questionnaire Name (TSTPRO). This prefix will be used to become the prefix of several files that will be created by the wizards.
Click on the SQL Wizard button next to items 1-3 under the #QUESTIONNAIRE section. Each of these SQL Wizards will create a SQL script automatically. These scripts will not need modifying.
 The
"Debug" checkbox at the bottom of the SQL Questionnaire Definition
screen can be turned on to display SQL errors to the user when testing
Keyviews and Questionnaires. This is helpful in finding errors
that keep a Questionnaire from working. It should be Un-checked
when the Questionnaire is working as desired.
The
"Debug" checkbox at the bottom of the SQL Questionnaire Definition
screen can be turned on to display SQL errors to the user when testing
Keyviews and Questionnaires. This is helpful in finding errors
that keep a Questionnaire from working. It should be Un-checked
when the Questionnaire is working as desired.
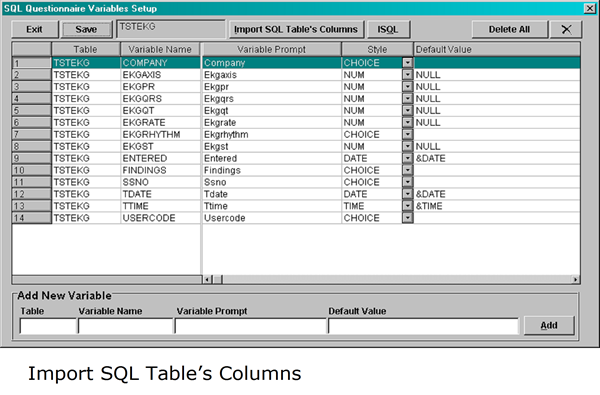
Click on the “Define Variables” button. A window like the one shown below will be displayed but it will initially be empty
Click on the button marked “Import SQL Table’s Columns”. This will create the data shown above.
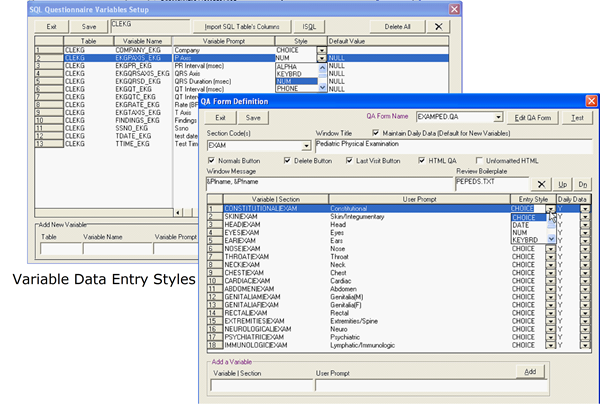
Edit this display. Specifically, note that the user prompts that appear to the user are the in the column marked “Variable Prompt”. The text shown (which are the names of the variables in the SQL Table) should be changed to more user-friendly terminology. Below is an example of how this has been modified. The Data Entry Style used can also be changed for each variable. In the example below, all of the none-date fields have been automatically given a data entry style of CHOICE (for Choice Box).
Save the entries by clicking on the Save Button. Return to the SQL Questionnaire Definition Window and save these entries as well. You have now completed defining a SQL Questionnaire.
To use this new Questionnaire, place the following as an action property on a Tree node: #QUESTIONNAIRE:TSTPROV.
When that tree node is double-clicked, the window below will be displayed.
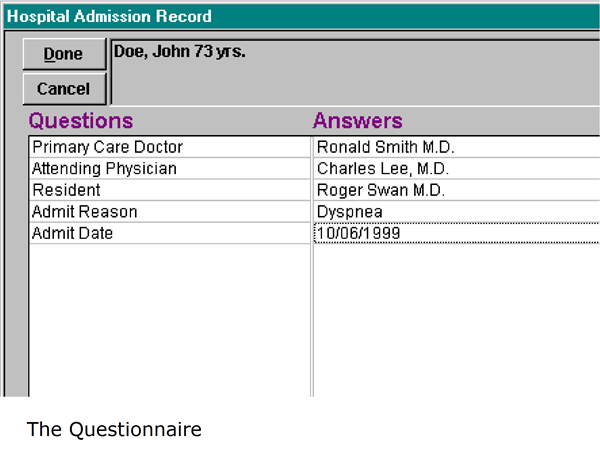
A One-to-One SQL Questionnaire has been successfully created. It can now be opened and completed.
Components of a One-to-One SQL Questionnaire
The SQL Questionnaire we just built will be made up of the following files:
TSTPROV.VAR
This file contains the definition of the TSTPROV Questionnaire
TSTPROV.QCH
This will contain any values created as selections in the Choice Boxes for this SQL Questionnaire.
TSTPRO1.SQL
This contains the SQL statement that populates the SQL Questionnaire when editing the data.
TSTPRO2.SQL
This is the SQL statement that updates the database whenever the SQL Questionnaire data is saved.
TSTPRO3.SQL
This special purpose SQL Statement inserts an empty row in the table for the patient if one does not yet exist. The empty row is then immediately updated by the SQL statement above in TSTPRO2.SQL.
Creating a One-to-Many SQL Table
The following discussion requires a complete understanding of SQL Table design and primary keys.
Below is a sample SQL script taken from MSCREATE.SQL. This script mimics the CLEKG table that is used to store EKG information. That particular table is accessed by SQL Questionnaires in the Primary Care Decision Tree. In order to fully complete this exercise without conflicting with existing Questionnaires that have already been defined, this table will be recreated using a different name as shown below:
CREATE TABLE dbo.TSTEKG (
COMPANY varchar (10) NOT NULL ,
SSNO varchar (15) NOT NULL ,
TDATE datetime NOT NULL ,
TTIME varchar (5) NOT NULL ,
FINDINGS varchar (255) NULL ,
EKGRHYTHM varchar (80) NULL ,
EKGRATE smallint NULL ,
EKGPR float NULL ,
EKGQRS float NULL ,
EKGQT float NULL ,
EKGST float NULL ,
EKGAXIS smallint NULL,
ENTERED datetime NULL,
USERCODE varchar(10) NULL,
CONSTRAINT TSTEKG_SSNO PRIMARY KEY
(
SSNO, TDATE, COMPANY, TTIME
)
)
GO
GRANT SELECT , INSERT , DELETE , UPDATE ON TSTEKG TO mwuser
GO
Note that this table has a more complex primary key. In addition to being indexed by SSNO (medical record number) and COMPANY, it has two additional key fields that are TDATE (Test Date) and TTIME (Test Time). The intent is that a patient may be given multiple EKG tests. For each patient, each specific test can then be identified by the specific Test date and Test time. There can be no duplicates since only one test can be done at any given time.
Important: IDENTITY fields should not be used as primary keys in tables. These data types confuse the wizard and cannot be used to automatically generate scripts. Complex manual restructuring of SQL statements will be required if these are used.
Creating a One-to-Many SQL Questionnaire
Careful thought must now be given to the SQL Table defined above. If the rows created in the new table will never be edited, an interface similar to the one used for the One-to-One SQL Questionnaire could be used. However, this is not realistic in most cases since there must be a way to edit or even view multiple records. This additional view must be presented to the user so that she can choose the particular record that will be edited among the many. This view must display the information from the primary key in order for it to accurately select a particular record.
This is the reason that an action property called “#KEYVIEW” will be introduced. This action property displays a window that allows you to select a row to be edited. It also allows you to add new rows, edit existing rows, or delete existing rows. An example of the #KEYVIEW window is shown below.
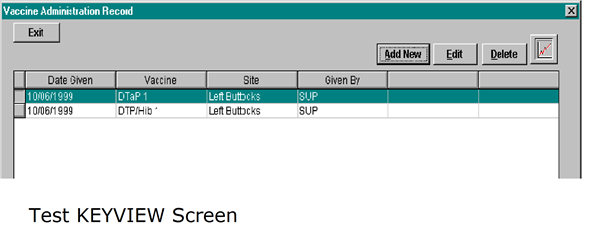
From this window, one can then select one of many records to be edited or deleted if necessary. In this example, the primary keys that identify a unique row include SSNO, COMPANY (which are always presumed, but not displayed) and the Date Given and Vaccine shown above.
There are therefore, more things to build when making a One-to-Many SQL Questionnaire. In addition to creating a normal Questionnaire, a Viewer window must also be built that displays the data according to the primary keys.
Note that the above example does not show SSNO and COMPANY in the #KEYVIEW window. Remember that since the user must be inside the record of a specific patient in order to use the Decision Tree and subsequently a SQL Questionnaire, the SSNO (medical record number) and COMPANY fields are automatically assumed.
To create a new Sample One-to-Many SQL Questionnaire.
Click on the SQL button at the bottom of the Decision Tree window located next to the Property field. This will bring up the screen shown below:
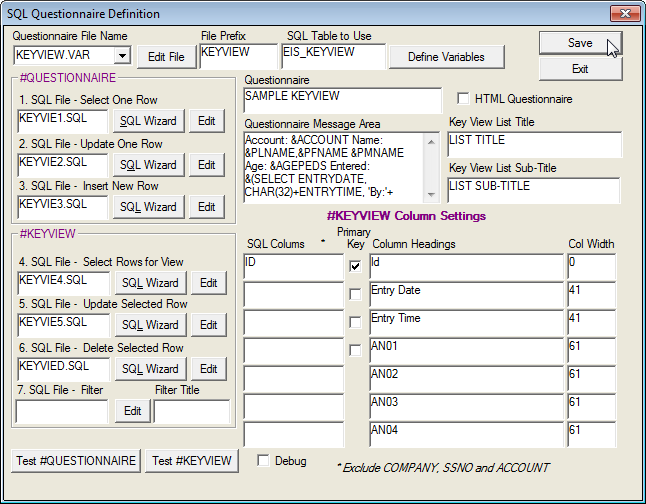
Fill in the Questionnaire File Name and SQL Table to use as shown. This will fill in the SQL File Prefix automatically.
Fill in the various titles and messages as shown. These include the Window Title, Questionnaire Message, #KEYVIEW Title (this is the main title on the caption bar), and the #KEYVIEW Sub-Title (appears below the caption bar). These fields control the appearance of the windows only and can be modified as desired.
Click on the SQL Wizard next to items 1 – 6. Create a new script each time and close the windows displaying the scripts. If desired, click the Edit button to modify the existing SQL file.
#KEYVIEW Column 1-4 Headings show the Key fields that will be used to select a particular row. . The SSNO and COMPANY columns are already assumed to be part of the primary key. In this exercise, one additional primary key exists and when combined with SSNO and COMPANY will identify a unique row. These additional primary keys must be placed as column headings on the #KEYVIEW window. As shown in the graphic, the columns ID, Entry Date and Entry Time have been added. Additional data from the table may be shown on the #KEYVIEW to allow users to browse the data in the multiple rows so Findings were added. Although only 7 columns headings are shown here (generic titles have been added for Answers 1 through 4), through manual modification of the VAR file, up to 10 columns can be included in #KEYVIEW and have custom column width sizes for each one displayed. Note that the column titles entered here are displayed for users to see – they are not column names to make these titles easy to recognize. .
Edit the individual SQL Scripts made by the Wizard. The Wizard will not know the primary keys and how they will be used so all the scripts assume only a key of SSNO and COMPANY.
The following examples are called Sample Keyview and provide the designer with a basic starting point for any Keyview created. Simply create the scripts as described below and customize as needed. Items to note:
- The date, time, and usercode are automatically recorded when a record is added or updated (in seperate fields) in the table.
- If the site is using APPTNO, it will be recorded in the table. This Keyview will also work well at non-radiology sites as the APPTNO field will be NULL.
- The boilerplate displayed after the Keyview will select the last record touched while in the Keyview screen.
- The ACCOUNT and SSNO are stored in the table, so it will be easy to create joins for boilerplates or reports from the data.
- The files include Last Visit and Normals queries.
KEYVIEW.SQL
Create or run the following KEYVIEW.SQL table:
if exists (select * from dbo.sysobjects where id = object_id(N'[dbo].[EIS_KEYVIEW]') and OBJECTPROPERTY(id, N'IsUserTable') = 1)
drop table [dbo].[EIS_KEYVIEW]
GO
CREATE TABLE [dbo].[EIS_KEYVIEW] (
[ID] [int] IDENTITY (1, 1) NOT NULL ,
[COMPANY] [varchar] (10) COLLATE SQL_Latin1_General_CP1_CI_AS NOT NULL ,
[SSNO] [varchar] (10) COLLATE SQL_Latin1_General_CP1_CI_AS NOT NULL ,
[ACCOUNT] [varchar] (10) COLLATE SQL_Latin1_General_CP1_CI_AS NOT NULL ,
[APPTNO] [int] NULL ,
[ENTRYDATE] [datetime] NULL ,
[ENTRYTIME] [varchar] (10) COLLATE SQL_Latin1_General_CP1_CI_AS NULL ,
[ENTRYUSER] [varchar] (10) COLLATE SQL_Latin1_General_CP1_CI_AS NULL ,
[EDITDATE] [datetime] NULL ,
[EDITTIME] [varchar] (10) COLLATE SQL_Latin1_General_CP1_CI_AS NULL ,
[EDITUSER] [varchar] (10) COLLATE SQL_Latin1_General_CP1_CI_AS NULL ,
[AN01] [varchar] (250) COLLATE SQL_Latin1_General_CP1_CI_AS NULL ,
[AN02] [varchar] (250) COLLATE SQL_Latin1_General_CP1_CI_AS NULL ,
[AN03] [varchar] (250) COLLATE SQL_Latin1_General_CP1_CI_AS NULL ,
[AN04] [varchar] (250) COLLATE SQL_Latin1_General_CP1_CI_AS NULL ,
[AN05] [varchar] (250) COLLATE SQL_Latin1_General_CP1_CI_AS NULL ,
[AN06] [varchar] (250) COLLATE SQL_Latin1_General_CP1_CI_AS NULL ,
[AN07] [varchar] (250) COLLATE SQL_Latin1_General_CP1_CI_AS NULL ,
[AN08] [varchar] (250) COLLATE SQL_Latin1_General_CP1_CI_AS NULL ,
[AN09] [varchar] (250) COLLATE SQL_Latin1_General_CP1_CI_AS NULL ,
[AN10] [varchar] (250) COLLATE SQL_Latin1_General_CP1_CI_AS NULL ,
[AN11] [varchar] (250) COLLATE SQL_Latin1_General_CP1_CI_AS NULL ,
[AN12] [varchar] (250) COLLATE SQL_Latin1_General_CP1_CI_AS NULL ,
[AN13] [varchar] (250) COLLATE SQL_Latin1_General_CP1_CI_AS NULL ,
[AN14] [varchar] (250) COLLATE SQL_Latin1_General_CP1_CI_AS NULL ,
[AN15] [varchar] (250) COLLATE SQL_Latin1_General_CP1_CI_AS NULL ,
[AN16] [varchar] (250) COLLATE SQL_Latin1_General_CP1_CI_AS NULL ,
[AN17] [varchar] (250) COLLATE SQL_Latin1_General_CP1_CI_AS NULL ,
[AN18] [varchar] (250) COLLATE SQL_Latin1_General_CP1_CI_AS NULL ,
[AN19] [varchar] (250) COLLATE SQL_Latin1_General_CP1_CI_AS NULL ,
[AN20] [varchar] (250) COLLATE SQL_Latin1_General_CP1_CI_AS NULL ,
[AN21] [varchar] (250) COLLATE SQL_Latin1_General_CP1_CI_AS NULL ,
[AN22] [varchar] (250) COLLATE SQL_Latin1_General_CP1_CI_AS NULL ,
[AN23] [varchar] (250) COLLATE SQL_Latin1_General_CP1_CI_AS NULL ,
[AN24] [varchar] (250) COLLATE SQL_Latin1_General_CP1_CI_AS NULL ,
[AN25] [varchar] (250) COLLATE SQL_Latin1_General_CP1_CI_AS NULL ,
[AN26] [varchar] (250) COLLATE SQL_Latin1_General_CP1_CI_AS NULL ,
[AN27] [varchar] (250) COLLATE SQL_Latin1_General_CP1_CI_AS NULL ,
[AN28] [varchar] (250) COLLATE SQL_Latin1_General_CP1_CI_AS NULL ,
[AN29] [varchar] (250) COLLATE SQL_Latin1_General_CP1_CI_AS NULL ,
[AN30] [varchar] (250) COLLATE SQL_Latin1_General_CP1_CI_AS NULL ,
[AN31] [varchar] (250) COLLATE SQL_Latin1_General_CP1_CI_AS NULL ,
[AN32] [varchar] (250) COLLATE SQL_Latin1_General_CP1_CI_AS NULL ,
[AN33] [varchar] (250) COLLATE SQL_Latin1_General_CP1_CI_AS NULL ,
[AN34] [varchar] (250) COLLATE SQL_Latin1_General_CP1_CI_AS NULL ,
[AN35] [varchar] (250) COLLATE SQL_Latin1_General_CP1_CI_AS NULL
) ON [PRIMARY]
GO
ALTER TABLE [dbo].[EIS_KEYVIEW] WITH NOCHECK ADD
CONSTRAINT [EIS_KEYVIEW_ID] PRIMARY KEY CLUSTERED
(
[ID],
[COMPANY],
[SSNO]
) ON [PRIMARY]
GO
CREATE INDEX [EIS_KEYVIEW_APPTNO] ON [dbo].[EIS_KEYVIEW]([APPTNO], [ACCOUNT], [COMPANY]) ON [PRIMARY]
GO
CREATE INDEX [EIS_KEYVIEW_ACCOUNT] ON [dbo].[EIS_KEYVIEW]([ACCOUNT], [COMPANY]) ON [PRIMARY]
GO
CREATE INDEX [EIS_KEYVIEW_SSNO] ON [dbo].[EIS_KEYVIEW]([SSNO], [COMPANY]) ON [PRIMARY]
GO
GRANT SELECT , UPDATE , INSERT , DELETE ON [dbo].[EIS_KEYVIEW] TO [mwuser]
GO
KEYVIE1.SQL
Create this script in the OUTLINE folder:
SELECT
AN01, AN02, AN03, AN04, AN05, AN06, AN07, AN08, AN09, AN10, AN11, AN12, AN13, AN14, AN15, AN16, AN17, AN18, AN19, AN20, AN21, AN22, AN23, AN24, AN25, AN26, AN27, AN28, AN29, AN30, AN31, AN32, AN33, AN34,
AN35 FROM EIS_KEYVIEW WHERE SSNO='&MRNO' AND COMPANY='&COMPANY' AND CONVERT(VARCHAR,ID)='&FIELD1'
KEYVIE2.SQL
Create this script in the OUTLINE folder:
UPDATE EIS_KEYVIEW SET
ENTRYDATE='&DATESQL2K',
ENTRYTIME='&TIME',
ENTRYUSER='&USER',
EDITDATE='&DATESQL2K',
EDITTIME='&TIME',
EDITUSER='&USER',
AN01=SUBSTRING('{{AN01}}',1,250),
AN02=SUBSTRING('{{AN02}}',1,250),
AN03=SUBSTRING('{{AN03}}',1,250),
AN04=SUBSTRING('{{AN04}}',1,250),
AN05=SUBSTRING('{{AN05}}',1,250),
AN06=SUBSTRING('{{AN06}}',1,250),
AN07=SUBSTRING('{{AN07}}',1,250),
AN08=SUBSTRING('{{AN08}}',1,250),
AN09=SUBSTRING('{{AN09}}',1,250),
AN10=SUBSTRING('{{AN10}}',1,250),
AN11=SUBSTRING('{{AN11}}',1,250),
AN12=SUBSTRING('{{AN12}}',1,250),
AN13=SUBSTRING('{{AN13}}',1,250),
AN14=SUBSTRING('{{AN14}}',1,250),
AN15=SUBSTRING('{{AN15}}',1,250),
AN16=SUBSTRING('{{AN16}}',1,250),
AN17=SUBSTRING('{{AN17}}',1,250),
AN18=SUBSTRING('{{AN18}}',1,250),
AN19=SUBSTRING('{{AN19}}',1,250),
AN20=SUBSTRING('{{AN20}}',1,250),
AN21=SUBSTRING('{{AN21}}',1,250),
AN22=SUBSTRING('{{AN22}}',1,250),
AN23=SUBSTRING('{{AN23}}',1,250),
AN24=SUBSTRING('{{AN24}}',1,250),
AN25=SUBSTRING('{{AN25}}',1,250),
AN26=SUBSTRING('{{AN26}}',1,250),
AN27=SUBSTRING('{{AN27}}',1,250),
AN28=SUBSTRING('{{AN28}}',1,250),
AN29=SUBSTRING('{{AN29}}',1,250),
AN30=SUBSTRING('{{AN30}}',1,250),
AN31=SUBSTRING('{{AN31}}',1,250),
AN32=SUBSTRING('{{AN32}}',1,250),
AN33=SUBSTRING('{{AN33}}',1,250),
AN34=SUBSTRING('{{AN34}}',1,250),
AN35=SUBSTRING('{{AN35}}',1,250) WHERE SSNO='&MRNO' AND COMPANY='&COMPANY' AND ENTRYDATE ='1900-01-01' AND ENTRYTIME=''
KEYVIE3.SQL
Create this script in the OUTLINE folder:
INSERT INTO EIS_KEYVIEW (
COMPANY,
SSNO,
ACCOUNT,
APPTNO,
ENTRYDATE,
ENTRYTIME,
ENTRYUSER,
EDITDATE,
EDITTIME,
EDITUSER,
AN01, AN02, AN03, AN04, AN05, AN06, AN07, AN08, AN09, AN10, AN11, AN12, AN13, AN14, AN15, AN16, AN17, AN18, AN19, AN20, AN21, AN22, AN23, AN24, AN25, AN26, AN27, AN28, AN29, AN30, AN31, AN32, AN33, AN34,
AN35 ) VALUES (
'&COMPANY',
'&MRNO',
'&ACCOUNT',
&XACID,
'1900-01-01',
'',
'',
'1900-01-01',
'', '', '', '', '', '', '', '', '', '', '', '', '', '', '', '', '', '', '', '', '', '', '', '', '', '', '', '', '', '', '', '', '', '', '', '',
'' )
KEYVIE4.SQL
Create this script in the OUTLINE folder:
SELECT ID,
ENTRYDATE,
ENTRYTIME,
AN01,
AN02,
AN03,
AN04 FROM EIS_KEYVIEW WHERE SSNO='&MRNO' AND COMPANY='&COMPANY'
ORDER BY ID DESC
KEYVIE5.SQL
Create this script in the OUTLINE folder:
UPDATE EIS_KEYVIEW SET
EDITDATE='&DATESQL2K',
EDITTIME='&TIME',
EDITUSER='&USER',
AN01=SUBSTRING('{{AN01}}',1,250), AN02=SUBSTRING('{{AN02}}',1,250), AN03=SUBSTRING('{{AN03}}',1,250), AN04=SUBSTRING('{{AN04}}',1,250), AN05=SUBSTRING('{{AN05}}',1,250), AN06=SUBSTRING('{{AN06}}',1,250), AN07=SUBSTRING('{{AN07}}',1,250), AN08=SUBSTRING('{{AN08}}',1,250), AN09=SUBSTRING('{{AN09}}',1,250), AN10=SUBSTRING('{{AN10}}',1,250), AN11=SUBSTRING('{{AN11}}',1,250), AN12=SUBSTRING('{{AN12}}',1,250), AN13=SUBSTRING('{{AN13}}',1,250), AN14=SUBSTRING('{{AN14}}',1,250), AN15=SUBSTRING('{{AN15}}',1,250), AN16=SUBSTRING('{{AN16}}',1,250), AN17=SUBSTRING('{{AN17}}',1,250), AN18=SUBSTRING('{{AN18}}',1,250), AN19=SUBSTRING('{{AN19}}',1,250), AN20=SUBSTRING('{{AN20}}',1,250), AN21=SUBSTRING('{{AN21}}',1,250), AN22=SUBSTRING('{{AN22}}',1,250), AN23=SUBSTRING('{{AN23}}',1,250), AN24=SUBSTRING('{{AN24}}',1,250), AN25=SUBSTRING('{{AN25}}',1,250), AN26=SUBSTRING('{{AN26}}',1,250), AN27=SUBSTRING('{{AN27}}',1,250), AN28=SUBSTRING('{{AN28}}',1,250), AN29=SUBSTRING('{{AN29}}',1,250), AN30=SUBSTRING('{{AN30}}',1,250), AN31=SUBSTRING('{{AN31}}',1,250), AN32=SUBSTRING('{{AN32}}',1,250), AN33=SUBSTRING('{{AN33}}',1,250), AN34=SUBSTRING('{{AN34}}',1,250),
AN35=SUBSTRING('{{AN35}}',1,250) WHERE SSNO='&MRNO' AND COMPANY='&COMPANY'
AND ID=&FIELD1
DELETE FROM EIS_KEYVIEW
WHERE SSNO='&MRNO' AND COMPANY='&COMPANY'
AND ENTRYDATE ='1900-01-01' AND ENTRYTIME=''
KEYVIED.SQL
Create this script in the OUTLINE folder:
DELETE FROM EIS_KEYVIEW WHERE SSNO='&MRNO' AND COMPANY='&COMPANY'
AND ID=&FIELD1
DELETE FROM EIS_KEYVIEW
WHERE SSNO='&MRNO' AND COMPANY='&COMPANY'
AND ENTRYDATE ='1900-01-01' AND ENTRYTIME=''
KEYVIEL.SQL
Create this script in the OUTLINE folder:
SELECT TOP 1
AN01, AN02, AN03, AN04, AN05, AN06, AN07, AN08, AN09, AN10, AN11, AN12, AN13, AN14, AN15, AN16, AN17, AN18, AN19, AN20, AN21, AN22, AN23, AN24, AN25, AN26, AN27, AN28, AN29, AN30, AN31, AN32, AN33, AN34,
AN35 FROM EIS_KEYVIEW WHERE SSNO='&MRNO' AND COMPANY='&COMPANY' ORDER BY ENTRYDATE DESC, ENTRYTIME DESC
KEYVIEN.SQL
Create this script in the OUTLINE folder:
SELECT
'AN01',
'AN02',
'AN03',
'AN04',
'', '', '', '', '', '', '', '', '', '', '', '', '', '', '', '', '', '', '', '', '', '', '', '', '', '', '', '', '', '',
'' FROM EIS_KEYVIEW
KEYVIEW.TXT
Create this script in the OUTLINE folder:
<FONT COLOR="#000000"><FONT FACE="Verdana"><font point="16"><CENTER><B>KEYVIEW BOILERPLATE</B></CENTER><font point="10">
Patient: <FONT COLOR="#0000FF">&PLNAME, &PFNAME &PMNAME<FONT COLOR="#000000">
Account: <FONT COLOR="#0000FF">&ACCOUNT<FONT COLOR="#000000">
&SQLNOCR&!{SELECT ENTRYDATE, ENTRYTIME, ENTRYUSER, EDITDATE, EDITTIME, EDITUSER, AN01, AN02, AN03, AN04,
AN05, AN06, AN07, AN08, AN09, AN10, AN11, AN12, AN13, AN14, AN15, AN16, AN17, AN18, AN19, AN20, AN21, AN22,
AN23, AN24, AN25, AN26, AN27, AN28, AN29, AN30, AN31, AN32, AN33, AN34, AN35 FROM EIS_KEYVIEW
WHERE COMPANY='&COMPANY' AND SSNO='&MRNO' AND ID=&FIELD1}
Date Entered: <FONT COLOR="#0000FF">&SQLCOL001 &SQLCOL002<FONT COLOR="#000000">
Entered By: <FONT COLOR="#0000FF">&SQLCOL003<FONT COLOR="#000000">
Dated Modified: <FONT COLOR="#0000FF">&SQLCOL004 &SQLCOL005<FONT COLOR="#000000">
Modified By: <FONT COLOR="#0000FF">&SQLCOL006<FONT COLOR="#000000">
<U>Question</U> <U>Answer</U>
Question 01: <FONT COLOR="#0000FF">&SQLCOL007<FONT COLOR="#000000">
Question 02: <FONT COLOR="#0000FF">&SQLCOL008<FONT COLOR="#000000">
Question 03: <FONT COLOR="#0000FF">&SQLCOL009<FONT COLOR="#000000">
Question 04: <FONT COLOR="#0000FF">&SQLCOL010<FONT COLOR="#000000">
Question 05: <FONT COLOR="#0000FF">&SQLCOL011<FONT COLOR="#000000">
Question 06: <FONT COLOR="#0000FF">&SQLCOL012<FONT COLOR="#000000">
Question 07: <FONT COLOR="#0000FF">&SQLCOL013<FONT COLOR="#000000">
Question 08: <FONT COLOR="#0000FF">&SQLCOL014<FONT COLOR="#000000">
Question 09: <FONT COLOR="#0000FF">&SQLCOL015<FONT COLOR="#000000">
Question 10: <FONT COLOR="#0000FF">&SQLCOL016<FONT COLOR="#000000">
Question 11: <FONT COLOR="#0000FF">&SQLCOL017<FONT COLOR="#000000">
Question 12: <FONT COLOR="#0000FF">&SQLCOL018<FONT COLOR="#000000">
Question 13: <FONT COLOR="#0000FF">&SQLCOL019<FONT COLOR="#000000">
Question 14: <FONT COLOR="#0000FF">&SQLCOL020<FONT COLOR="#000000">
Question 15: <FONT COLOR="#0000FF">&SQLCOL021<FONT COLOR="#000000">
Question 16: <FONT COLOR="#0000FF">&SQLCOL022<FONT COLOR="#000000">
Question 17: <FONT COLOR="#0000FF">&SQLCOL023<FONT COLOR="#000000">
Question 18: <FONT COLOR="#0000FF">&SQLCOL024<FONT COLOR="#000000">
Question 19: <FONT COLOR="#0000FF">&SQLCOL025<FONT COLOR="#000000">
Question 20: <FONT COLOR="#0000FF">&SQLCOL026<FONT COLOR="#000000">
Question 21: <FONT COLOR="#0000FF">&SQLCOL027<FONT COLOR="#000000">
Question 22: <FONT COLOR="#0000FF">&SQLCOL028<FONT COLOR="#000000">
Question 23: <FONT COLOR="#0000FF">&SQLCOL029<FONT COLOR="#000000">
Question 24: <FONT COLOR="#0000FF">&SQLCOL030<FONT COLOR="#000000">
Question 25: <FONT COLOR="#0000FF">&SQLCOL031<FONT COLOR="#000000">
Question 26: <FONT COLOR="#0000FF">&SQLCOL032<FONT COLOR="#000000">
Question 27: <FONT COLOR="#0000FF">&SQLCOL033<FONT COLOR="#000000">
Question 28: <FONT COLOR="#0000FF">&SQLCOL034<FONT COLOR="#000000">
Question 29: <FONT COLOR="#0000FF">&SQLCOL035<FONT COLOR="#000000">
Question 30: <FONT COLOR="#0000FF">&SQLCOL036<FONT COLOR="#000000">
Question 31: <FONT COLOR="#0000FF">&SQLCOL037<FONT COLOR="#000000">
Question 32: <FONT COLOR="#0000FF">&SQLCOL038<FONT COLOR="#000000">
Question 33: <FONT COLOR="#0000FF">&SQLCOL039<FONT COLOR="#000000">
Question 34: <FONT COLOR="#0000FF">&SQLCOL040<FONT COLOR="#000000">
Question 35: <FONT COLOR="#0000FF">&SQLCOL041&SQLEND<FONT COLOR="#000000">
KEYVIEW.VAR
Create this script in the OUTLINE folder:
[%keyview]
READ=KEYVIE1.SQL
SAVE=KEYVIE2.SQL
TITLE=SAMPLE KEYVIEW
MESSAGE=Account: &ACCOUNT Name: &PLNAME, &PFNAME &PMNAME Age: &AGEPEDS Entered : &{SELECT ENTRYDATE, CHAR(32)+ENTRYTIME, ' By: '+ ENTRYUSER FROM EIS_KEYVIEW WHERE COMPANY='&COMPANY' AND SSNO='&MRNO' AND CONVERT(VARCHAR,ID)='&FIELD1'}
NEW=KEYVIE3.SQL
SQL TABLE=EIS_KEYVIEW
KEY QUERY=KEYVIE4.SQL
SAVE EDIT=KEYVIE5.SQL
KEY TITLE=LIST TITLE
KEY SUBTITLE=LIST SUB-TITLE
READLAST=KEYVIEL.SQL
READNORMAL=KEYVIEN.SQL
KEY1=ID
KEY2=Entry Date
KEY3=Entry Time
KEY4=AN01
KEY5=AN02
KEY6=AN03
KEY7=AN04
KEY7=AN04
KEY1Width=0
KEY2Width=41
KEY3Width=41
KEY4Width=61
KEY5Width=61
KEY6Width=61
KEY7Width=61
Key Filter Query=
Key Filter Title=
DELETE=KEYVIED.SQL
KEY8width=
KEY9width=
KEY10width=
KEY COL1=61 KEY COL2=61 KEY COL3=61 KEY COL4=61 KEY COL5=61 KEY COL6=61
KEY COL7=61 KEY COL8=61 KEY COL9=61 KEY COL10=61
Debug=0
HTML=0
[Primary Key]
1=ID
2=
3=
4=
5=
6=
7=
[Variables]
AN01=EIS_KEYVIEW|CHOICE||Question 01 AN02=EIS_KEYVIEW|CHOICE||Question 02
AN03=EIS_KEYVIEW|CHOICE||Question 03 AN04=EIS_KEYVIEW|CHOICE||Question 04
AN05=EIS_KEYVIEW|CHOICE||Question 05 AN06=EIS_KEYVIEW|CHOICE||Question 06
AN07=EIS_KEYVIEW|CHOICE||Question 07 AN08=EIS_KEYVIEW|CHOICE||Question 08
AN09=EIS_KEYVIEW|CHOICE||Question 09 AN10=EIS_KEYVIEW|CHOICE||Question 10
AN11=EIS_KEYVIEW|CHOICE||Question 11 AN12=EIS_KEYVIEW|CHOICE||Question 12
AN13=EIS_KEYVIEW|CHOICE||Question 13 AN14=EIS_KEYVIEW|CHOICE||Question 14
AN15=EIS_KEYVIEW|CHOICE||Question 15 AN16=EIS_KEYVIEW|CHOICE||Question 16
AN17=EIS_KEYVIEW|CHOICE||Question 17 AN18=EIS_KEYVIEW|CHOICE||Question 18
AN19=EIS_KEYVIEW|CHOICE||Question 19 AN20=EIS_KEYVIEW|CHOICE||Question 20
AN21=EIS_KEYVIEW|CHOICE||Question 21 AN22=EIS_KEYVIEW|CHOICE||Question 22
AN23=EIS_KEYVIEW|CHOICE||Question 23 AN24=EIS_KEYVIEW|CHOICE||Question 24
AN25=EIS_KEYVIEW|CHOICE||Question 25 AN26=EIS_KEYVIEW|CHOICE||Question 26
AN27=EIS_KEYVIEW|CHOICE||Question 27 AN28=EIS_KEYVIEW|CHOICE||Question 28
AN29=EIS_KEYVIEW|CHOICE||Question 29 N30=EIS_KEYVIEW|CHOICE||Question 30
AN31=EIS_KEYVIEW|CHOICE||Question 31 AN32=EIS_KEYVIEW|CHOICE||Question 32
AN33=EIS_KEYVIEW|CHOICE||Question 33 AN34=EIS_KEYVIEW|CHOICE||Question 34
AN35=EIS_KEYVIEW|CHOICE||Question 35
COMPANY=EIS_KEYVIEW|CHOICE||Company
EDITDATE=EIS_KEYVIEW|DATE|&DATE|Edit Date
EDITTIME=EIS_KEYVIEW|TIME|&TIME|Edit Time
EDITUSER=EIS_KEYVIEW|CHOICE|&USER|Edit User
ENTRYDATE=EIS_KEYVIEW|DATE|&DATE|Entry Date
ENTRYTIME=EIS_KEYVIEW|TIME|&TIME|EntryTime
ENTRYUSER=EIS_KEYVIEW|CHOICE|&USER|Entry User
ID=EIS_KEYVIEW|NUM|NULL|ID
SSNO=EIS_KEYVIEW|CHOICE||MRNO
ACCOUNT=EIS_KEYVIEW|CHOICE||Account
[Primary DataType]
ID=1
SCRIPT_SAMPLE.SQL
Edit the SCRIPT.TBL by adding the following entry:
[KEYVIEW]]
1=#KEYVIEW:KEYVIEW
2=#EDITC:KEYVIEW.TXT
Creating Variables
The new variables from the table KEYVIEW must now be made visible to the SQL Questionnaire program. Data entry prompts and data entry styles also need to be specified.
Click on the Define Variables button on the SQL Questionnaire Definition window
Click on the Import SQL Table’s Columns button and the window will appear as shown below.
Modify the variable prompts so they are more understandable to the user (since the labels come from the column name in the SQL Table). The window below displays the variable prompts modifications made.

Once modifications are complete, save the changes and save the SQL Questionnaire. The new One-to-Many SQL Questionnaire is available to use with the action property: #SCRIPT:KEYVIEW
Defining Variables
Variables are referenced in SQL Questionnaire Scripts as {{VARIABLE_NAME}}. These variables, which are automatically created by the SQL Wizard, must be entered in the Define Variables window. This can automatically be created by using the Import SQL Columns button.
FIELD |
DESCRIPTION |
GROUP |
Enter the name of the SQL table. |
VARIABLE NAME |
Use unique variable names. By default, when you use the Import button, the variable names will be appended with an underscore ( ‘_’) and part of the SQL Table name (3rd character and on). This will ensure that the variable names are unique. If you import the same SQL table variables more than once you may overwrite your previous entries. If this occurs, press Cancel from the SQL Questionnaire Variables Setup. All your changes to the list of variables will be cancelled. |
VARIABLE PROMPT |
This will be the user prompt that will appear on the SQL Questionnaire. Make sure the prompt is as clear and concise as possible. You have only 40 characters available. |
STYLE |
Enter a data entry style based on the choices on the following table. Please make sure the Data Entry Style is acceptable to the SQL table, i.e. do not put alpha entries in numeric fields, or put numeric entries in alpha fields, or put date fields in anything but a date field. |
DEFAULT VALUE |
Place the value which you would like the variable to have if the user does not modify the item. Please make sure that this default value is acceptable to the SQL table, i.e. do not put alpha entries in numeric fields, or put numeric entries in alpha fields, or put date fields in anything but a date field. |
Data Entry Styles
Once a variable is defined, the user is able to select a style of appearance on the QA or Questionnaire. Style options are presented in the Style column and can be selected by using the dropdown arrow on the field.
When using an HTML formatted Questionnaire, if the item’s data entry style is KEYBOARD, then one can type directly on the HTML input field. Otherwise, an icon is provided which will display the standard style dialogs.
DATA ENTRY STYLES |
DESCRIPTION |
CHOICE |
Choice Box will be displayed with main values in an upper list box and adjectives in a lower list box. |
CHOICE UC |
This is the same as CHOICE above except that it automatically converts all selections to Upper Case. |
SCHOICE |
This style displays a list box that has exactly the same features as the CHOICE style. The difference is in when multiple items are highlighted it separates each item only by one space. Commas and other spaces or words are not added. This is useful for forming short sentences. The words are organized according to the order by which they appear on the list box (top first). |
CHOICEQ |
This is an advanced version of the CHOICE style. In this case, the selection options displayed on the list box are pulled from a query from a SQL table. The query is defined with the same name as the variable in the Questionnaire VAR file under the heading [%SELECT_QUERY] For example: [%SELECT_QUERY] HPPROBLEMFUP1=“SELECT PROBLEM FROM CLPROBLM WHERE SSNO=‘&MRNO’ AND STATUS!=‘Resolved’ “ The variable HPPROBLEMFUP1, which has a style of CHOICEQ will then search the Problem List for unresolved diagnosis and this will appear on the List Box. |
NUM |
This style displays a numeric keypad. Only numbers and decimals can be entered. |
ALPHA |
This style displays an alphanumeric keypad in A-Z order. Data can be typed in upper or lower case. If you use the keypad, the entries will be automatically lower case. |
ALPHA UC |
This style displays an alphanumeric keypad in A-Z order. Data will always be returned in upper case regardless of how it was entered. |
FREE |
This style allows free form entry of text up to 255 characters directly on the Questionnaire window without keyboard or other prompts. This is used for Questionnaires intended for keyboard oriented users. |
KEYBRD |
This style displays an on-screen QWERTY keyboard. Data can be typed in upper or lower case. |
KEYBRD UC |
This style displays an on-screen QWERTY keyboard. Data will always be returned in upper case regardless of how it was typed. |
YESNO |
A Yes/No control will be displayed by this style. The value returned will be “Yes” or “No”. |
YN |
A Yes/No control will be displayed by this style. The value returned will be a “Y” or “N”. |
DATE |
This will display a numeric keypad but will only accept dates based on the current setting of dates in International Settings - Control Panel. In other words if the standard date is in MMDDYY format then it is expected that you would enter numbers in that order, supplying ZEROES where appropriate. The date returned will be in the accepted short date format for that country such as MM/DD/YYYY or YYYY.MM.DD. |
DATESQL |
This option is similar to DATE but will return the date in a YYYY-MM-DD format. |
PHONE |
This style accepts a number using a numeric keypad, which is assumed to be a Phone Number. If the date settings match the settings for the U.S. (i.e. MM/DD/YY), then the phone number returned matches the U.S. format which is 999/999-9999 |
TIME |
This style requires a time value to be entered as HH:MM. The colon is automatically entered. Value is entered in Military Time Format. |
TIME2 |
This style requires a time value to be entered in AM or PM, which returns a HH:MM AM or HH:MM PM format. |
DUMMY |
This style is available in QA and will display a blank answer field with no option for entry or edit. The text entered for display appears in bold and is typically used as a heading or section marker. |
NONE |
This style is available in Questionnaire and will display a blank answer field with no option for entry or edit. Often used as a heading or section marker. |
LOOKUP |
Brings up a selection list that is not user modifiable. In addition to displaying the choices from the choice file (*.QCH), you must manually edit the choice file to display a description that applies to each choice. In the standard choice box, all entry choices are recorded in the choice file with an “=1” entry. When using a LOOKUP style, you must specify “=description” instead. |
MULTILINE |
This can be used only in HTML formats. When used during the auto create HTML process, the resulting HTML windows will use a multiline, scrollable text control. It will also accept typed input directly. In QA’s, these controls are limited to 255 characters. There is no limit in Questionnaires and is dependent on the database structure. |
REFRACT |
Displays a window for entering Ophthalmology Refraction Information (Glasses Prescription). |
REFRACTK |
Displays a window for entering Keratometry Information for Ophthalmology. |
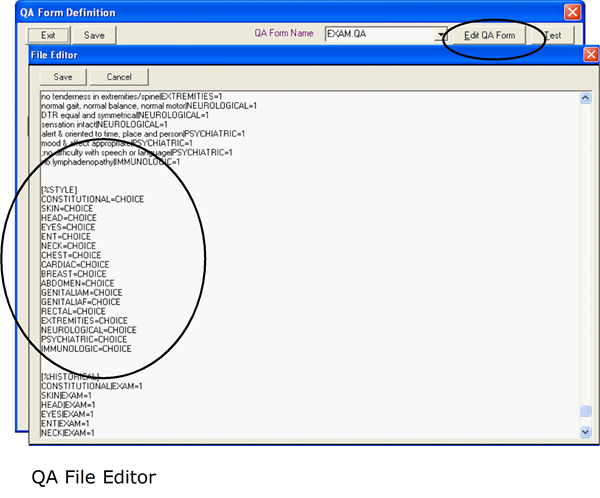
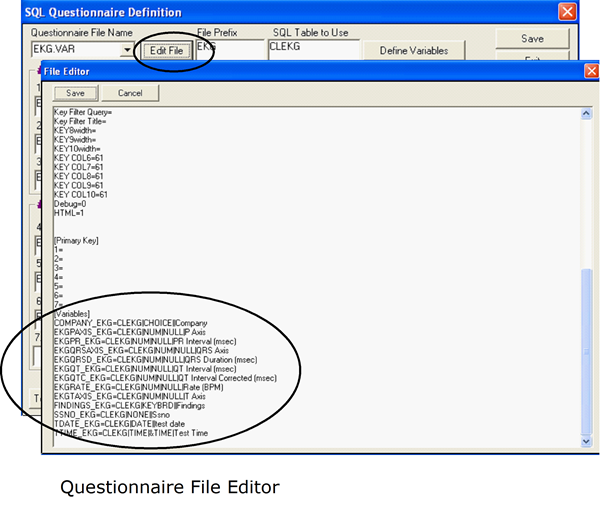
Modifying Data Entry Styles via File Editor
Data Entry Styles can be edited directly via the File Editor for both QA’s and Questionnaires.
QA: Click on the Edit QA Form button on the QA Form Definition screen to display the QA File Editor. Navigate to the “STYLE” section of the file to make changes.
Questionnaire: Click on the Edit File button on the Questionnaire Definition screen to display the Questionnaire File Editor. Navigate to the section of the file where Styles are located to make desired changes.
Modifying the Columns Displayed in SWL Questionnaires
The data displayed in the Questionnaires are based upon the columns identified in SQL Script #1, 2, and 5 (only if it exists). If you wish to modify the order of the columns in the Questionnaire, move the columns the scripts 1, 2 and 5. If wish to remove a column from user view, remove them from all the above scripts. It is important however that the scripts mentioned always have matching columns otherwise unexpected results will occur (data will land in incorrect columns in the table).
If certain columns are removed from being editable, make sure that SQL Script #3 populates the field with some default value.
Special Instructions for Use in SQL Scripts
Dates
Date strings should not be entered simply as ‘YYYY-MM-DD’. Instead, use in scripts as shown below:
DATE=&{#’YYYY-MM-DD’}
Examples:
VISITDATE=&{#’&DATESQL2K’}
VISITDATE=&{#’{{TEST_VISITDATE}}’}
Purpose: If the date value ends up with a blank value as in (‘’) then the above will be automatically converted to the word NULL. Example:
VISITDATE=&{#’{{TEST_VISITDATE}}’}
If {{TEST_VISITDATE}} is blank, then the above will convert it to:
VISITDATE=NULL
If you don’t use the above format, the value will end up as
VISITDATE=’’
This will cause a SQL Error.
Data Exceeds Size of Column
In some cases, the data returned by the Questionnaire exceeds the size of the column (field). Use the SUBSTRING function to force values not to exceed the field size.
Example:
Original
PLNAME=’{{TEST_LASTNAME}}’
Revised
PLNAME=SUBSTRING({{TEST_LASTNAME}}, 1,15)
In SQL Server 7, if you attempt to save a value into a column that is larger than what is allowed by the column, a SQL Error message will appear. In older decision trees using older versions of SQL Server, this was automatically truncated. Thus, in SQL Server 7, it is not a necessity to use the SUBSTRING command to truncate the text manually
Additional Variable can be sued to select a Key from SQL Table
&KEY value can be used in SQL Scripts. &KEY contains the data in the KEY PROPERTY of the Tree node item that was clicked. This can allow a SQL Query to automatically filter the set of records based on where the user clicked on the tree.
Automatic Refresh of Side Text
If you use #QUESTIONNAIRER instead of #QUESTIONNAIRE, the Side View Text will be automatically refreshed when clicking on the “Done” button
Special Global Variables Used with #KEYVIEW
&FIELD1 - Column 1 of KeyView
&FIELD2 - Column 2 of KeyView
&FIELD3 - Column 3 of KeyView
&FIELD4 - Column 4 of KeyView
Note: Make sure data is converted to appropriate format before using them in SQL Scripts. These global variables return the value exactly as displayed in the Key List View
Special Counter Field
In Addition, the global variable &FIELD5 is also available in this is used to contain a unique counter field where the value is the result of another query. This counter field is retrieved and updated by two additional queries which are specified in Questionnaire VAR file (in the Outline Directory, under the name of the Questionnaire) by two entries:
[QuestionnaireName]
COUNTER QUERY=Script6.SQL
COUNTER INCREMENT QUERY=Script7.SQL
Where Script is the prefix used by the Questionnaire for SQL files.
Script6.SQL should contain a query that will return a numeric value that will stand for the unique counter ID. If multiple rows are returned, only the first row will be used as the counter. Be careful with this. If you intend to access a table that will return multiple rows as a result set. Sort them properly first so that the desired counter will show up on the first row.
The second query, indicated by the file name “File7.SQL”, should contain an UPDATE statement that will increment the prior counter.
Note that both these queries are optional and are not necessary if you create tables with the IDENTITY data type. If you do this, SQL Server will assign automatic and unique counter values.
Normals and Last Entry Buttons
Just like in QA’s, you can have a “Normals” button in a Questionnaire. And similar to a “Last Visit” button, you can also have one labeled “Last Entry”. Since Questionnaire records don’t necessarily relate to an office visit, the name is slightly different.
To activate a Normals button and a Last Entry button, make the following entries in the Questionnaire.VAR file as follows:
[%Questionnaire]
READNORMAL=QuestionnaireN.SQL
READLAST=QuestionnaireL.SQL
Substitute the questionnaire name wherever “Questionnaire” appears in italics. If the SQL files specified are found in the OUTLINE folder, the system will make the buttons visible.
The actual content of the SQL files must be a query that returns the exact columns that are shown when editing or adding new record. In other words, the organization of the query would be very similar to that in *1.SQL file. In our example above the TSTEKG1.SQL looks like this:
SELECT TDATE,
TTIME,
FINDINGS,
EKGRHYTHM,
EKGRATE,
EKGPR,
EKGQRS,
EKGQT,
EKGST,
EKGAXIS FROM TSTEKG WHERE SSNO='&MRNO' AND COMPANY='&COMPANY'
AND TDATE=&{#'&FIELD1'} AND TTIME='&FIELD2'
If, for example, the Last Entry button should be used to select the contents of the latest prior entry from the TSTEKG Table, this can be done by reusing most of the above query (with slight modifications as shown below).
SELECT TOP 1 TDATE,
TTIME,
FINDINGS,
EKGRHYTHM,
EKGRATE,
EKGPR,
EKGQRS,
EKGQT,
EKGST,
EKGAXIS FROM TSTEKG WHERE SSNO='&MRNO' AND COMPANY='&COMPANY'
ORDER BY TDATE DESC, TTIME DESC
The most important elements in the above change is the use of the “TOP 1” command, which would select only the first record in the having the medical record number and company of the desired patient. In order to make sure that the correct record is selected, the ORDER BY clause sorts the records by date and time in descending order (DESC). This will ensure that the most recent data is first. This new statement can then be stored in a TSTEKGL.SQL file and will be used by the Last Entry Button.
A “Normals” button requires a different approach. You must use the SELECT statement as shown above, but instead of retrieving a specific record (row), you instead put the desired “default” values in your select statement as shown in the example below:
SELECT cast(datepart(mm,getdate()) as varchar)+'/'+
cast(datepart(dd,getdate()) as varchar)+'/'+
cast(datepart(yy,getdate()) as varchar),
’00:00’,
‘’,
‘’,
‘’,
‘’,
‘’,
‘’,
‘’,
‘’ FROM TSTEKG
All data supplied as a default or normal value may be placed between single quotes. There is no need to distinguish between numeric data and alphanumeric data (numeric data normally does not use quotes). This is because inside a questionnaire, all data is translated to alphanumeric to fill in the Questionnaire’s initial values.
In the above example, the first column shows:
cast(datepart(mm,getdate()) as varchar)+'/'+
cast(datepart(dd,getdate()) as varchar)+'/'+
cast(datepart(yy,getdate()) as varchar)
This returns today’s date in the MM/DD/YYYY format, the desired format for a Questionnaire.
View Text Buttons
(#QUESTIONNAIRE) Questionnaires may use a View Text button, which allows the user to view entries as a text file. To activate put the boilerplate name in the *.VAR file under the main section as follows:
[%Questionnairename]
TEXT=VWSIDE.TXT
When using the View Text button in a Questionnaire, the data will first be saved before the text is displayed. Thus View Text button now means SAVE and then VIEW TEXT in one function.
Note: Behavior for #KEYVIEW is more restricted. When performing an ADD, clicking View Text will display the text but will also be the equivalent of DONE (save and exit). EDIT will function as described for Questionnaires.
Splitting up a Questionnaire into Multiple Screens
Sometimes it is necessary to split a large Questionnaire into multiple screens, even though the data accessed belongs to a single table. There are good reasons for doing so, primarily consideration of the workflow. In some cases, parts of the Questionnaire are done at a different time than another part of a Questionnaire. Another consideration is the identification of the users who will fill up the data entry screen. You will need to consider whether these are completed by different people. If so, then it would be more logical to split the Questionnaire into pieces that fit the people who will use it.
If you decide to split up a questionnaire, it is important to decide which of the new Questionnaires accessing the same table, will be used to create a new record. It should be limited to only one of them.
The other questionnaires in the group should be limited to just viewing an existing record and editing it. Don’t be confused by this point because remember that we are creating only one new row in the table. But different questionnaires will allow editing only of different parts of the table. However, the first questionnaire must initialize a brand new row and must include all fields. The first questionnaire must be the one to initialize all other values in the other columns using the *3.SQL file.
In order to prevent data entry errors, you need to disable the “ADD” button in all the other questionnaires. This will ensure that only the first questionnaire in the set can create a new record. To do this, remove the “NEW=Questionnaire3.SQL” entry in the Questionnaire.VAR file.