Radiology Workflow
When using MedInformatix in the Radiology environment, it will be necessary to plan and design the appropriate workflow.
Many options within MedInformatix are designed to provide greater ease in the access and process of information in this environment. The system can provide a seamless workflow from the arrival of the patient to to the final patient report and processing of the claim. Medical Transcription is often a key requirment in the Radiology environment and is addressed in the next section of this manual.
The typical Radiology workflow begins with the Master Patient List view, which provides staff the ability to enter the patient Demographic information and create an appointment. When the patient presents for the test, staff are able to Tag the arrival of the patient, make a room assignment, and once the patient visit is completed, mark the appointment as finished.
Typically, the front desk is responsible for alerting the Technologists that there are patients waiting by logging the patient’s arrival on the computer. They are also able to verify information about the patient’s account and/or the visit and to check and note the patient’s previous or current appointment status.
Once the patient is tagged as having arrived, the Technologist is able to determine that a patient is waiting via the Master List or Waiting Patients screen and will assign them to a room as soon as possible. After the patient is placed in the room, the staff will perform the appropriate test and Finalize the appointment with the appropriate detail. This step typically creates an order for the Radiologist and creates a Delayed Billing charge that the billing staff will later confirm and process for payment.
By checking the Orders view, the Radiologist is able to determine when a test has been completed and is available for reading. Upon completion of the reading, the Radiologist updates the order, which alerts the Transcriptionists that a test has been read.
When the Transcriptionist completes the report, the order is updated and is returned to the Radiologist. Again, by checking the Orders view, the Radiologist is able to determine that a report is ready for review and for signature. From that point, the billing staff is able to confirm charge and diagnosis detail and process billing for the test(s).
The following documentation explains how this is accomplished by a tree designer in a custom decision tree. As with any area of the Decision Tree, how each option is opened depends on the tree design.
PACS Button
Many Radiology facilities interface with a PACS system and access is provided via a setting. When the Radiology Setting is set in DIMPROF ([DIM] Radiology=1], a PACS button replaces the LAB button on the Decision Tree. These are specific interfaces to Siemens PACS. To change the parameters for launching the PACS interface, set the parameters under:
[DIM]
Pacs Launch Parameters=place parameters here
Document History Custom Button Action Properties -- Radiology
When using the Radiology Pacs=2 setting, one can now configure custom buttons in Document History with an action property.
There are 5 available buttons. Examples are listed below.
[DIM]
Pacs Custom Button Action=#SCRIPT:Do Something
Pacs Custom Button Title=Do Something
Pacs Custom Button2 Action=#CHIEF
Pacs Custom Button2 Title=ICD9
Pacs Custom Button3 Action=#ICD9
Pacs Custom Button3 Title=ICD9
Pacs Custom Button4 Action=#PROGNOTE
Pacs Custom Button4 Title=Progress Note
Pacs Custom Button5 Action=#EDITC
Pacs Custom Button5 Title=Create Note
Copy PCP/Copy to Providers
Often additional medical providers need to receive a copy of a patient’s diagnostic report for the exam. This option is added to the decision tree via a tree node that opens a Provider Copy List window. The tree node should be given the following action property:
#PCPCOPY
The Provider Copy List screen allows user to select additional providers from the Referral Source Database, which are then added to the Copy To list. Providers entered will be unique to an Appt No. This feature also includes a COPY LAST button which will copy the provider list of the highest previous Appointment Number.
Providers entered in this list will override any providers listed in the Related Providers Information in Demographics (CLPCP Table) when printing copies in the Print Server Module. If the print server module is not installed, or if the Use Appt No setting is not used, this feature will have no effect.
Change Referring Physician/Authorizations
An Authorizations Window is added via a tree node. This option displays current authorizations for treatment and will allow the user to enter new authorizations. The tree node is given the following action property:
#AUTHORIZATIONS
Finalize
Finalize is a tree node added to the Technologist tree. This action property is used to mark an appointment as completed. Once marked as completed, it triggers automatic billing of charges that are tied to an appointment reason code (#BILLDELAYED) and signals that billing can be done. The tree node is given the following action property:
#FINALIZE
The action property allows users to enter up to four (4) ICD9 codes and select a primary item. Diagnosis priority is assumed by order of diagnosis entry (i.e. first item is primary). However, a diagnosis entered on the Confirm Appointment window will appear as the first ICD10 in this action. When authorization is created, it will display diagnosis options based on the content of the matching authorization for current appointment number. It requires the DIMPROF setting:
[DIM]
Use Appt No=1
When marking an appointment as completed for the purpose of billing, one can also set the appointment as “Finished”. This will be done automatically but can be disabled using this DIMPROF?.INI setting:
[DIM]
Finalize will Finish=1
When using #FINALIZE to finalize an appointment, it is possible to prevent its reuse on the same appointment, as well as prevent the running of a script on Exit. To enable this special behavior, set the following in DIMPROF?.INI:
[DIM]
Finalize Once=1
#FINALIZE2
This is similar in appearance and functionality to #FINALIZE, however, it only allows one action, which is to update the DX list (up to four ICD10 codes). If diagnosis is pulled from authorization, updating the diagnosis here will update the authorization record’s diagnosis. A diagnosis entered on the Confirm Appointment window will appear as the first ICD10 in this action. Updating a diagnosis can be done at any time including before or after the appointment is finalized.
Finalize and Order
In addition to marking the appointment as finalized, an order to alert the Radiologist that a test has been completed is often put in place. This is accomplished by enhancing the above #FINALIZE option with a script. (See Scripting Action Properties in the Decision Tree Node Properties section of this manual.) The tree node is given the following action property:
#SCRIPT:FINALIZE
For a STAT read, use the following action property:
#SCRIPT:FINALIZESTAT
The action properties are designed run the following scripts, which will send an order to the Radiologist’s Orders View. The SQL scripts are stored in the SCRIPTS.TBL file in the OUTLINE directory:
[FINALIZE]
1=#FINALIZE
2=#SQLQUERY:DICTORD.SQL
[FINALIZESTAT]
1=#FINALIZE
2=#SQLQUERY:DICTORDSTAT.SQL
Notes
The Radiology workflow may requre that the Technologist record a Progress Note regarding the patient process. This allows the Radiologist the opportunity to review additional information prior to dictating the results. Progress Notes are made available via a tree node using one of the following action properties:
#PROGNOTES
This option opens the Progress Notes Window, where short notes for the medical record are entered. The entry date and user of the note will be automatically tracked and notes will be displayed from newest to oldest. Notes may be edited only by the original creator and only on the same day of creation. Notes can accept up to 4096 characters per note entry.
An RX button is available for easy access and a Send as Message option allows a user to send a selected note to other users. (i.e. Used by nurse to alert doctor of important note(s))
A new, blank note may not be saved. However, an existing note can be made blank (based on rights) and saved.
#PROGNOTENEW: SectionName
This action property is related to #PROGNOTES which is described below. It is a short cut feature because it allows a new note to be entered automatically without having to enter the Progress Notes View and click on the New button. In other words this is the “New Note” function of #PROGNOTES. This is useful if the user is expected to primarily enter a new note each time and thus cuts out the step of having the view existing notes first.
#PROGNOTES:SectionName
This is a “database” version of the progress notes. You can pass the section name to this module, which will cause only the messages belonging to the same section to be displayed.
Dictation/Transcription Orders
MedInformatix supports Phillips Dictation systems. Within the setup of the dictation system, the order received from the Technologist for the Radiolgist to be read is typically marked as completed and a new order can be designed to send to the Transcriptionist. This is done via the equipment setup and a decision tree node. The following is an example of the action property that turns the Phillips Speech Microphone on:
#DICTATE:&MRNO_&XACID.WAV
When the user selects EOL to end the dictation, the POSTDICT.SQL file is called, which can be designed to mark the Dictate order completed and create a Transcibe order for the transcriptionist.
A tree node will also be created for the Transcirptionist to open the dictated file, often called Listen to Dictation. An example of the action property assigned to the node is:
#TRANSCRIBE:&MRNO_&XACID.WAV
And, when the transcription is ended, the posttrans.sql file is called, which is designed to mark the order completed and create a new Billing/Coding order for the billing staff.
Coding (Process Delayed Billing)
As noted above, once the report has completed the dictation and transcription process, an order is sent to the Billing or Coding area for final processing. This option is added to the decision tree via a tree node that opens the Process Delayed Billing Screen. The tree node should be given the following action property:
#BILLDELAYED
A thorough explanation of the Delayed Billing process and screen is outlined in the following sections.
Delayed Billing
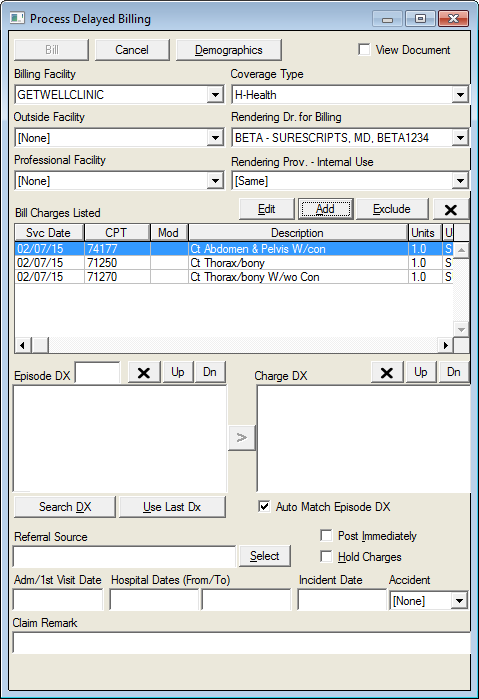
The purpose of Delayed Billing is to pre-define the billing codes for each exam so a coder or biller does not have to determine them separately for each exam. This provides a more efficient and time saving workflow. A Delayed Billing workflow can be automated for the Radiology environment, which is often preferred. Delayed Billing works only from the Decision Tree and sends the charges to a holding area for later processing. In contrast to standard billing, this special billing mode requires only the selection of a CPT code, which is associated with an Appointment Reason. Billing using this mode can only be processed using the Process Delayed Billing screen shown in the graphic above.
When a technologist completes an exam, they will select the final Appointment Reason for the exam. This is very important because the actual exam or scan completed may not be the one the patient was originally scheduled for. When the final reason is selected, the system uses the CPT codes entered in the Billing Profile for the appointment reason to “pre-bill” for the patient visit. Final billing is later performed by a coder who assigns the Radiologist (Rendering Doctor), the Facility, and the appropriate diagnosis codes to the charges, however the Technologist may have the option to enter the appropriate billing detail through a Coding option.
Charges entered in this manner go into the CLBILL table and do not affect the Bill window for standard charge entry. The action property used to open the Delayed Billing window is #BILLDELAYED.
A recommended workflow requires that several items must be in place for Delayed Billing to occur:
Security option (Workgroup Profile or DIMPROF setting): Use Appt No=1
Security option (Workgroup Profile or DIMPROF setting): Delayed billing Mode=1
Appointment Reasons with Billing Profiles (CPT Codes) attached. (See User Guide: Appointment Reason Setup/Billing Profile)
#FINALIZE Action Property: Used to mark the appointment as completed.
#BILLDELAYED Action Property: Used to open the Process Delayed Billing screen
Once these items are in place, the following workflow typically occurs: The patient presents for the scheduled appointment and the appointment is Tagged as Arrived. Once the test is performed, the Technologist selects the Finalize Appointment option on the Decision Tree which creates the delayed bill. Once the biller receives confirmation of the test (typically a signed report), they open the delayed bill via the Coding option on the Decision Tree to confirm that the information on the bill matches the information on the report. Once confirmed, the biller clicks on the Bill button. The charge(s) is available at that point in the Bill screen and will fall into normal claims processing.
Delayed Billing Window
Bill: When selected, charges listed are transferred to the standard Bill screen and are ready for claims processing.
Cancel: Closes the screen and cancels any changes.
View Document: When checked, this option displays the document related to the current Appointment Number. The size of the document view varies depending on screen resolution. The system will remember the last checkbox status when moving to a new entry.
Facility Fields: Displays the Billing Facility and Outside Facility.
Rendering Provider Fields: Displays the provider that performed services or the billing provider for services rendered by the non-billing provider (Internal Use).
Edit: Opens an Edit Delayed Charge screen where charge detail may be edited.
Add: Opens a Confirm Charge screen where additional charges and/or a Line Item Remark can be added without returning to the tree.
Exclude: When several items are listed, this option allows selected item to be excluded from processing until a later date.
Delete: Deletes the selected item.
Use Last Dx: Adds the diagnosis code(s) from the previous claim.
DX Buttons: Allows the user to search for and select diagnosis.
Referral Source: Displays patient’s Referral Source. Use the Select button to change the selection.
Admit and Hospital Date fields: Used to enter patients Admit or First Visit Date and/or Hospitalization dates.
Post Immediately: Marks the item as self pay. Charge will not be billed to insurance.
Hold Charges: Places the item on Hold status, which keeps the charge from being forwarded to the Claim Batch.