Order Entry System
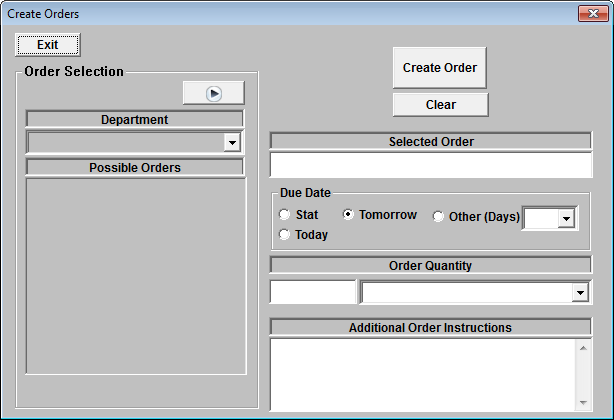
The Order Entry system is made up of several components. The actual order is initiated only through the use of an Order Property in a tree node on the Decision Tree. Clicking on a node displays a window such as the one show below.
-
An order may be directed to different departments and the valid list of departments are defined in DEPT.TBL in the OUTLINE directory, as described in the Orders Property section of the Decision Tree Chapter.
-
Orders can be done with or without asking for a confirmation window. Orders requiring confirmation as defined in DEPT.TBL, can be set to require a diagnosis in order to specify a Reason for Study. Usually, this is enabled only for departments that perform diagnostic testing.
-
Multiple Orders can be sent from one order event using the Order Macro feature, which is described in the Order Property section.
-
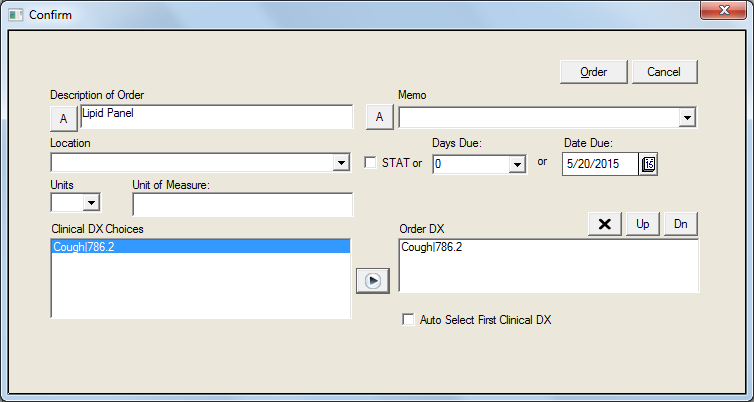
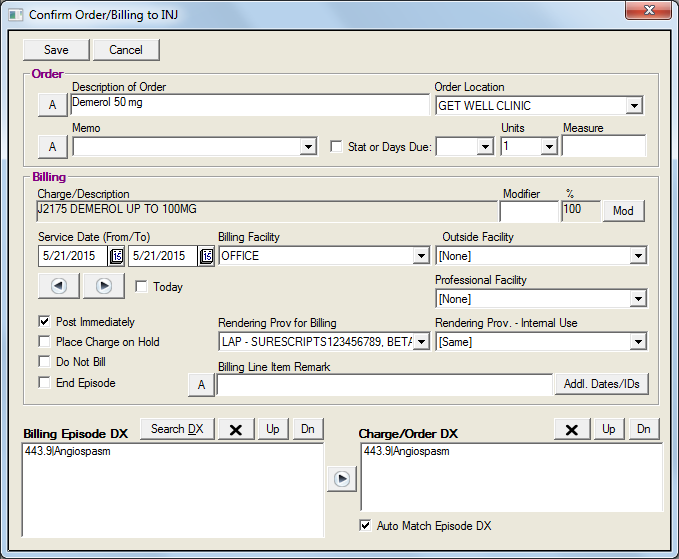
If a billing property is also found on the tree node, the Order confirmation window will change so that it is combined with the Billing confirmation and looks like the window shown below.
-
In the Order/Charge Confirmation screen, diagnosis codes will now be pulled from the Problem List and shown even if billing is disabled.
-
When editing an order, which creates a new order, the diagnosis will default to the last one found for the current Order Description with today’s order date.
Managing Orders by Patient
Once the orders are confirmed, they are able to be reviewed by clicking on the Orders button in the Decision Tree window. This will display the window shown below.
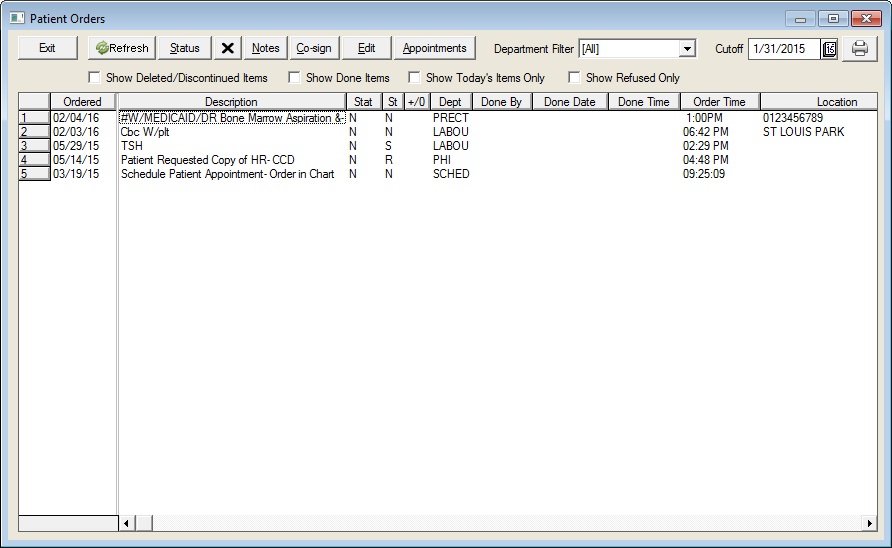
Users wishing to manage the orders and their status for one patient can easily do it from the Orders button in the Decision Tree. For example, after a physician has finished with a patient encounter and the nurse has been signaled to coordinate physician orders (via a flag in the Rooms View), the nurse can just enter the patient chart and go directly to the Patient Orders window.
Patient Orders are also viewable by patient from the Appointment List and Master Appointment Views. Select the desired patient, and click the View Orders button to view the window shown below:
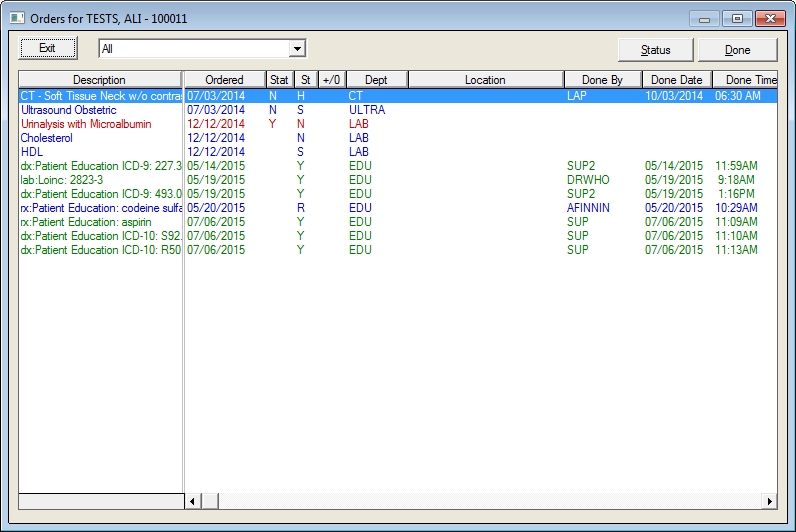
This view does not show all orders. Since it is intended for the person in charge of checking the patient out, it is often filtered to show only orders that relate to the check out process. You can control which departments will appear by making the following entry in DEPT.TBL in the OUTLINE directory.
[Dept Group]
PATORDERS=NURSE,PATH,PROC,LAB,SCHDP,SCHED,REFD,ULTRA,
CT,NUCL,REF,SURG,MRI,RAD,VER
Managing Orders by Department
A more global view of orders is provided in the Workflow View. An option called “Orders View” will allow display of orders either by department or by ordering provider. Filters are also provided based on due dates and ordering locations.
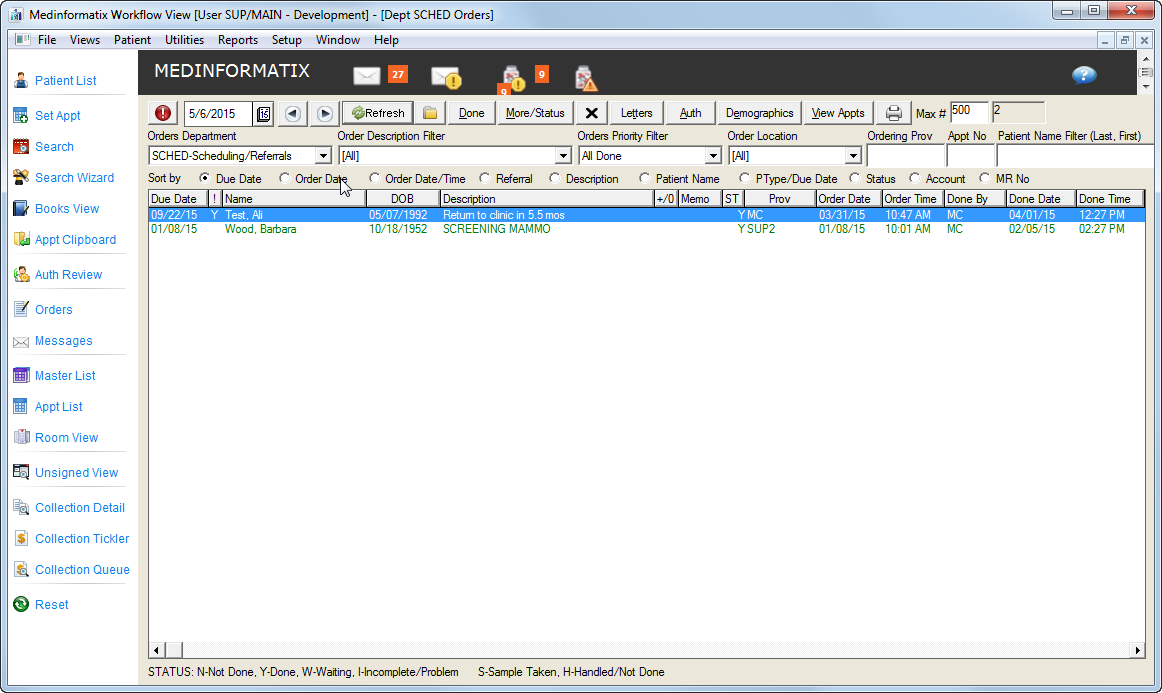
The Orders View window is used as a followup/tickler window and can be the main tool for used by management to ensure that no order slips through the cracks. If the alert icon (!) appears on the upper left hand corner of the window, then this indicates that past due orders exist.
Customizing Orders Departments
The Orders View is used to assign responsibility to specific individuals in the office to take care of a class of orders. Sometimes these responsibilities can be split up along the same groups as the department codes but often, a person will have to be responsible for followup of multiple department codes.
To accommodate this, the Orders Department selection box on the view does not actually list all valid departments. Instead it lists a custom set of labels, which are defined in DEPT.TBL, that correspond to specific department codes that fall within the persons’ range of responsibility.
This is defined using the [Departments] and [Department Groups] setting in DEPT.TBL. Both of these were discussed in the section on Orders Property in the Decision Tree chapter. Thus, during an installation, the tech support/trainer can customize this to fit the actual organization that exists in the practice.
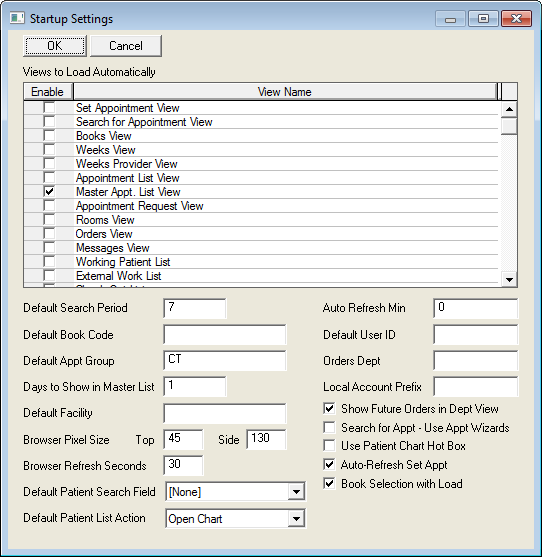
The Orders Department can be defaulted to a specific department by making the entry for default department (under Orders Dept) in Startup Settings from the SETUP menu of Workflow View. This field affects what orders are to be displayed on the Orders View. If left blank, the system displays all orders created by the current user. If a DEPT code is entered, it will show only orders that belong to that department. (Only users responsible for specific departments need to have a default set here.) If an “*” (which means all departments) is entered, all orders in the system are displayed.
In DEPT.TBL (Orders setup), the [DEPT GROUP] section allows a wildcard department group of “*”. This translates to “all” departments. Thus a code of NURSE=* means that NURSE will see all orders regardless of department in Orders View.
Order Priority Filter
The Orders priority filter allows the users to list only the orders that match the criteria of the filter. These filters are fixed and include the following:
|
All Due Today |
|
All Due This Week |
|
All Due in 1 Week |
|
All Due in 2 Weeks |
|
All Due in 4 Weeks |
|
All Due Today and Future |
|
All Past Due |
|
All Ordered Today |
|
All Done Today |
|
All Done This Week |
|
All Done |
Order Location
In the Orders View, the Order Location filter is defaulted to [All] unless set by a prior Refresh. The last setting is always remembered when you return to the Orders View, which is specific to a workstation.
-
An order location can be used to indicate where the order will be handled.
-
The ordering provider can be used to identify who initiated the order.
These two fields need to be coordinated so that the users managing the orders will be able to filter those orders for which they are responsible.
-
If Order Locations are defined under PREFERENCES – CLINICAL SETUP TABLES – ORDER LOCATIONS, users will be able to select an order location each time they order.
-
If the Order Location is specified in the Security Profile of the user’s Login ID, then this user’s orders will always default to the specified location. However, the user may still override this setting to choose a different order location.
Changing Order Status
To change the status of the order, click on the Done button from the Orders view in Workflow View or the Done button when looking at Patient Orders from Master Appointment view or Appointment List. A simple confirmation message needs to be acknowledged and the order will be marked done.
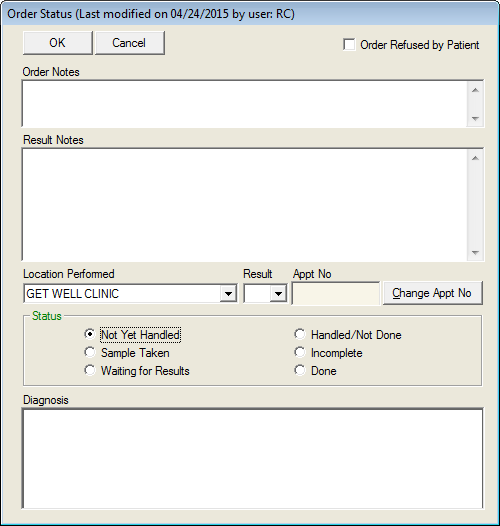
If further detail about the order needs to be stored, you can use the More/Status button. This allows you to put notes, enter results, and select from additional status codes. If multiple steps are required, the status codes will indicate the stage that the order is in.
Complex orders that require detailed followup should use this method of indicating status.
Patient Recall Orders
An optional Patient Recall feature is available to record the next time the patient is due for an appointment. This feature is very important in medical specialties where periodic exams and checkups are necessary
The Patient Recall feature will prompt the user for a recall period (days, weeks, months, or years) when a patient appointment is tagged as “Finished”. If a follow-up appointment will be scheduled at the time of check out, the user can simply click Cancel when the Recall screen appears. If a follow-up appointment will NOT be scheduled at checkout, the user can select the proper recall period, enter any additional notes and click OK to save the Recall notice
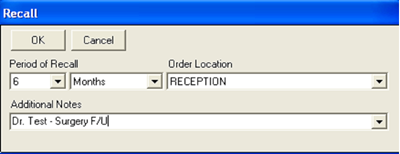
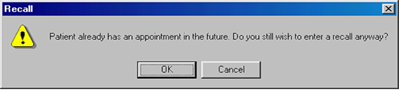
When a recall notice is saved, an Order is created to the SCHED department that is due in the future, and calculated based on the current date + the recall period selected. If a future appointment is already scheduled, the user will be given the option to add a new recall notice. If an uncompleted order to the SCHED department already exists, the patient recall prompt will NOT appear. This avoids creation of duplicate orders when the physician also orders a follow-up visit while the treatment plan is documented in the Decision Tree.
The recall or scheduling orders can then be used to contact patients by telephone, by form letter or used to create a report. An internal process should be developed to notify patients of a needed appointment and to follow up on patients that do not schedule a follow-up. Typically, a form letter or postcard can be mailed to patients who have a SCHED order due in the following month.
When the Recall process is in use, an extra step is required for users scheduling appointments. During the scheduling process, the user needs to check for existing SCHED orders and mark the order as completed when a follow-up appointment is made which fulfills the uncompleted order. This will keep recall form letters from being mailed to patients who have already scheduled an appointment, and will remove the patient from the Recall list.
Note: For steps needed to “turn on” the Recall Feature, see Recall in the DimProf manual.
Recall Orders -- Additional Notes
The Additional Notes section of the Recall screen are populated through the OMEMO.TBL. The table must included the Department (equivilant to the Order Department) as a section heading. The following are samples that may be created.
[LAB]
Fasting=1
Non-Fasting=1
[SCHED]
If no improvement=1
[EDU]
Booklet=1
EduSheet=1
Pamphlet=1
Video=1
[REFU3]
CI / Allergic=1
Not Applicable=1
NA / Under Rx for Disorder=1
NA / Organ Absent=1
[REFU2]
Declined, fear of abnormality=1
Declined, too expensive=1
Declined=1
Refused=1
Will Check Insurance=1
Will discuss w parent=1
Will talk to spouse=1
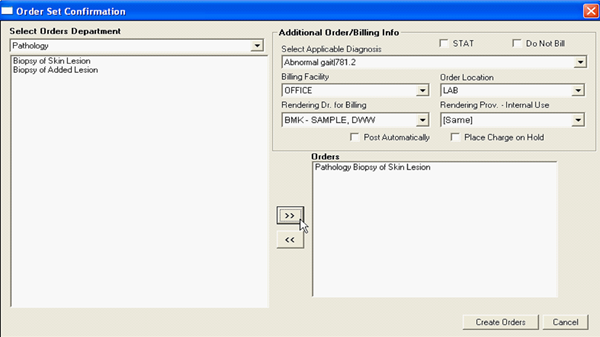
Orders -- ORDERSET
#ORDERSET and #ORDERSET:OrderFileName.set provides an order/billing window that allows for faster entry of multiple order items. (See Action Properties.) The change involves the presentation of all possible orders using a dropdown Order Department field and selection box on the left. Items can be selected from this list and added to the Orders list on the right. Supporting order and billing information, such as diagnosis, facility, rendering doctor are only provided once which eliminates the individual confirmation of orders. To accomplish the speed entry; certain values are not entered and are simply assumed. These include units (which must be specified in advance during setup), billing remark, dates of service (assumed to be today), and days due (which can also be specified during setup and in DEPT.TBL).
OrderFileName.set is in the OUTLINE directory. File Contents:
[%DEPT%]
Laboratory=1
Pathology=1
Radiology=1
The above example specifies the selection of departments. These do not have to match the actual department codes in DEPT.TBL since they just act as sections of order.
The actual orders for each of the departments listed above must be defined, using the following format:
Department|Order Description ^Order
Code|Units|Measure|Memo|STAT Y or N|Days Due|CPT Code or Macro
All values other than Department and Order Description are optional. Billing is triggered by the [BILLING] Setting for the department as is used in other standard orders.
Using ‘Laboratory’ as an example, the section in the file would appear as follows:
[Laboratory]
1=LAB|Panel-Arthritis||||N||80072
2=LAB|Bun & Creatinine||||N||#BUNCR
The format is almost exactly like the Order Property on the tree, except that a CPT code can be placed in the 8th position for billing. This CPT code may also be a billing Macro. Items must be listed in sequential order starting from ‘1=’.
Each “.SET” file may have any number of departments but may not exceed 64K in size. A sample of this file is PLTEST.SET in M6DISK5.EXE (Primary Care Decision Tree).
[Deprecated - Do Not Use] Orders -- ORDERSBYDEPT
The #ORDERSBYDEPT action property displays a different method of entering orders. This window allows the department to be selected, and the list of orders and memos are also selectable, all from a combo box. The list of departments and orders are defined in PACSORDR.TBL and has the following format:
[Departments]
CT=1
LAB=1
[Orders]
This is an Order=1
This is another Order=1