Information Locations
Modifying Default Behavior of Patient Demographics Windows
Many default values for the Demographics window can now be set in DIMDB.TBL which is located in the \DIM\TABLES directory.
Customization of the MedInformatix system can be done through Demographic Preferences. The demographic preferences in MedInformatix are stored and defined in the dimdb.tbl file located in the \MEDINFO\TABLES folder on the application server.
Each installation of MedInformatix includes standard demographic preferences that can be customized to display particular information; to make a field required; and or to check for duplicate information as necessary. To make such changes, the dimdb.tbl (demographic preferences) file must be edited. The DimDB manual describes the settings available in the dimdb.tbl files.
 Many of the settings
described in the DimDB manual can be turned on or off by using the Demographic
Preferences Setup Table inside the MedInformatix product. Some settings
are NOT included in this table and may only be turned on or off by manually
editing the dimdb.tbl file. (See the
MedInformatix User Guide – Demographic Preferences section.)
Many of the settings
described in the DimDB manual can be turned on or off by using the Demographic
Preferences Setup Table inside the MedInformatix product. Some settings
are NOT included in this table and may only be turned on or off by manually
editing the dimdb.tbl file. (See the
MedInformatix User Guide – Demographic Preferences section.)
Action Property Available in Patient Demographics
Action properties are discussed and created n the section on Decision Trees. Up to four action properties can be called directly from the Patient Demographics window. This allows one to design custom QA forms, questionnaires, and other data entry screens in the Decision Tree that can be called from the Patient Demographics and, thus, eliminating the need for data entry personnel to access the decision tree.
This action property can be called from buttons, which appear under the Account Info section at the bottom of the Demographics window. If the buttons are not defined (labeled), they will not appear and no change will be noted on the Demographics screen.
The Action label is used to place a title on a button. Again, the buttons will be invisible unless an action label is defined here. The Action entry indicates the action property to be used. Use the exact same format as the action properties in the Decision Tree.
A button can be activated using the steps shown below
Activating the Action Button
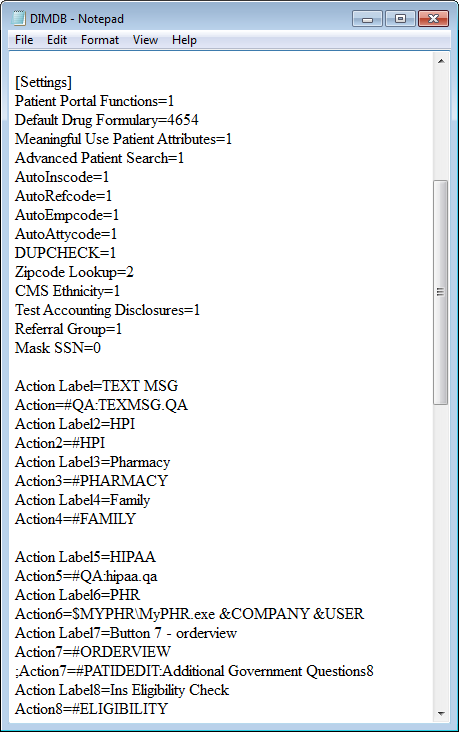
To activate a button, entries can be made to DIMDB.TBL as shown in this example:
[Settings]
Action Label=Charity Assessment
Action=#KEYVIEW:CHARITY
Action Label2=
Action2=
Action Label3=
Action3=
Action Label4=
Action4=
File Locations
The EMR documentation created using the Decision Tree is based on the coordination of many features explained throughout this manual. One of the key aspects in coordinating the features is understanding where information is housed. This section will provide an overview of setup tables and data tables locations.
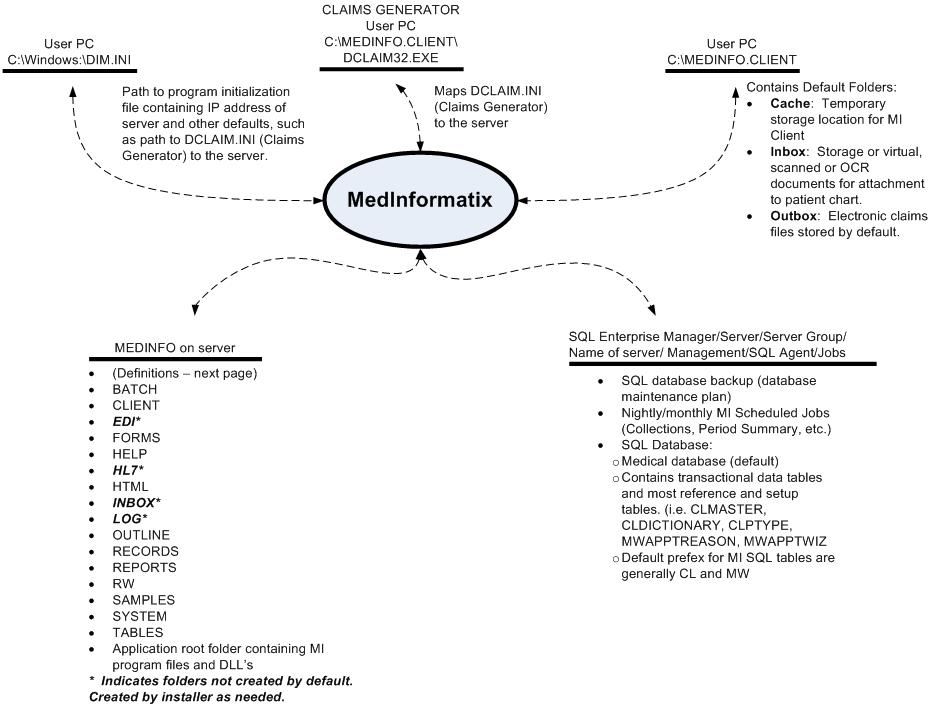
Tables
When information is entered into MedInformatix, it is typically stored in a table. As the map displayed earlier demonstrates, tables are located in one of two locations. The first is on the server under MEDINFO and then the Tables folder. Many setup tables are found in this location.
The second location for data tables in MedInformatix is the SQL database, which is stored with SQL on a server. (See your technical support for this location.) A familiarity with SQL and SQL statement is necessary in order to work with these tables of information.
Preferences
The Setup Tables are used to customize and define operations of the demographics, charting or electronic medical record capability of MedInformatix. Many of these tables should not be modified without first consulting the MedInformatix Technical Reference Manual and the system administrator or your reseller for technical assistance. These tables are located under Preferences on the Menu Bar of the Main MedInformatix Screen. The following Common Diagnosis Codes Table and Chart Limit table provide examples of steps required in working with these tables.

Common Diagnosis Codes Table
The Diagnosis Codes Table contains the ICD10 diagnosis codes for the common or short list of problems. Codes entered here should represent the most common codes used in the medical practice
It is important to note that codes in this list cannot be edited. If a code must be changed, it must first be deleted from the list and then added back in correctly.
The diagnosis code setup table is one of the few clinical tables that is also used in the billing system. This short list of diagnosis codes is accessible when entering charges manually, which is covered in the Practice Management section of this manual, under Charge Entry.
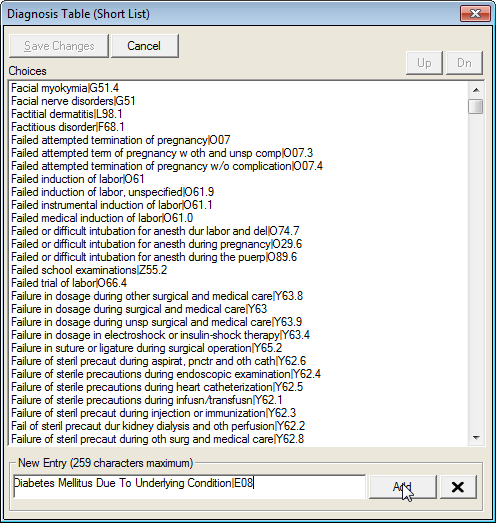
To add a common diagnosis code
Select 1 Common Diagnosis Codes from the Setup Clinical Tables list under Preferences on the Main Menu.
Enter a diagnosis description and ICD9 code in the New Entry field in the format: Description|Code.
Click the Add button.
Repeat the process to add another code.
Click the Save Changes button when all codes have been entered.
 Format requires data to be entered as Description|Code. The
“|” is the Pipe symbol, which is entered by selecting the SHIFT
and \ keys on the keyboard.
Format requires data to be entered as Description|Code. The
“|” is the Pipe symbol, which is entered by selecting the SHIFT
and \ keys on the keyboard.
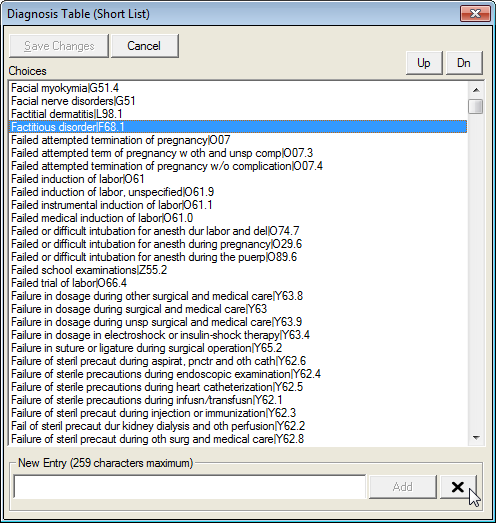
To delete a diagnosis code
Select 1 Common Diagnosis Codes from the Setup Clinical Tables list under Preferences on the Main Menu.
Locate and click on the code to be deleted in the Choices window of the Diagnosis Table. The selected code will be highlighted.
Click the Delete (X) button.
Repeat the process to delete another code.
Click the Save Changes button when all codes have been deleted.
Chart Limit Table
The Chart Limit Setup table provides the ability to limit Chart Sections for a specific Workgroup within a particular Program Area. For example, the Doctor workgroup may be limited to (or only need to see) the E&M and Notes sections of the Document Repository. When entering the area where Chart Sections have been limited, the provider no longer needs to search through a long list of chart sections, but sees only those he/she needs to review.
Limiting the chart sections that a workgroup can view, can improve speed and efficiency by reducing the number of keystrokes needed to locate a pertinent document.
This also may be used for Security purposes to limit certain workgroups, like Front Desk to only view chart sections necessary to complete their tasks. The following table outlines the Program Area selections
Program Area |
Description |
Document Repository |
Choose Chart Sections that should appear in the Document Repository for the selected workgroup. |
Document History |
Choose Chart Sections that should appear in the Document History screen for the selected workgroup. |
Unsigned/Unsaved Documents |
Choose Chart Sections that should appear in the Unsigned/Unsaved Documents view for the selected workgroup. |
Review/Not Sign |
See Signature Workflow: Review/Not Sign. Used to assign Chart Sections where documents will be marked as Reviewed rather than Signed. Used when additional/authorizing signatory will review document and add final signature. |
Document History/Use Appt Desc |
Used with security setting Use Appt No is selected, typically in Radiology setting. Chart Sections specified will display Appointment Description rather than Chart Section description. |
To use Chart Limit

Select 4 Chart Limit from the Setup Document Repository tables under Preferences on the Main Menu, which opens the Chart Limit screen.
Using the Workgroup field dropdown arrow, select the desired workgroup.
Using the Program Area field dropdown arrow, select the desired Program Area (i.e. Document Repository).
Select the Chart Section to be added to the Inclusion list and click on the right arrow button. The item will appear in the inclusion list.
Continue adding to the inclusion list until all desired items for view have been selected.
To remove an item from the inclusion list, select the item and then click the left arrow button.
Once completed, click the Exit button to save the changes and exit the table.