Imaging System
Imaging refers to features of MedInformatix that deal with the import, manipulation and storage of graphical images.
-
MedInformatix can accept Windows graphic images, which can be imported directly into the Document Repository if they are in BMP, JPG, TIF, GIF, PDF, DOC, XLS, MPG, AVI, etc., format. It also supports multi-page TIF files.
-
Images can be copied to the clipboard from another application and pasted directly into the Document Repository.
-
The Inbox can receive files that have been created in batch (using a scanner) to be filed in individual patient Document Repository.
-
Documents can be scanned directly into the patient’s document repository.
- The Document Repository allows the index and display of Virtual Documents (non-MedInformatix created documents such as those created in Word or PDF) found in any folder accessible from the server.
Importing Images into the Document Repository
1 Click the Document Repository button on the Decision Tree menu bar.
2 Select a chart section from the Save Document screen.
3 Click the Import button.
4 Select a file from the directory
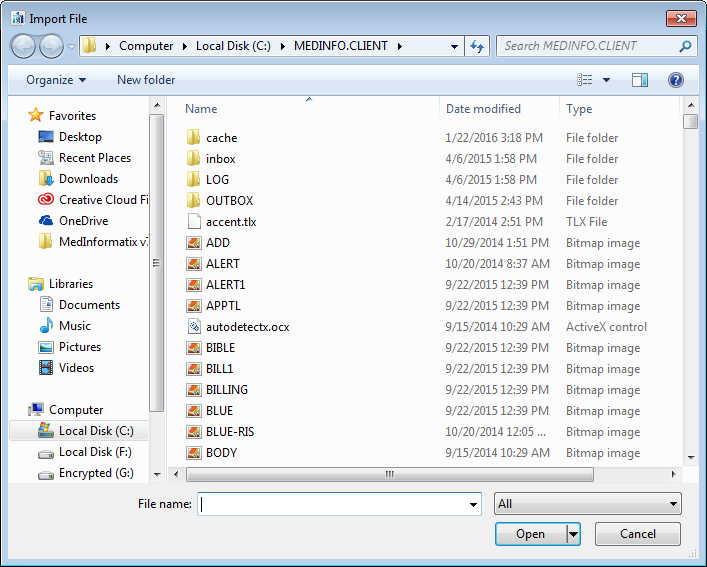
Once in the Document Repository, a user can simply click on the Import button in order to navigate and import the desired image directly into the Document Repository.

Once imported, the Inking feature is available to document or draw onto the image prior to saving. This is useful when a stored image is used to demonstrate or document a procedure for a patient.
Importing Windows Documents
Examples of Windows Documents are BMP, JPG, TIF, GIF, PDF, DOC, XLS, MPG, AVI, etc. These files can be imported into a designated folder and MedInformatix will behave as if these documents are integrated into the Document Repository (except for printing). Documents appear in the Document History window and the actual physical location of the files can be in any folder on the Net Service computer.
To use this feature, place the files to be imported into the Inbox Folder. The names of the files do not matter. In order for this feature to work, a Browser Plug-In must be installed in Internet Explorer for the desired document type.
Before using this feature, virtual chart sections must be defined which will store the non-native documents. Using CHART.TBL make entries as shown in the example below:
[Chart Sections to Show]
Diagnostic Test PDF=INDEXED|C:\MEDINFO\RECORDS\C01\PDF\
Visual Fields PDF=INDEXED|C:\MEDINFO\RECORDS\C01\PDF\
[Chart Sections to Save Inbox]
Diagnostic Test PDF=INDEXED|C:\MEDINFO\RECORDS\C01\PDF\
Visual Fields PDF=INDEXED|C:\MEDINFO\RECORDS\C01\PDF\
In the above example, “Diagnostic Test PDF” and “Visual Fields PDF” are chart section names that are to be used to name the imported documents. The designation “INDEXED” must be entered as shown and then followed by the folder as seen by the net service. It is recommended that these documents be kept in the RECORDS folder for easy maintenance.
From the Inbox, the document is previewed to determine which patient it belongs to; a patient is selected, as well as a Chart Section that has been defined as shown above.
The document can also be assigned an “Owner” when filing it under the In box. This allows the document to appear in the Unsigned/Unsaved documents view for review and/or electronic signature of the assigned Owner. It is important to note that when the Use Appt No setting is active, appointment numbers cannot be assigned to virtual documents at this time. Therefore, when this feature is active, virtual documents will not appear in the Unsigned/Unsaved view.
A Send Message option is also available. After attaching a document to a patient chart, the user can select Send Message immediately following the attachment and the document previously imported and/or filed will be automatically attached to the message.
The document is then attached to the patient’s chart. The document will be recorded in the Document History with the name of the selected chart section as specified above.
The same folder can be used for multiple documents. The system will be responsible for naming the imported file (format of file name is ACCOUNT+DATE+TIME.extension). Any file is acceptable as long as a browser plug-in exists for it.
Scanning Documents
Direct control of a scanner is now possible for TWAIN driver equipped scanners using two action properties: #SCANIMAGE and #SCANIMAGEWITHCONFIRM. The only difference between these two versions is that the scan with confirm allows users to supply an alternate document date. #SCANIMAGE always uses today’s date for documents. Use of these action properties on a tree mode significantly cuts down on steps required to perform a single document scan. Certain parameters must be supplied to the above action properties to control the scanners. These are as follows:
Parameters:
-
SETUP - (optional) forces a source selection menu to show up. This value is used only during initial setup and testing of a scanner and should not be included in a production environment.
-
SHOWCAP - (optional) forces a source capability menu to show up. This allows additional functions to be performed on the scan, including selecting a specific area of the document to save or image cropping.
-
SOURCE scannername - (optional) name you want to use for the scanner which will be used to store the scanner settings. The default name used is “DEFAULT”. If there is a possibility of using multiple scanners or other devices on the same workstation, it is recommended that you supply a unique name here. Otherwise this setting is not necessary.
-
COLOR – for color scans. Best for color photos.
-
GRAY – for Grayscale scans. Best for most documents that can be stored in black in white. This has better quality than a black and white scan, and does not use much more space if using JPEG compression. Recommended for most non-photo documents.
-
BW– for Black and white scans. This is best to save space on scans saved in BMP format, which is a required format when future inking is desired on the saved document. However, this format is not as readable as a grayscale. If using JPEG, GRAY is the recommended setting.
-
RESOLUTION dpi – to supply a value for resolution in DPI (Dots per Inch). A resolution of 100 is a recommended value. You can adjust this downwards or upwards (e.g. 75, 300) to decrease space or improve quality.
-
JPEG – for jpeg compression. This compression is recommended for most uses.
-
BMP – for zipped-bitmap compression. This is recommended for black and white and grayscale images. Although it can be used for color, it will require a significant amount of space. However, only BMP scans allow inking so if inking is required, this is the only possible format that can be used.
-
COMPRESS n – Allows a variable compression setting where n is a number in the range of [1, 100]. The default compression value = 50.
All of the above parameters can be passed in any order in the action property provided each is separated by a “|” delimiter. Of course, some parameters cannot coexist such as the selection of color/bw/gray and jpeg/bmp at the same time.
Examples:
[?]#SCANIMAGE:SHOWCAP|SETUP|SOURCE MYSCANNER1|RESOLUTION 75|COLOR
[?]#SCANIMAGE:SHOWCAP|SOURCE MYSCANNER1|RESOLUTION 75|GRAY|BMP
-
Drivers License
#SCANIMAGE:SOURCE MY SCANNER1|RESOLUTION 100|COLOR|JPEG
-
Regular Documents (Not to be Inked Later):
#SCANIMAGE:SOURCE MY SCANNER1|RESOLUTION 100|GRAY|JPEG
-
Regular Documents (To be Inked Later):
#SCANIMAGE:SOURCE MY SCANNER1|RESOLUTION 100|BW|BMP|COMPRESS 60
Notes:
1. Using B&W v. Grayscale doesn't really affect the size of the scanned document.
2. Testing the scan of a full page HCFA 1500 claim form at varying resolutions resulted in the following findings:
a. 150 dpi = 254kb
b. 100 dpi = 141kb
c. 75 dpi = 92kb
In addition to the normal settings using #SCANIMAGE you add the following to control the size (area) of the scan.
AREA StartX StartY Width(![]() X) Height(
X) Height(![]() Y) – expressed in pixels. Assuming
you are working with an 800x600 Screen and wanted the image to be scanned only the top ¼ of the normal page size the settings would be the following:
Y) – expressed in pixels. Assuming
you are working with an 800x600 Screen and wanted the image to be scanned only the top ¼ of the normal page size the settings would be the following:
AREA 00 00 800 150
Sample of complete property entry:
#SCANIMAGE:RESOLUTION 100|GRAY|AREA 00 00 800 150|JPEG
Summary:
This new version of DIMSCAN.DLL adds the following enhanced features:
-
Support for Auto Document Feeders (ADF)
-
Support for Duplex scanning.
-
Support for controlling how many pages should be scanned in one session.
It requires the DSCSUPRT.DLL which contains the support for the new enhancements. r
Duplex Scanning
Instructions:
-
Copy DLL files into your MEDINFO.CLIENT folder.
-
Use the following parameters according to your needs.
The following parameters has been added to support the above features:
TWAINMODE2: Enables support for the above features.
Example: #SCANIMAGE:TWAINMODE2|
ADF [support is scanner dependent]- This enables the Auto Document Feader.
Example: #SCANIMAGE:TWAINMODE2|ADF|
DUPLEXMODE[support is scanner dependent]- This enables the duplex mode feature. The supported options for this parameter are:
a. DUPLEXNONE - Disable duplex mode.
b. DUPLEX1PASS - Enable 1 pass duplex mode.
c. DUPLEX2PASS - Enable 2 pass duplex mode.
Example: #SCANIMAGE:TWAINMODE2|DUPLEXMODE DUPLEXNONE|
MAXSCANPAGE - Maximum number of pages to scan in one scan session.
Example: #SCANIMAGE:TWAINMODE2|MAXSCANPAGE 2|
Taking Images from a Digital Camera
If you have a Digital Camera, it usually includes a software program for image processing. Images captured from the camera are retained in albums or subdirectories where the JPEG files are kept.
These JPG images can be imported directly into the patient’s medical record using the Import File button in the Document Repository or using the Inbox. To use the Inbox, the file should be placed in the Inbox folder. The Inbox feature is then used to place the image into the patient’s record.
Alternatively, you can copy an image directly from the photo program. To do this, the user can click on an image in an album, and then select Copy from the File menu. This may require selecting an area of the photo to be included). The user then proceeds to the Document Repository of the desired patient, and selects the desired chart section. Clicking on the button will display the image, which is saved automatically.
The image will be stored in original resolution. Note that you can supply a document date to the pasted image. The system will sort documents in the repository using the Document date (date of service). If not provided, it will always default to the document creation date.
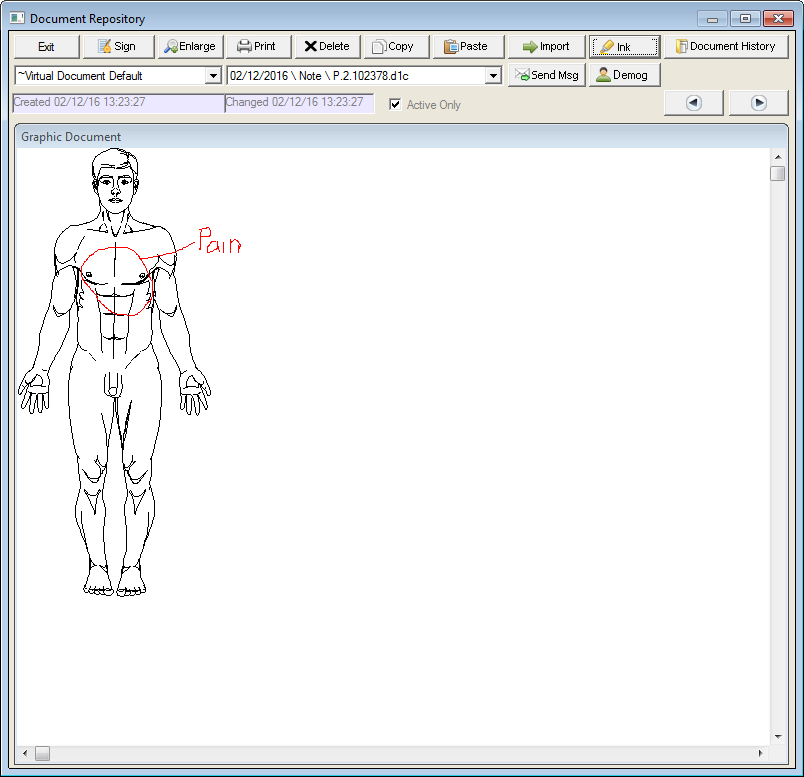
Inking on Pictures and Forms
MedInformatix supports the use of inking on graphic forms. This method of recording documents (which emulate the pen and paper interface) is kept efficiently in the system and thus does not take up much space or use excessive resources on a wide area network.
The Ink Width can be controlled via DIMPROF setting:
[DIM]
Ink Width=1
“1” is the default. “2” is double thickness. “3” is triple thickness. Depending on the device used to store the ink, increasing thickness makes the lines smoother.
Forms and pictures that are to be used as the background for inking must be saved as BMP files and stored in the FORMS directory. These pictures and forms can be drawn and modified using the Microsoft Paint program. In the interest of speed of access on a wide area network (or wireless network), images would be displayed faster if they are created in black and white. The standard MedInformatix installation has a set of images that are included in the Primary Care Decision Tree. They can be accessed through the Examination Section of the each Problem in the tree, under the heading called PICTURES. The branches of this node are shown below.
Each of the nodes with a picture label has an action property such:
[1]AMALE.DIB
Note that the number inside the parenthesis defines the chart section where the image will be placed and it is followed by the file name, which can be a DIB or BMP graphic file.
After a node is clicked, the user is able to preview the image to be inserted into the Document Repository. After confirming, it should be placed in the document repository with the image displayed. The user is then able to proceed to write on the image with a pen. An example is shown below.
Making Forms Permanent
It is important to make sure that once a form has been used to provide the background for a form in the Document Repository, the image itself should never be modified. This is because the ink is not actually stored with the image. The background form is shared among all users while the ink is stored by itself (with a pointer to the background form). If the image is changed or the image is moved, the ink will not align to the correct areas of the form.
As a safety precaution, installations that require heavy use of graphic forms should always mark these forms READ ONLY.
Viewing Images in Zoom Mode
Scanned images can be viewed in an enlarged mode from the Document Repository by clicking the Enlarge button. When selected, the image will enlarge to occupy the entire screen. The size of the image can be manipulated using the Zoom options. Right click to access the Zoom tools.
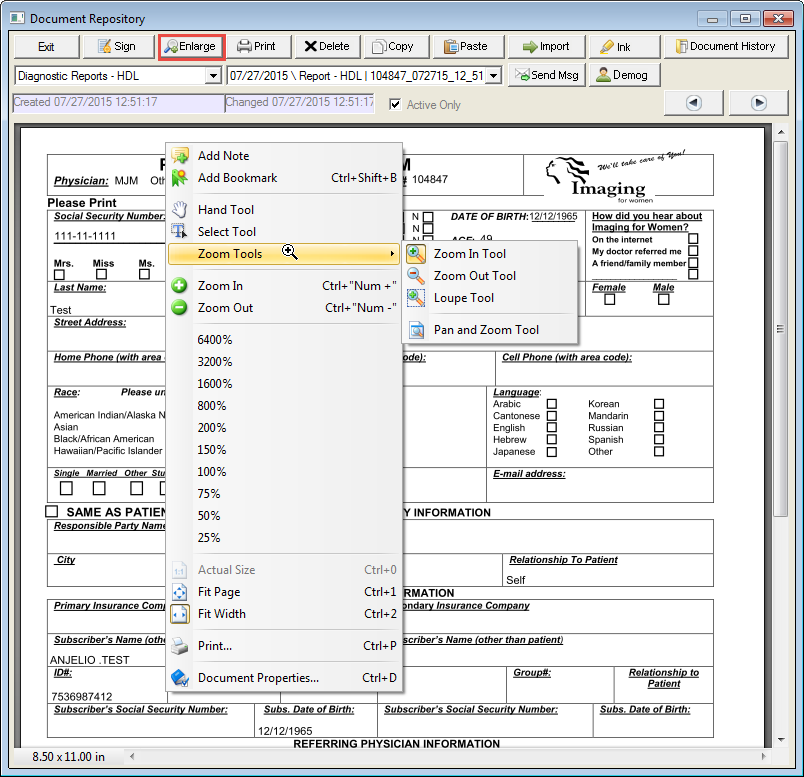
If a scale of greater than 100% is selected, scroll features appear to allow scrolling from side to side of the image. You will also see a left and right navigation arrow on the Zoom options. These are used to change to the previous or next page without having to go back to the repository. If the pages you are trying to display contain images, they will be immediately displayed using the same scale as the current image. However, the Zoom mode will terminate if the page being displayed does not contain images but contains text instead. If a text page is selected, the user is returned to the standard Document Repository view.
Virtual Documents
The Virtual Chart Section Approach replaces the #VIEWERBOX functionality described in the next section, and does not require that a station have any drive mapping to the server location. To enable this feature, a “Virtual Chart Section” can be created in CHART.TBL. Instead of identifying the location of the folder with a chart section number, a series of parameters is passed, which will identify the location of the folder. The format is as follows:
[Chart Sections to Show]
;Examples
PDF Files from Sample Folder=DIR|C:\SAMPLEPDF\|&MRNO-*.PDF
JPG Files from Sample Folder=DIR|C:\SAMPLEJPG\|&MRNO-*.JPG
Parameters are separated by a “|”. The first parameter must always be “DIR”. The second parameter is the location of the folder to be searched. The third parameter is a wildcard search. Usually this will include some patient identifier (via a global variable such as &MRNO or &ACCOUNT) in order to limit the results.
When this virtual “Chart Section” is selected from the Chart Section selection box, the combo box displaying pages will display file names instead. You can use the PREVIOUS and NEXT button to switch from document to document if there are multiple items.
The document, when selected will be displayed in an HTML browser and will use the default browser plug-in for handling that document type. For example if using PDF files, make sure that Adobe Acrobat is available on the computer.
Using External Programs in to Store Data
This option is used for backward compatibility. In many cases, it is not necessary to duplicate the storage of data already being stored by another software into MedInformatix. This is particularly true of scanned images (BMP, JPG, TIFF files) where the original document cannot be altered by normal means and thus is not subject to medical-legal concerns. Also, due to space requirements, it may be advantageous to use the original software to display this data instead of copying it over to MedInformatix.
The system provides a methodology for viewing data stored by other software, inside the Decision Tree, using the action property #VIEWERBOX. In order for this to work, the data that is kept externally must be readable and displayable using a windows based software loaded on each workstation. It is also necessary for this software to be associated to the externally maintained files using the windows “File Association” feature. This methodology may be applied to different kinds of data including transcription documents, JPG images from cameras, PDF files from Ophthalmology equipment, TIFF files from scanned or faxed documents.
If the above-described documents are created, they should be stored in a fixed directory location on your server, to which all users have network access. The documents must also be stored using a file naming convention that includes the medical record number and other document identifiers.
For example, if you decide to keep word transcription files, these can be placed into a \DIM\RECORDS\WP folder. Then documents can be saved in a format such as MRNO-DATE.DOC. The following are sample names kept in this format:
1-20010717.DOC
1-20010718.DOC
In this example, the Medical record number is “1”. Note that a separator such as the “-“ is essential since the length of the Medical Record Number may vary and the “-” is used to distinguish separate values by recognizing the delimiter.
To call up the documents from the Decision Tree, use the new action property #VIEWERBOX. This action displays a window that will list all files found in the specified directory and that matches the file search criteria. When a specific file (document) is selected and the View button is pressed, the system will launch the document with it’s corresponding associated application.
The procedure is:
Make a tree item and use the action property #VIEWERBOX:WindowName|Directory Path to File Location|&MRNO-*.ext
Window Name = Title of Document Selection window in the Tree Directory Path to File Location = Path to location of documents.
UNC names are allowed and path should end with a “\”.
Ext = Document Extension (e.g. DOC, JPG, TIFF, PDF, etc.). Make sure that if you use this feature, you need to install the appropriate software to view the document and make an association between the file extension and the application.
To make this clear, the actual launching of the application is done using the Operating system’s ability to associate a file extension with an application. Thus, whatever application is used is external to MedInformatix and is not part of our application. This utility duplicates the functionality already available in Windows Explorer.
In the above window a user selects the desired document and clicks on the Preview button. At that moment, the application associated with the file extension in Windows will be launched and it will display the selected document.
An example of a #VIEWERBOX entry in action property is shown below:
#VIEWERBOX:Fundus Photos|\\SERVER\D$\PHOTOS\|&MRNO-*.JPG
In this example, all files in the Photos folder of the server’s D drive where the JPG files have the medical record number of the currently displayed patient will be displayed.
Advanced #VIEWERBOX Options
Although discussed in the Imaging section of the manual, #VIEWERBOX action can also be used in a Medical Transcription workflow to manage sound files. To enable the unique requirements of this workflow it supports a “Delete” button. It also includes a choice to automatically close the window immediately after a selection is made. The ability to close a window is important when transcription is to be done since an open “modal” window will prevent users from working with the system. To use this feature, the modified #VIEWERBOX syntax will be as follows:
#VIEWERBOX:WindowTitle|FileDirectory|FilenameWildcard|DeleteEnabledFlag|
KeepWindowOpenFlag
WindowTitle = Any Desired Text to describe the documents listed
FileDirectory = Path to directory containing files to be displayed
FilenameWildcard = Filename, presented in wildcard format to select for viewing. An example of this is “&MRNO-*.WAV” which will display all files starting the patient’s medical record number and ending with “.WAV”, with any characters in between.
DeleteEnabledFlag = This value is “Y” if you wish the delete button to be enabled and “N” if the delete button is to be disabled. The default is “N”.
KeepWindowOpenFlag = This value is “Y” by default which means that the Viewer List window will remain open until the exit button is clicked. The value “N” means that the window will be automatically closed after selection of an item.
Color vs. Black and White and Space Requirements
Before aggressively starting an imaging project, it is important to test the typical images to be stored and measure the space requirements. Once imaging is placed in production, it will be too late to make changes in the infrastructure without disruption. Accidentally filling up a hard disk in the document repository can have severe consequences and stop people from using the system.
-
Part of this study should include a determination of what images to store. Black and white images are the best for storage and also compress well. Just the appearance of only black and white colors on an image do not guarantee that the resolution is actually only black and white. One could take a color photograph of a black and white document and it would appear as non-color. However, the space occupied by a color image is dramatically larger than a black and white. The best way to ensure that an image is in fact black and white is to control it from the source. When using scanning software, specifically select the option to scan in black and white only.
-
The second thing to consider is resolution. Always use the lowest resolution possible and still make the image readable. It is recommended that the level of resolution be set prior to implementation of scanning. When users are offered the highest resolution or a choice of different resolutions, they will typically pick the highest level.
-
To select the resolution, consider whether the document readable and how often the document is going to read before spending resources on storing in high resolution. In scanning programs, one can often specify the quality of the scan. Perhaps the selection of the scanning devices used for imaging should already incorporate the minimal requirements needed based on a study of document readability needs.
- Another item typically overlooked is that one does not need to capture an entire 8 ½ x 11 document, if the important portion of the document covers only a small area. Users should be trained to save or copy only the significant portion of the document and eliminate white space.