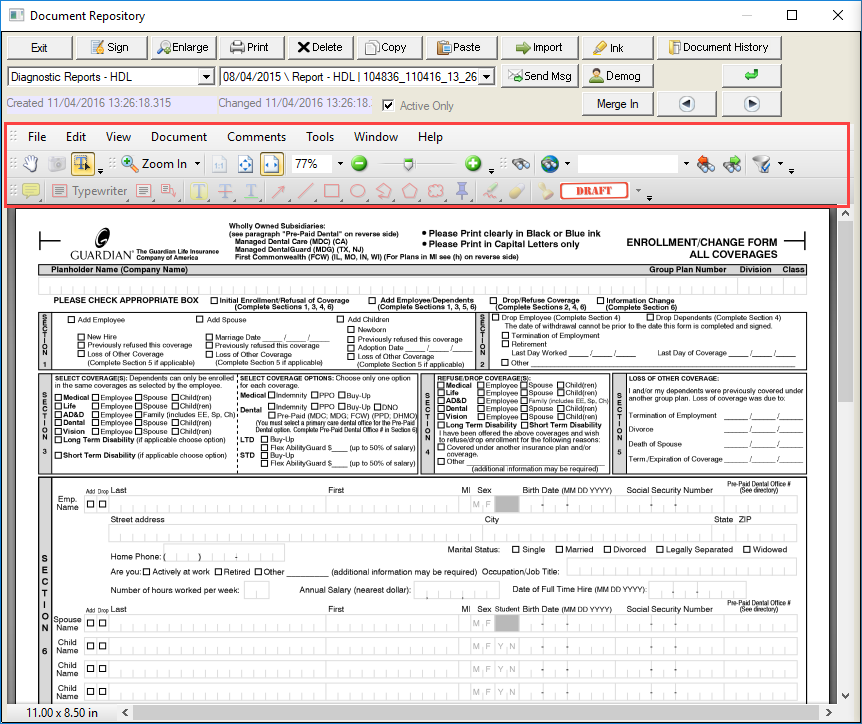
Document Repository
The Document Repository is the storage area of the Medical-Legal documents created in a medical facility and is the equivalent of the Paper Chart. Information kept here is time stamped and controlled. When documents placed here are signed, they can no longer be removed (but can be inactivated when necessary). Documents are also stored in order, based on the date and time stamp and this order cannot be altered.
When a physician or other health care worker provides care, they use the various branches of the Decision Tree to record the data being captured. Although documentation of care is occurring throughout this process, a separate step of compiling and saving of a document is usually required because, unlike a database, the information placed in the Document Repository is considered unalterable. Thus it is the most certain proof of the medical data, as it existed at the time. This separate document saving process is also an indication of intent. The provider, by saving a document, is clearly stating that the document is complete.
The documentation process performed by a physician follows this workflow:
Data is entered pertaining to History, Examination, and Decision Making in various data entry screens presented in the Decision Tree.
The physician clicks on the Document button in the Decision Tree. A final document is then presented to the physician, which compiles all the information taken from prior entries.
After review, the physician makes the decision to save this document. The document is shown as saved in the Document Repository.
The physician must now sign this document to lock it from being changed. .
Document Repository Environment
Documents placed in the Document Repository may be reviewed at any time. They are organized according to document type and a sequential order based upon order of creation. Chart Sections to be displayed in the Document Repository and the Document History screens can be controlled for each workgroup using the Chart Limit table. The Document Repository window is accessible from the Decision Tree when the Chart button is clicked.
Document Repository images are scaled by default to maximize the width of the document. This feature uses a normal logic of scaling with a priority given to the width of the document, which typically makes the upper part of a large 8 ½ x 11 document more readable on lower resolution computers. When displays have very high resolution, it is possible to read the entire document. A setting option has been added that scales the image so that 100% of the document shows whether the height or width exceeds the screen size. To turn this feature on, set the following parameter in DIMPROF?.INI:
[DIM]
Image Scaling Style=2
Key Functions
- Sign: The Electronic Signature button is a substitute to the handwritten signature placed on the bottom of the document. This locks out the document from further changes. A user may set up an electronic signature in advance using the option Set Electronic Signature in the LOG IN menu. After a document is signed, the name of the signer appears at the bottom of the document. The system can be set so that it prints the message “Electronically Signed by ‘UserName’ at the bottom of a text document that has been electronically signed and can display a total of four (4) signatures. The signature on print is set up in the DIMPROF?.INI file using the following entry:
[DIM]
Electronic Signature On Print=1
This message only appears on text documents and only if the document was signed electronically.
Additional DIMPROF setting options provides the flexibility to change the text of electronically signed signature. Included is the option to use a signature and date variable. This allows for a more custom and flexible signature text.
[DIM]
ESign Print Text=”Electronically Signed By {_ESIGNATORY}
{_ESIGNDATE} {_ESIGNTIME}”
{_ESIGNATORY} is the signature
{_ESIGNDATE} is the signature date
{_ESIGNTIME} is the signature time and is currently only supported for documents saved in enhanced editor.
In the Document Repository, when a document is signed with ink, both the ink and the user name of the signer are displayed. This may not be preferred when the document being presented is for “Patient Signing” purposes. Since the patient is not logged in, the signing information in the database reflects the current signed in user only. The purpose of displaying the “logged in” signer is to show multiple signatures (mixed electronic signature and ink). If this is not needed, the signed by message can be eliminated from the display with a DIMPROF?.INI setting as follows:
[DIM]
Inked Documents No Signed Message=1
- Enlarge: This button will open the View Document screen, which displays a graphic image in an enlarged document view or text data in an expanded text edit window. An indicator field in the bottom left corner displays the user who last signed the document (if signed) and the date. If an image is displayed, the user will have the ability to scale the image to various sizes from 100% to 250%. If the displaying text and the document are not yet signed, the user will be able to edit the text, including the copy and paste of embedded JPG and TIFF images. If text is signed, the document can only be viewed. When viewing an enlarged image, the user is able to move around the image by clicking on the screen instead of using the scroll bars on the image control.
§ An Enhanced Editor feature (available in Security Profile: Use Enhanced Editor in Doc Repository) allows the user to view documents in a What-You-See-Is-What-You-Get (WYSIWYG) format for printing. This option allows transcriptionists to align text as needed in an interface that emulates Microsoft Word. A full Rich Text Format is provided for advanced formatting such as tabbing and right clicking on parts of the document will display the format options menu. Documents will be printed exactly as displayed. However, when printing from the standard Document Repository print button, the system will make judgments on printing and alignment may not be absolutely perfect with respect to orphaned sentences at the bottom of the page. When this feature is used to modify a text document, a second copy of the Text document is retained on the server that has the full RTF formatting on it. When editing using this button the RTF version is always displayed. Upon saving, the text from the RTF editor is saved in MIML format to ensure that the text between the two documents is identical (minus formatting characters).
§ If a workgroup is given Transcriber Mode rights (Security Profile), a Transcribe button is available to the user. This allows the transcriber to listen to dictation when that window is open. In addition, a Document Owner selection is available, which replaces the “Additional Signatory” selection found in non-transcriber mode. Transcribers are allowed to reassign the owner of a document, and thus the appearance of the document in Unsigned Documents View for specific users. The Document Owner can be changed in this view until the document is signed.
§ A “Hold from Signing” checkbox (also in Unsigned/Unsaved View – View Document) allows the user to temporarily prevent a document from appearing in Unsigned/Unsaved view, at the discretion of the person editing the document (such as a transcriber). When checked, the unsigned document will receive a “pre-transcriber status” code and it will be removed from the Unsigned/Unsaved view until it is saved again when the “Hold from Signing” check box is unchecked. Note: When using View Document from the Unsigned/Unsaved View, if Dictation or Send Message is used, the “Hold from Signing” is automatically checked (but can be overridden).
- Print: This button provides the ability to print the current document or all documents within the same document type. The Printing/Faxing screen opens, which provides the ability to specify additional parameters before printing, such as letterhead, headers and footers and print margins. Documents to be printed can be selected using one of the following selection criteria: Current Page, All, Date Range, Today and Today's RX. If the Date Range option is selected, it is possible to set the beginning date and the end date from the calendar icons next to the date fields. It is also possible to print multiple page documents with the same appointment number in the header/footer.
- Delete: The Delete button will remove the contents of the page from view. It will not, however, remove the actual slot occupied by the page. This option is used to remove inaccurate documents from view. If the documented being “deleted” is already signed, the system will prompt the user to create a new un-signed copy of the original document. When marking a document inactive in the Document Repository, the CLDOCS.PROV2 stores the user ID of the deleting user. Rights to this feature are provided in the Security Profile and can be controlled with two separate rights: Inactivate Signed Documents, and Inactivate Unsigned Documents. However, each user has “same day deletion rights.”
Inactivated documents can be reviewed by deselecting the Active checkbox on the Document Repository screen. Inactivated documents are displayed with a “(D)” next to the date in the Date field.
- Copy: A confirmation window will appear which allows the user to select what aspect of the document will be placed in the clipboard (text, bitmap, or bitmap + ink). The information is then easily added to an email or to the Document Repository.
- Paste: Choosing Paste will cause data in Clipboard to be placed as a new document in the Document Repository. It will be placed as the last page in the current Document Type (Chart Section). Copy and paste functions are useful when modifying an existing document that is already locked from changes. When you copy the locked document and paste it once again into the Document Repository, a brand new document will be created which can then be edited. It can also be used to move documents that have been incorrectly placed in the wrong patient’s chart.
- Import: Use this function to directly import BMP or TXT files directly into a virtual (indexed) directory in the Document Repository. When selected, the Import File screen opens to allow the selection of the file to be imported.
- Ink: This button opens the Color screen. The screen displays a color palette, which provides the ability to select a different color(s) to be used when inking. Several colors can be used per document.
- Send Msg: Opens the Send New Message screen, which allows the user to send a message regarding the patient to another user. If selecting while a document is open, the document will be attached to the message.
- Demog: Opens the patient’s Demographic screen where demographic information can be reviewed or updated.
- Document History: This button opens the Documents on File screen, which displays all of the documents that have been created in the system regardless of Document Type (chart section) within the Cutoff Date Range selected. (Chart Sections displayed can be controlled using Chart Limit table.) It will allow the user to view documents by date order or document type order within the date range specified. The date displayed in the Date column is the service date associated with the document. If no service date was provided, the creation date is used. Those unsigned documents for chart sections specified under Unsigned/Unsaved in CHART LIMIT Table for their workgroup will be displayed with peach shading.
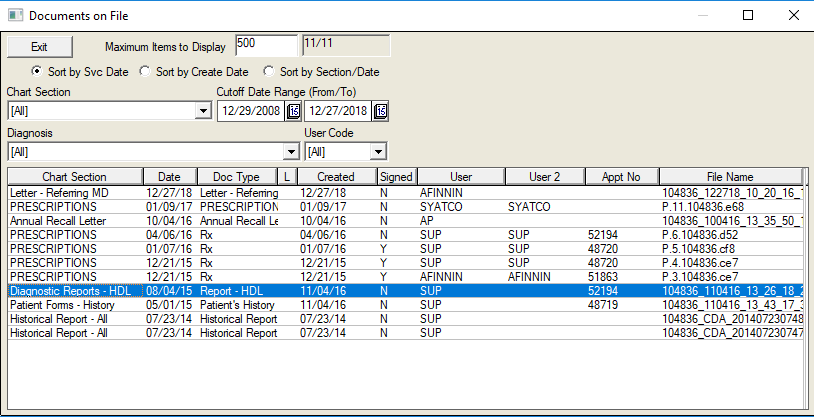
Depending on the Screen resolution, a more advanced Document History window will be displayed in the Document Repository. If the screen width is 1280 pixels or better, the enhanced Document History window will contain a document filter for Diagnosis and User Code. Diagnosis selection is based on documents with service dates (or creation dates if no service date) that match the ‘reported’ dates of problems in the problem list history that have a status other than ‘Not Treated’. User code selection will be based on document owner, last signer, and supervisory provider (additional signatory). This can be changed by right-clicking over the desired document in the Document History window, which opens the Change Document Settings screen.
When selected, the Security Profile option “Auto Display Doc History” allows the Document History window to automatically be displayed upon entry into the chart.
- 34: The Next/Previous buttons allow the user to navigate to the Next or Previous page in the current Document Type section. Documents are sorted by date (service date if available, creation date if no service date) and not by actual page number.
- Active Only: When checked, allows the user to filter out any “deleted” or inactive documents from the view. This box is checked by default. One cannot actually delete items in the Document Repository but incorrect documents can be hidden from casual view with this option.
Merge In: Provides the ability to merge information out of a specified patient chart and into another one.
Virtual Documents
The Document Repository has been modified to allow the display of virtual documents found in any folder accessible from the server. There are two approaches to implementation of this feature. If there is already an existing folder with documents in it, then one can simply display the contents of that folder using a virtual chart section (Non-Indexed Virtual Chart Section). The second approach involves importing documents in non-native MedInformatix formats using the Inbox and maintaining them in a separate folder of the user’s choice (Indexed Virtual Chart Section). This approach automatically names the imported documents and also makes an entry in the database so the documents can be found in the Document History window. Only Indexed virtual documents may be signed electronically (see Signature Workflow section
Non-Indexed Virtual Chart Section Approach: This replaces the #VIEWERBOX functionality and does not require that a station have any drive mapping to the server location. To enable this feature, a “Virtual Chart Section” can be created in CHART.TBL. Instead of the chart section number, a series of parameters is passed that will identify the location of the folder. The format is as follows:
[Chart Sections to Show]
;Examples
PDF Files from Sample Folder=DIR|C:\SAMPLEPDF\|&MRNO-*.PDF
JPG Files from Sample Folder=DIR|C:\SAMPLEJPG\|&MRNO-*.JPG
Parameters are separated by a pipe symbol “|”. The first parameter must always be “DIR”. The second parameter is the location of the folder to be searched. The third parameter is a wildcard search. Usually this will include some patient identifier (via a global variable such as &MRNO or &ACCOUNT) in order to limit the results.
When this virtual “Chart Section” is selected from the Chart Section selection box, the combo box displaying pages will display file names instead. You can use the
PREVIOUS and NEXT button to switch from document to document if there are multiple items.
The document, when selected will be displayed in an HTML browser and will use the default browser plugin for handling that document type. For example if using PDF files, make sure that Adobe Acrobat is available on the computer.
Indexed Virtual Chart Section (Importing Windows Documents): Example of Windows Documents are BMP, JPG, TIF, GIF, PDF, DOC, XLS, MPG, AVI, etc. These files can now be imported into a designated folder and MedInformatix will behave as if these documents are integrated into the Document Repository (except for printing). Documents show up in the Document History window and the actual physical location of the files can be in any folder on the Net Service computer. To use this feature, place the files to be imported into the Inbox Folder. The names of the files do not matter. In order for this feature to work, a Browser Plug-In must be installed in Internet Explorer for the desired document type.
Before using this feature, virtual chart sections must be defined which will store the non-native documents. Using CHART.TBL make entries as shown in the example below:
[Chart Sections to Show]
Diagnostic Test PDF=INDEXED|C:\MEDINFO\RECORDS\C01\PDF\
Visual Fields PDF=INDEXED|C:\MEDINFO\RECORDS\C01\PDF\
[Chart Sections to Save Inbox]
Diagnostic Test PDF=INDEXED|C:\MEDINFO\RECORDS\C01\PDF\
Visual Fields PDF=INDEXED|C:\MEDINFO\RECORDS\C01\PDF\
In the above example, “Diagnostic Test PDF” and “Visual Fields PDF” are chart section names that are to be used to name the imported documents. The designation “INDEXED” must be entered as shown and then followed by the folder as seen by the net service. It is recommended that these documents be kept in the RECORDS folder for easy maintenance.
When a virtual document is saved to the chart via the Inbox, the document will be recorded in the Document History with the name of the selected chart section as specified above. The same folder can be used for multiple documents. The system will be responsible for naming the imported file (format of file name is CCOUNT+DATE+TIME.extension). Any file is acceptable as long as a browser plug-in exists for it.
When printing documents from the Document Repository, the behavior of the printing is different for virtual indexed documents. Since the documents are not native to MedInformatix they are printed individually using the browser plug-in for the particular document type. However, a cover sheet based on a boilerplate in VFCOVER.TXT (Outline Folder) will be printed and this will indicate if the virtual document was signed. Virtual document cover sheets will be printed if ALL documents are printed, or if the current page being printed is a virtual indexed document.
Virtual Indexed Documents stored in the Document Repository cannot be copied to clipboard. However, a new feature has been added so that if the Copy to Clipboard button is clicked, the virtual document will be copied as a file to the inbox (file name used will be displayed in a message box). This allows users to re-import the document in case it was placed in the wrong chart section or wrong patient.
How Documents are Stored
This information is important only to those providing technical support and analyzing the data structures of MedInformatix.
- Documents stored in the Document Repository are kept as separate files in the RECORDS subdirectory. Under the RECORDS subdirectory (and possibly under a specific company subdirectory like “C01”), 255 chart sections exist and are labeled as 1 to 255.
Each of these subdirectories corresponds to a Chart Section (also referred to as ‘Document Type’), which is defined in the exact same order in TYPE.TBL in the TABLES directory. The contents of TYPE.TBL display the name or label of the Chart Section and is discussed in detail later in this section.
Each subdirectory also corresponds to an item in CHART.TBL. This file breaks the Chart Sections into categories for display in certain areas of the software, which are also explained in more detail later. (i.e. Chart Sections to Show; Chart Sections to Save Inbox).
- Within each chart section, a document is stored using the format: MRNO.PAGENUMBER
Where MRNO is the medical record number of the patient (expressed in Hexadecimal) and the PAGENUMBER is the page of the document, which can be a number from 1 – 4095 (also expressed in Hexadecimal format). (In mathematics and computer science, base-16, hexadecimal, or simply hex, is a numeral system with a radix or base of 16, usually written using the symbols 0–9 and A–F or a–f. For example, the decimal numeral 79 whose binary representation is 01001111 can be written as 4F in hexadecimal (4 = 0100, F = 1111).)
Example: If a Document displayed on the repository is a Document Type of “E&M -PCP” this identifies the location of the document to be in chart section 1 or \DIM\RECORDS\C01\1. In this subdirectory, the file name should be 1.1 if the medical record number of the patient is 1 and the page number is 1.
If a Document displayed in the repository is a Document Type of “Diagnostic – X-Ray” this identifies the location of the document to be in chart section 44 or \DIM\RECORDS\C01\44. In this subdirectory, the file name should be FF.A if the medical record number of the patient is 255 and the page number is 10. Remember that the numbers are in Hexadecimal.
- Data in a MedInformatix document file is encrypted and includes time stamp information. It is not readable using any other software. If this file is altered in any way outside of MedInformatix, the file will be corrupted and will no longer be readable.
- In addition to the actual medical documentation kept in the RECORDS directory, a header file for the Document Type’s chart section is retained in the RW directory. This header file is used to record archive information as well as to indicate the last page in the Document Type chart section for a particular patient. Although the information kept in the RW directory is not critical, it may inconvenience the user if it is not updated.
- Support for archiving has been added to the Document Repository. Archiving module will be a separate add on but the system will now allow this for the future. Primarily, this includes recognition of the new column CLDOCS.ARCHIVED.
Document Types/Chart Sections
Contents of TYPE.TBL in TABLES Directory.
 IMPORTANT:
This file is released by MedInformatix
and should not be modified without informing MedInformatix. If this file
is modified, records stored in chart sections will no longer be standard
and compatibility issues will come up with Decision Trees released in
the future.
IMPORTANT:
This file is released by MedInformatix
and should not be modified without informing MedInformatix. If this file
is modified, records stored in chart sections will no longer be standard
and compatibility issues will come up with Decision Trees released in
the future.
This file determines the types of documents filed under the subdirectories 1-255 under the \DIM\RECORDS\C01\ directory. For example, if a document is stored under the \DIM\RECORDS\C01\1 folder in the RECORDS directory, the TYPE.TBL tells us that the document is stored in the E&M – PCP Chart Section. We can determine that a document in \DIM\RECORDS\C01\31 is an Outside Consult.
Documents filed in the RECORDS directory are kept in MRNO.PAGE format where both MRNO and PAGE are in hexadecimal numbers.
1 |
E & M – PCP |
2 |
E & M – ENT |
3 |
E & M – Ophthalmology |
4 |
E & M – Cardiology |
5 |
E & M – Pulmonology |
6 |
E & M – Gastroenterology |
7 |
E & M – Nephrology |
8 |
E & M – OB |
9 |
E & M – Gynecology |
10 |
E & M – Urology |
11 |
E & M – Orthopedics |
12 |
E & M – Allergy |
13 |
E & M – Endocrinology |
14 |
E & M – Dermatology |
15 |
E & M – Oncology |
16 |
E & M – Neurology |
17 |
E & M – Psychiatry |
18 |
E & M – Anesthesiology |
19 |
E & M – Hematology |
20 |
E & M – Surgery |
21 |
E & M - Reserved 1 |
22 |
E & M - Reserved 2 |
23 |
E & M - Reserved 3 |
24 |
E & M - Reserved 4 |
25 |
E & M - Reserved 5 |
26 |
E & M - Reserved 6 |
27 |
E & M - Reserved 7 |
28 |
E & M - Reserved 8 |
29 |
E & M - Reserved 9 |
30 |
E & M - Reserved 10 |
31 |
Notes - Outside Consults |
32 |
Notes - Nursing |
33 |
Notes - Immunization |
34 |
Notes - Allergy Shots |
35 |
Notes - Telephone Triage |
36 |
Notes – Surgery |
37 |
Notes – Procedures |
38 |
Notes - Surgical Center |
39 |
Notes - Hospital |
40 |
Notes - Workers Comp |
41 |
Past Medical Records |
42 |
Diagnostic - Lab |
43 |
Diagnostic - Pathology |
44 |
Diagnostic - X-Ray |
45 |
Diagnostic - Ultrasound |
46 |
Diagnostic - Echocardiogram |
47 |
Diagnostic - Stress Tests |
48 |
Diagnostic - Nuclear |
49 |
Diagnostic - EKG |
50 |
Diagnostic - Other Cardiac |
51 |
Diagnostic - Neurology |
52 |
Diagnostic - Pulmonary |
53 |
Diagnostic - Allergy |
54 |
Diagnostic - PAP |
55 |
Diagnostic - Ophthalmology |
56 |
Diagnostic - GI |
57 |
Diagnostic - MRI |
58 |
Diagnostic - CT-Scan |
59 |
Diagnostic - Other |
60 |
Diagnostic - Reserved 1 |
61 |
Diagnostic - Reserved 2 |
62 |
Diagnostic - Reserved 3 |
63 |
Diagnostic - Reserved 4 |
64 |
Diagnostic - Reserved 5 |
65 |
Diagnostic - Reserved 6 |
66 |
Diagnostic - Reserved 7 |
67 |
Diagnostic - Reserved 8 |
68 |
Patient Forms - History |
69 |
Patient Forms - Consents |
70 |
Patient Forms - Insurance |
71 |
Patient Forms - Surveys |
72 |
Authorizations |
73 |
Photographs/Video |
74 |
Prescriptions |
75 |
Notes – Laboratory |
76 |
Notes – Billing |
77 |
Notes – Collection |
78 |
Messages |
79 |
Notes - Signed Orders |
80 |
Notes - Dietary |
81 |
Notes - Social Work |
82 |
Notes - Pharmacy |
83 |
Notes – Physical Therapy |
Contents of CHART.TBL in OUTLINE Directory
This file controls how users see the document types (when viewing or saving) in the Document Repository. You may modify the labels to suit user preferences, but it is very important that you do not change the meaning of the document types. This means never change the numeric assignment to a chart section. You may freely rearrange the order of items in this list, which will affect the order of their appearance on the document repository. You may also disable access to a document type by placing a semicolon (;) symbol before the document type’s chart section label (the user will not see the item displayed in the list) or remove it from the list altogether.
Note that there are three sections in this file:
Chart Sections to Show affects the display in the document repository.
Chart Sections to Save affects the chart sections visible when saving a document into the repository from the Decision Tree. ([?] pulls from CHART.TBL [Chart Sections to Save])
Chart Sections to Save Inbox (optional) controls the list of chart sections visible in the Inbox section of the program. ([?I] pulls from CHART.TBL [Chart Sections to Save Inbox])
When this section is not provided, the system uses “Chart Section to Save” instead.
The Chart Sections are outlined in the following table:
[Chart Sections to Show] |
E & M – PCP=1 |
;E & M – ENT=2 |
;E & M – Ophthalmology=3 |
;E & M - Cardiology=4 |
;E & M - Pulmonology=5 |
;E & M - Gastroenterology=6 |
;E & M - Nephrology=7 |
E & M – OB=8 |
;E & M - Gynecology=9 |
;E & M – Urology=10 |
;E & M - Orthopedics=11 |
;E & M - Allergy=12 |
;E & M - Endocrinology=13 |
;E & M - Dermatology=14 |
;E & M - Oncology=15 |
;E & M - Neurology=16 |
;E & M - Psychiatry=17 |
;E & M - Anesthesiology=18 |
;E & M - Hematology=19 |
;E & M – Surgery=20 |
;E & M - Reserved 1=21 |
;E & M - Reserved 2=22 |
;E & M - Reserved 3=23 |
;E & M - Reserved 4=24 |
;E & M - Reserved 5=25 |
;E & M - Reserved 6=26 |
;E & M - Reserved 7=27 |
;E & M - Reserved 8=28 |
;E & M - Reserved 9=29 |
;E & M - Reserved 10=30 |
Notes - Outside Consults=31 |
Notes - Nursing=32 |
Notes - Immunization=33 |
Notes - Allergy Shots=34 |
Notes - Telephone Triage=35 |
Notes - Surgery=36 |
Notes - Procedures=37 |
Notes - Surgical Center=38 |
Notes - Hospital=39 |
Notes - Workers Comp=40 |
Past Medical Records=41 |
Diagnostic - Lab=42 |
Diagnostic - Pathology=43 |
Diagnostic - X-Ray=44 |
Diagnostic - Ultrasound=45 |
Diagnostic - Echocardiogram=46 |
Diagnostic - Stress Tests=47 |
Diagnostic - Nuclear=48 |
Diagnostic - EKG=49 |
Diagnostic - Other Cardiac=50 |
Diagnostic - Neurology=51 |
Diagnostic - Pulmonary=52 |
Diagnostic - Allergy=53 |
Diagnostic - PAP=54 |
;Diagnostic - Ophthalmology=55 |
;Diagnostic - GI=56 |
Diagnostic - MRI=57 |
Diagnostic - CT-Scan=58 |
Diagnostic - Patient Letter=59 |
;Diagnostic - Reserved 1=60 |
;Diagnostic - Reserved 2=61 |
;Diagnostic - Reserved 3=62 |
;Diagnostic - Reserved 4=63 |
;Diagnostic - Reserved 5=64 |
;Diagnostic - Reserved 6=65 |
;Diagnostic - Reserved 7=66 |
;Diagnostic - Reserved 8=67 |
Patient Forms - History=68 |
Patient Forms - Consents=69 |
Patient Forms - Insurance=70 |
Patient Forms - Surveys=71 |
Authorizations=72 |
Photographs/Video=73 |
Prescriptions=74 |
Notes - Laboratory=75 |
Notes - Billing=76 |
Notes – Collection=77 |
Notes - Signed Orders=79 |
Messages=78 |
[Chart Sections to Save] |
E & M - PCP=1 |
;E & M - ENT=2 |
;E & M - Ophthalmology=3 |
;E & M - Cardiology=4 |
;E & M - Pulmonology=5 |
;E & M - Gastroenterology=6 |
;E & M - Nephrology=7 |
E & M - OB=8 |
E & M - Gynecology=9 |
;E & M - Urology=10 |
;E & M - Orthopedics=11 |
;E & M - Allergy=12 |
;E & M - Endocrinology=13 |
;E & M - Dermatology=14 |
;E & M - Oncology=15 |
;E & M - Neurology=16 |
;E & M - Psychiatry=17 |
;E & M - Anesthesiology=18 |
;E & M - Hematology=19 |
;E & M - Surgery=20 |
;E & M - Reserved 1=21 |
;E & M - Reserved 2=22 |
;E & M - Reserved 3=23 |
;E & M - Reserved 4=24 |
;E & M - Reserved 5=25 |
;E & M - Reserved 6=26 |
;E & M - Reserved 7=27 |
;E & M - Reserved 8=28 |
;E & M - Reserved 9=29 |
;E & M - Reserved 10=30 |
;Notes - Outside Consults=31 |
Notes - Nursing=32 |
Notes - Immunization=33 |
Notes - Allergy Shots=34 |
Notes - Telephone Triage=35 |
;Notes - Surgery=36 |
Notes - Procedures=37 |
;Notes - Surgical Center=38 |
;Notes - Hospital=39 |
;Notes - Workers Comp=40 |
;Past Medical Records=41 |
;Diagnostic - Lab=42 |
;Diagnostic - Pathology=43 |
;Diagnostic - X-Ray=44 |
;Diagnostic - Ultrasound=45 |
;Diagnostic - Echocardiogram=46 |
;Diagnostic - Stress Tests=47 |
;Diagnostic - Nuclear=48 |
;Diagnostic - EKG=49 |
;Diagnostic - Other Cardiac=50 |
;Diagnostic - Neurology=51 |
;Diagnostic - Pulmonary=52 |
;Diagnostic - Allergy=53 |
;Diagnostic - PAP=54 |
;Diagnostic - Ophthalmology=55 |
;Diagnostic - GI=56 |
;Diagnostic - MRI=57 |
;Diagnostic - CT-Scan=58 |
Diagnostic - Patient Letter=59 |
;Diagnostic - Reserved 1=60 |
;Diagnostic - Reserved 2=61 |
;Diagnostic - Reserved 3=62 |
;Diagnostic - Reserved 4=63 |
;Diagnostic - Reserved 5=64 |
;Diagnostic - Reserved 6=65 |
;Diagnostic - Reserved 7=66 |
;Diagnostic - Reserved 8=67 |
Patient Forms - History=68 |
Patient Forms - Consents=69 |
;Patient Forms - Insurance=70 |
Patient Forms - Surveys=71 |
;Authorizations=72 |
;Photographs/Video=73 |
;Prescriptions=74 |
Notes - Laboratory=75 |
Notes - Billing=76 |
Notes - Collection=77 |
Notes - Signed Orders=79 |
Messages=78 |
[Chart Sections to Save Inbox] |
E & M - PCP=1 |
;E & M - ENT=2 |
;E & M - Ophthalmology=3 |
;E & M - Cardiology=4 |
;E & M - Pulmonology=5 |
;E & M - Gastroenterology=6 |
;E & M - Nephrology=7 |
E & M - OB=8 |
E & M - Gynecology=9 |
;E & M - Urology=10 |
;E & M - Orthopedics=11 |
;E & M - Allergy=12 |
;E & M - Endocrinology=13 |
;E & M - Dermatology=14 |
;E & M - Oncology=15 |
;E & M - Neurology=16 |
;E & M - Psychiatry=17 |
;E & M - Anesthesiology=18 |
;E & M - Hematology=19 |
;E & M - Surgery=20 |
;E & M - Reserved 1=21 |
;E & M - Reserved 2=22 |
;E & M - Reserved 3=23 |
;E & M - Reserved 4=24 |
;E & M - Reserved 5=25 |
;E & M - Reserved 6=26 |
;E & M - Reserved 7=27 |
;E & M - Reserved 8=28 |
;E & M - Reserved 9=29 |
;E & M - Reserved 10=30 |
;Notes - Outside Consults=31 |
Notes - Nursing=32 |
Notes - Immunization=33 |
Notes - Allergy Shots=34 |
Notes - Telephone Triage=35 |
;Notes - Surgery=36 |
Notes - Procedures=37 |
;Notes - Surgical Center=38 |
;Notes - Hospital=39 |
;Notes - Workers Comp=40 |
;Past Medical Records=41 |
;Diagnostic - Lab=42 |
;Diagnostic - Pathology=43 |
;Diagnostic - X-Ray=44 |
;Diagnostic - Ultrasound=45 |
;Diagnostic - Echocardiogram=46 |
;Diagnostic - Stress Tests=47 |
;Diagnostic - Nuclear=48 |
;Diagnostic - EKG=49 |
;Diagnostic - Other Cardiac=50 |
;Diagnostic - Neurology=51 |
;Diagnostic - Pulmonary=52 |
;Diagnostic - Allergy=53 |
;Diagnostic - PAP=54 |
;Diagnostic - Ophthalmology=55 |
;Diagnostic - GI=56 |
;Diagnostic - MRI=57 |
;Diagnostic - CT-Scan=58 |
Diagnostic - Patient Letter=59 |
;Diagnostic - Reserved 1=60 |
;Diagnostic - Reserved 2=61 |
;Diagnostic - Reserved 3=62 |
;Diagnostic - Reserved 4=63 |
;Diagnostic - Reserved 5=64 |
;Diagnostic - Reserved 6=65 |
;Diagnostic - Reserved 7=66 |
;Diagnostic - Reserved 8=67 |
Patient Forms - History=68 |
Patient Forms - Consents=69 |
;Patient Forms - Insurance=70 |
Patient Forms - Surveys=71 |
;Authorizations=72 |
;Photographs/Video=73 |
;Prescriptions=74 |
Notes - Laboratory=75 |
Notes - Billing=76 |
Notes - Collection=77 |
Notes - Signed Orders=79 |
Messages=78 |
Document Signature Workflow
A variety of signature features are available in MedInformatix and are outlined below:
One Signature per Session: When selected, the security workgroup profile called Sign Documents Once Per Session requires the actual entry of a Signature Password only once per user session. For example, a user may be working in the Document Repository and then signs his/her first document. The Electronic Signature Code is prompted and entered. When moving on to the next document and clicking on the Signature icon, no further prompt or entry would be necessary to have the signature added to the document.
Auto Sign All: When using the Unsigned/Unsaved Documents view and the “Auto Sign All” Workgroup Profile setting is selected under Security, users have the opportunity to sign all Documents listed under the Unsigned filter with a single click of the button and without re-review of the documents. It is important to note that MedInformatix assumes that all documents in the list have been reviewed prior to selecting this option. The Unsigned view provides a View Document button that opens the Edit Chart Document screen. This allows the user easy access to view the unsigned document and then to click on Next to continue viewing the unsigned documents in the list prior to selecting Auto Sign All. This was primarily designed for authorizing physicians using the Reviewed Documents filter to provide the opportunity to “spot check” documents prior to selecting Auto Sign All.
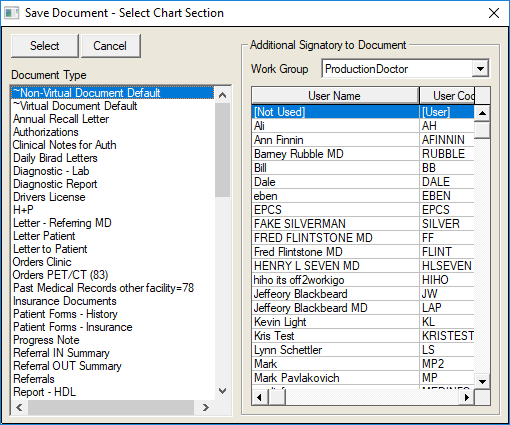
Additional Signatories: When a Document is saved using the ‘Document’ button in the Tree, the option to allow the entry of the user code of an additional signatory is provided. This was designed primarily for use by Physician Assistants or Residents that require co-signature of a supervising/attending physician. After the document is saved with an additional signatory, it will display in the “Unsigned/Unsaved Documents View” for the document creator and the designated signatory. The supervising provider will see documents assigned for additional signature as well as his/her own documents. Other options for Additional Signatories are:
Action properties in the #EDITx family also allow an additional signatory.
Right clicking over the document in the Document History screen also calls a Change Document Settings screen that allows the user to assign an Additional Signatory and/or change the document date.
The View Document option in Unsigned/Unsaved Documents view includes a Document Owner edit option, which allows the user to assign the document to an additional signatory. Changing the Document Owner will remove it from the current user’s list once it is refreshed.
Displaying Multiple Signatures: Documents displayed in the Document Repository will now show up to 4 electronic signatures on the document (for advanced users, an unlimited number of signatories is recorded in the CLDOCSHIST table and can be queried if necessary). The signatures can also display date and time of signature, based on DIM settings.
Review/Not Sign: For those sites preferring documentation review prior to authorizing signature, this feature allows the creator of a document to save it so that it appears as “Reviewed By”, rather than “Signed By.” The document can then be reviewed by a supervising provider or preceptor and, when adding the final or authorized signature, both signatures are converted and display as “Signed By.” Note: If document creator “signs” the document, review capability remains, however it will be displayed in the Unsigned filter of the supervising provider rather than the Reviewed Document filter.
A major benefit to this feature is that the “Reviewed” document remains available for edit until the authorizing or final signature is assigned. Normally, the “Review” signature workflow is used in conjunction with the Additional Signatory feature so that the review can be directed to a specific supervisor. However, this feature allows the original signatory the opportunity to assign the document to his/her self in order to edit or review the document in detail at a later time. In order to initiate this behavior:
Sites must utilize Electronic Signature only. This capability is not needed if the user is inking an additional signature or adding notes using ink. (Inked documents will continue to be noted as signed) It is necessary for direct editing of a previously signed (as reviewed) document only.
Chart Sections designated for reviewed documents must be specified in the Chart Limit Setup table under the Review/Not Sign category for the appropriate workgroup(s). It is important to note that only the chart sections designated in this category will be affected. If documents are saved in other chart sections, signature(s) will be displayed as “Signed by” rather then “Reviewed by”.
If “Transcriber Settings” right is specified in Security Profile, the assignment of an Additional Signatory becomes the re-assignment of a Document Owner instead (labels are changed accordingly in the displays).
By default, the signature of the supervising physician signer will appear as a second signatory if different from the original signer. The second, or authorizing signature may be removed from display with the following setting in DIMPROF:
[DIM]
Electronically Sign Stealth=1
Unsign: If a document is signed electronically while in View Document (via Unsigned/Unsaved Documents view), the user has the option to unsign the document within the same session. Once signed electronically, an “Unsign” button is available in View Documents that allows the document to be unsigned. Note: Inked documents cannot be unsigned.
- Virtual Documents: Indexed virtual documents (filed with a virtual file name that includes chart#_date_document id) may also be electronically signed. Although “Electronically signed by” does not appear below the document as it does with those created in MedInformatix, when it is selected in the Document Repository, a green lined signature icon will appear next to the page combo box in and the Signed column in the Document History screen also displays a “Y.”
Unsigned/Unsaved Documents View
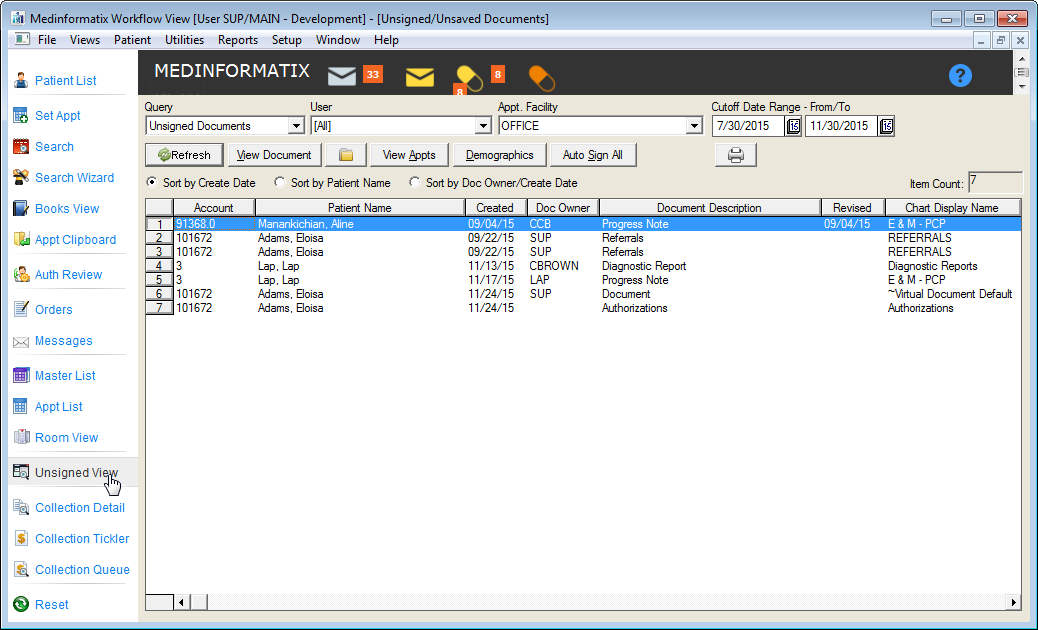
Many of the options available in the Signature Workflow are accessible via the Unsigned/Unsaved Documents view. Some key features available in this feature are outlined below.
The Unsigned/Unsaved documents view allows the provider one location in which to review any unsigned and/or unsaved documents. (Scanned documents may also be directed to this view via the Inbox.)
A key feature available in the Unsigned/Unsaved Documents view is the ability to manage and review other provider’s documents. This is very beneficial when a provider is responsible for Residents, Interns, Nurse Practitioners and/or Physician Assistants. When these rights are assigned, the responsible provider is able to select the documentation created by another provider in order to review, edit and add his/her signature or co-signature. The list of users displayed for any particular user in the User field dropdown is determined by the Security setting “Display in E-Signers List” for each user. If this option is selected for a user, another (authorizing) user will be able to review his/her Unsigned/Unsaved documents.
In addition, chart sections to be displayed in the Unsigned/Unsaved Documents view can be limited using the Chart Limit setup table under Preferences on the Main Menu. (See Chart Limit section.)
The Unsigned/Unsaved Documents view provides a number of different options, which are outlined in the table below.
Unsigned/Unsaved Documents View Options |
|
Button/Option |
Description |
Query (Filter) |
This field allows the provider to select the desired view or type of document to review. Depending on rights assigned, the options are: · Unsigned Documents: This filter allows the user to view any documents that are unsigned, not on hold and that are created or scanned into a chart section assigned to this view (via Chart Limit). A View Document button allows the user to view the document directly, rather than navigating to the document through the chart to the Document Repository. · Reviewed Documents: This view, only available when the security right “Manage Reviewed Documents” is selected and document is saved to a chart sections specified as Review/Not Sign, allows managing providers the ability to review unsigned documents created by non-signatory or co-signatory providers. Documents in this view can also be placed on or released from Hold status. (Not to be confused with Hold From Signing option on Enlarge Document view.) · On Hold Documents: This filter, which is only available when the security right “Manage Reviewed Documents” is selected for the user, allows the user to review all documentation that was placed on Hold for further review and/or discussion via the Reviewed Documents filter. A button option on this view allows the user to release the document from Hold which allows it to be displayed in the Unsigned Documents view. Note: This feature is not related to the “Hold From Signing” option available in the Enlarge (Edit) Document View. · Queued Documents: This filter displays documents queued to the Batch Print/Fax Server, stored in the CLPRINTQUEUE table. This is a special feature linked to a batch printing/faxing module separate from MedInformatix. · Signed Today Documents: Allows provider to review all documents authorized to view that are signed today. · Unsaved Documents: Allows the user to review all documents that have been created (in which a boilerplate was activated) but have not been signed. User is able to open the chart to complete and save the document from this view. If a document was created on a previous date, it will open with the creation date and boilerplates created on that date. |
User |
This field defaults to the provider logged on, however, depending on rights assigned, allows a provider to review, manage, and sign or cosign other provider’s documents. |
Appt Facility |
This filter is displayed only when the security profile setting “Use Appt No” is selected. It allows documents to be reviewed based on Appointment Facility in addition to the standard sort options. Note: “When Use Appt No” is set, Documents can be displayed in this view with Appointment Description rather than Chart Section for sections designated in Chart Limit (Document History/Use Appt Desc) setup. |
View Documents |
Provider may select a document and then click on View Documents (or double-click on the item) to open the document in the Document Repository of the patient’s chart. This avoids navigating through the chart to the Document Repository and the document. This view provides a variety of editing options, which include review, edit, sign, unsign, or assign a different owner. Note: If Dictation or Send Message is used, the “Hold from Signing” is automatically checked (but can be overridden). |
Chart |
Selecting an item and then clicking on the Chart icon opens the patient’s chart for further review or documentation. |
View Appointments |
Selecting an item and then clicking View Appointments opens the Appointments For… screen. |
Demographics |
Selecting an item and then clicking on Demographics opens the patient’s Demographics screen. |
Auto Sign All |
A user with “Manage Reviewed Documents” rights is able to select the filter “Review Documents” or “On Hold Documents” on Unsigned/Unsaved Documents view. A supervising physician can then review each document or spot check documents marked for review, and, if no problems found, can click “Auto Sign All”. All reviewed items are signed by the original provider and the supervising physician signer’s ID is recorded as being a second signatory and may or may not be displayed based on DIM settings. |
Hold |
Selecting an item and then clicking on this button will remove the document from the unsigned view and “hold” it from signature. It will remain “on hold” until user reviews On Hold Documents (using the Release Hold button on Reviewed Documents filter) and releases it for signature. |
Manage Reviewed Documents |
This is a right assigned to providers that allows review and management of “reviewed” documents prior to signature. The document can be placed on hold or released from hold by the managing provider. |
Sort Filters |
These filters allow the provider to sort the list of items by Create Date, Patient Name, or Document Owner/Create Date. |
The printer icon allows the user to print the information displayed. |
|
Cutoff Date Range |
Allows the provider to select the date range of the items to review. The system defaults to the last selected range of dates when returning to this view. A fixed range can be set via DIM using the following settings: [DIM] Sign View Cutoff Days From=-30 Sign View Cutoff Days to=-1 Where the negative number shown is the number of days from today’s date. |